Prerequisites
In this lesson you will learn the basics about creating and managing users and their permissions. To understand the basic concepts of the Connectware, please check out the Technical Overview lesson. To follow along with the example, you will also need a running instance of the Connectware. If you don’t have that, learn How to install the Connectware. You should also be familiar with MQTT. If in doubt, head over to our MQTT Basics lesson.
Introduction
This article will enable you to do the following:
- Manage users and permissions utilizing the Connectware Admin UI
- Create and use Commissioning Files for easy user management
In the following we will take a look at the first steps of user management: How to define a set of permissions, create a user and make him/her a useful member of the team. We will do this two times, first manually and then with a Commissioning File.
This lesson will guide you through the very basics of user management in a casual way. If you need any detailed instruction take a look at the User Management section in the Reference docs.
The Commissioning Files used in this lesson are made available in the Example Files Repository on GitHub.
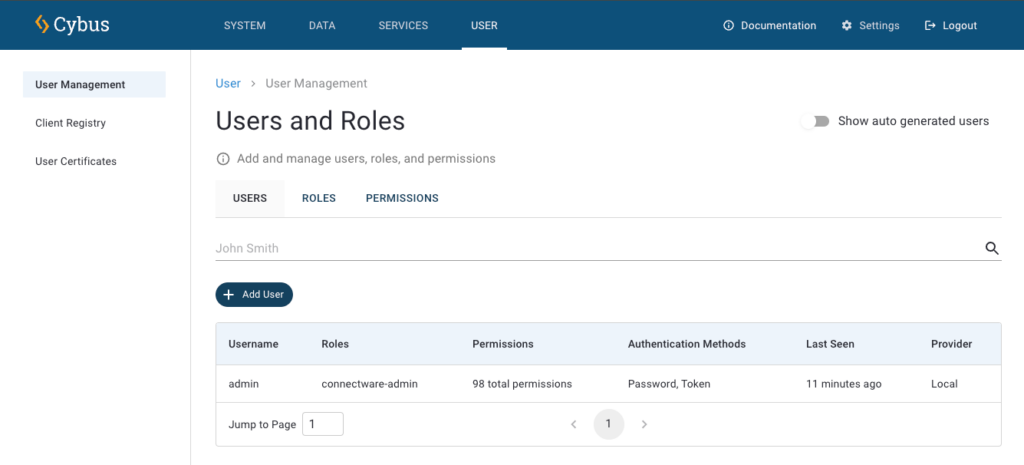
The Connectware Admin UI Approach
First go ahead and log in to the Connectware using your admin account. Once you are successfully logged in you have all the tools available you need to manage users and permissions directly from the Connectware Admin User Interface (Admin UI).
Expand the section User Management on the menu bar by clicking on it. It will present three options to you:
- Users allows you to create and manage users and their permissions. A user can be a person or a software/hardware agent.
- Roles provides the options to create or modify roles which help you organize and share sets of permissions with multiple users.
- Client Registry is the place to supervise and control client self registration which is a suitable approach especially for user management of hardware devices
If you want to learn more about Client Registry check out the How to MQTT lesson, which includes a hands-on example of self registration.
Now we will start right away with the definition of a Role.
Creating and Modifying Roles
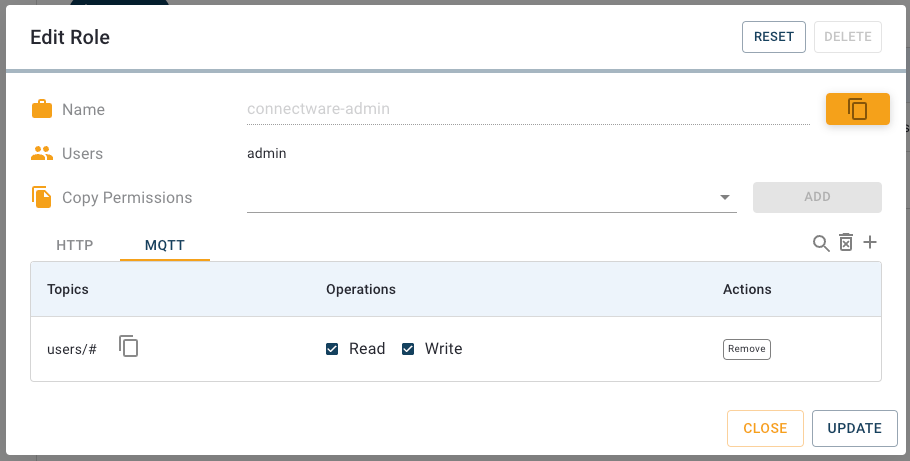
To create a set of permissions switch to the section Roles. Here you can see all the roles that are available on your Connectware. To create a new role click the plus-button in the upper right corner of the UI. A dialog opens which demands you to define a name. We choose the name „UserManagement“ and click Create. The newly created role does now appear in the list. Clicking on this entry will open the permissions view. Here you can switch between MQTT, the data interface, and HTTP, the application programming interface.
We start with an MQTT permission by selecting the MQTT tab and clicking the plus-button in the upper right corner of the permissions list. An MQTT permission is easily to define and requires just two parts of information:
- The topic of interest (Resource)
- The kind of allowed access (Read and/or Write)
For the resource we define the MQTT topics located under users/# (with the wildcard # indicating that this is valid for the topic users as well as every subtopic) with Read and Write permission and confirm by clicking Add.
Now we again click the plus-button in the upper right corner. The second permission shall grant access to the HTTP API on path /api/users/# (again utilizing the wildcard #) which includes the interface for user management. In result assigning a user the role UserManagement will grant him rights to manage users via the HTTP API. Please note, that this does not grant access to the Admin UI nor its User Management section!
After creating both permissions click Update and Close. This role is now ready to use.
Creating Users
Go ahead and open the Users view. Unless you have not already configured any users yourself or installed any services, there is only a single user in the list: the admin. We will start off by creating a new user. To do so you only need to press the plus-button located in the upper right corner of the UI. Once you pressed the button, a dialog will appear in which you can set the username and the initial password.
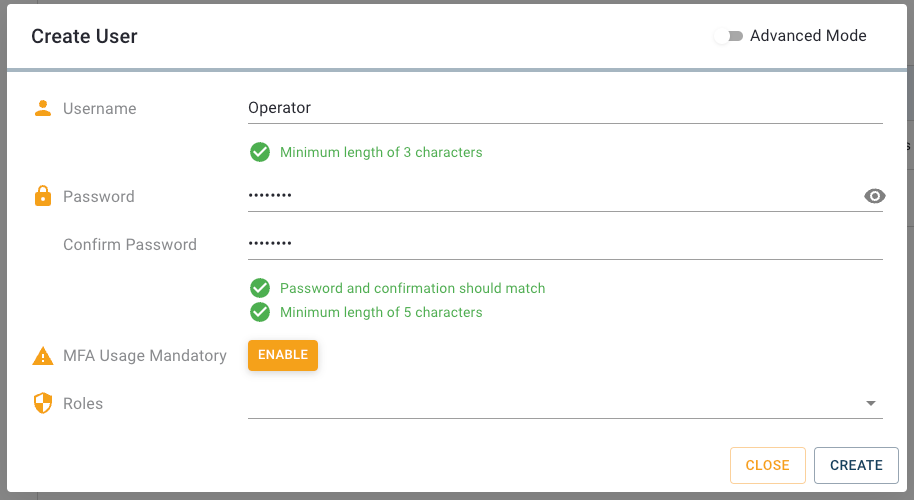
For this lesson we will create a simple user called user. Enter the username and a password. We will delete the user at the end of the lesson so the password doesn’t have to be particularly complex. Accept the new user by clicking Create. The menu will close and you will see that your new user appears in the list.
Adding Permissions
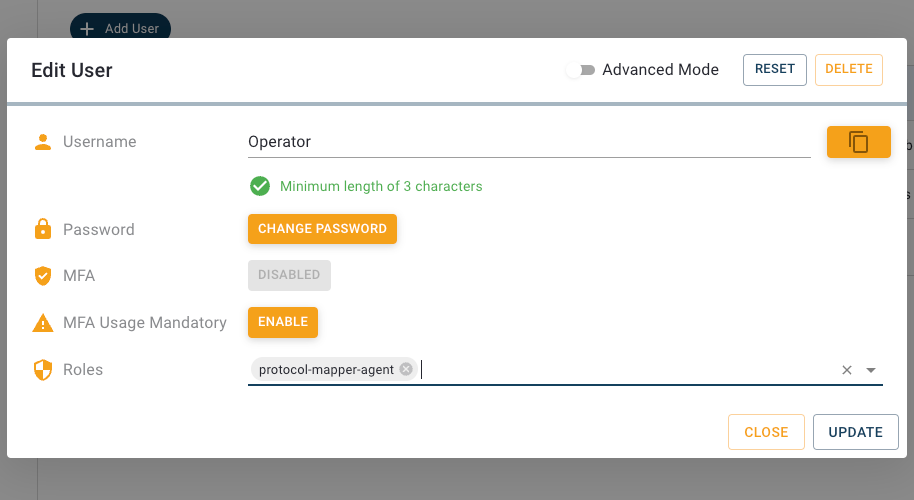
Right now our new user has no permissions to access the API or read data. To make the user a bit more useful we will go ahead and add a few permissions by assigning a role. Open the user configuration by clicking the entry of our user in the list and activate the “Advanced mode”. This view provides the following options:
- Change the username
- Change the password
- Assign Roles to the user
- Copy permissions from another user
- Manage additional HTTP and MQTT permissions
- Change the Authentication Methods
- Define a MQTT Publish Prefix for this user
- Delete user
We want to assign the earlier created role to this user, so we type „UserManagement“ to the input line Roles and select it from the list. Since we created the set of permissions for this user as a role, which by the way is considered good practice, we don’t need to grant additional permissions. But if we wanted to, it would work just like assigning permissions to a role, by clicking the plus-button.
Great! Our newly created user is now able to read and write data on the users topic and access the user management API.
Removing Users
Sometimes a good member of the team has to leave and you might be in charge of delivering the bad news. Luckily the Connectware makes this task a piece of cake! Just go to the Users view, choose the poor candidate’s entry in the list and click it. In the user configuration click Delete in the upper right corner and confirm if you are certain about it. Proceed like this for our user to continue with the lesson.
The Commissioning File Approach
Instead of adding users utilizing the User Management section of the Admin UI, you can also define users in a Commissioning File and create them as part of a service installation. You would probably do that in the process of integrating a device that connects to the Connectware API, to have a user directly associated with the service which would reduce the required user management effort because you do not have to create, manage and remove users manually when installing or deleting services.
Writing the Commissioning File
The Commissioning File contains all information which is required for a Service installation. It defines all kinds of resources needed, like connections, mappings or also users. To understand the file’s anatomy in detail, please consult the Reference docs. To get started, open a text editor and create a new file, e.g. users-example-commissioning-file.yml. The Commissioning File is in the YAML format, perfectly readable for human and machine! We will now go through the process of defining the required sections for this example:
- Description
- Metadata
- Parameters
- Resources
Description and Metadata
These sections contain more general information about the commissioning file. You can give a short description and add a stack of metadata. Regarding the metadata, only the name is required while the rest is optional. We will just use the following set of information for this lesson:
description: >

  User Management Example Commissioning File
  Cybus Learn - User Management Basics
  https://learn.cybus.io/lessons/user-management-basics/

metadata:

  name: User Management Example
  version: 0.0.1
  icon: https://www.cybus.io/wp-content/uploads/2019/03/Cybus-logo-Claim-lang.svg
  provider: cybus
  homepage: https://www.cybus.io
Code-Sprache: YAML (yaml)
Parameters
Parameters allow the user to customize Commissioning Files for multiple use cases by referring to them from within the Commissioning File. Each time a Commissioning File is applied or reconfigured in the Connectware, the user is asked to enter custom values for the parameters or to confirm the default values.
parameters:

  userPassword:
    type: string
    description: Password for user
Code-Sprache: YAML (yaml)
We are defining the user’s password as a parameter without any default, so it has to be set during the installation of the service.
Resources
In the resources section we declare every resource that is needed for our service. Besides resources like connections, endpoints or volumes, the user we want to create is also a resource which has to be defined in this section. And even the role we want to assign to our new user is a resource and that is what we start with.
Cybus::Role
The name of the role that will be created, will match the name of the resource we define, so we just name the resource UserManagement.
resources:

  UserManagement:
    type: Cybus::Role
    properties:
      permissions:
        - resource: users/#
          operation: readWrite
          context: mqtt
        - resource: /api/users/#
          operation: readWrite
          context: http
Code-Sprache: YAML (yaml)
This resource is of the type Cybus::Role which provides the single property permissions. Permissions are defined by the resource, which in this case is not a resource of those defined in the Commissioning File, but a resource path in the context of data interface (mqtt) or application programming interface (http).
We define two permissions here. The first is the permission to access data on MQTT topics located under users/# (with the wildcard # indicating that this is valid for the topic users as well as every topic under it). The second permission grants access to the API on path /api/users/# (also utilizing the wildcard #) which includes the interface for user management. In result assigning a user the role UserManagement will grant him rights to manage users via the HTTP API. Please note, that this does not grant access to the Admin UI nor its User Management section!
Cybus::User
Again the name of the user that will be created, will be equal to the name of the resource we define, so we just name the resource user, like we did before.
  user:
    type: Cybus::User
    properties:
      password: !ref userPassword
      roles:
        - !ref UserManagement
Code-Sprache: YAML (yaml)
Although the name of our resource already implies that it should be a user, we still have to define it explicitly by setting the property type to Cybus:User. This brings us to the next, type-specific properties: For the definition of the password we reference the parameter userPassword we declared earlier by using !ref and for the roles we assign the previously created role UserManagement.
We could also define additional permissions in the same way we did for the role but it is considered advisable to organize sets of permissions as roles and just assign those to users.
Installing the Service
You now have the Commissioning File ready for installation. Head over to the Services tab in the Connectware Admin UI and hit the plus-button to select and upload the Commissioning File. You will be asked to specify values for the service ID and each member of the section parameters, in our case the password for the user. Once the service was installed successfully click its entry in the list and enable it from the service details view. You can now head back to the User Management and find the freshly created user and role. But they look a bit different as we might have expected: The names of our user and role come with the service ID of the associated service as a prefix. This prefix is also part of the credentials you will need for authorization of your client!
Furthermore we recognize that there are an additional user and role called <prefix>.defaultUser and <prefix>.defaultRole which are created by any service being enabled. Those do mainly serve its service’s concerns and you should just not care too much about them.
Removing User and Role
Since the user and role we defined in the Commissioning File are associated with the service, you should avoid to simply delete them from the lists. Doing this will be detected by the service and cause a deviation warning! The cleanest way of deleting them is to disable the service and if not needed anymore to delete the service too. Of course in most cases this would be the way to go anyhow because normally the created users become obsolete when the service is not needed anymore so you would delete the service and with it automatically the user and role.
Summary
After completing this lesson you should now have a better understanding of how user and permission management of the Connectware works. Keep in mind that service users should be created in their respective commissioning file.
Learn More
The Connectware offers powerful features to build and deploy applications for gathering, filtering, forwarding, monitoring, displaying, buffering, and all kinds of processing data… why not build a dashboard for instance? For guides check out more of Cybus Learn.