


Connectware Technical Overview
Prerequisites
This lesson requires basic knowledge of
- Microservice and networking concepts
- Docker (see Docker Basics Lesson)
- MQTT (see MQTT Basics Lesson)
Introduction
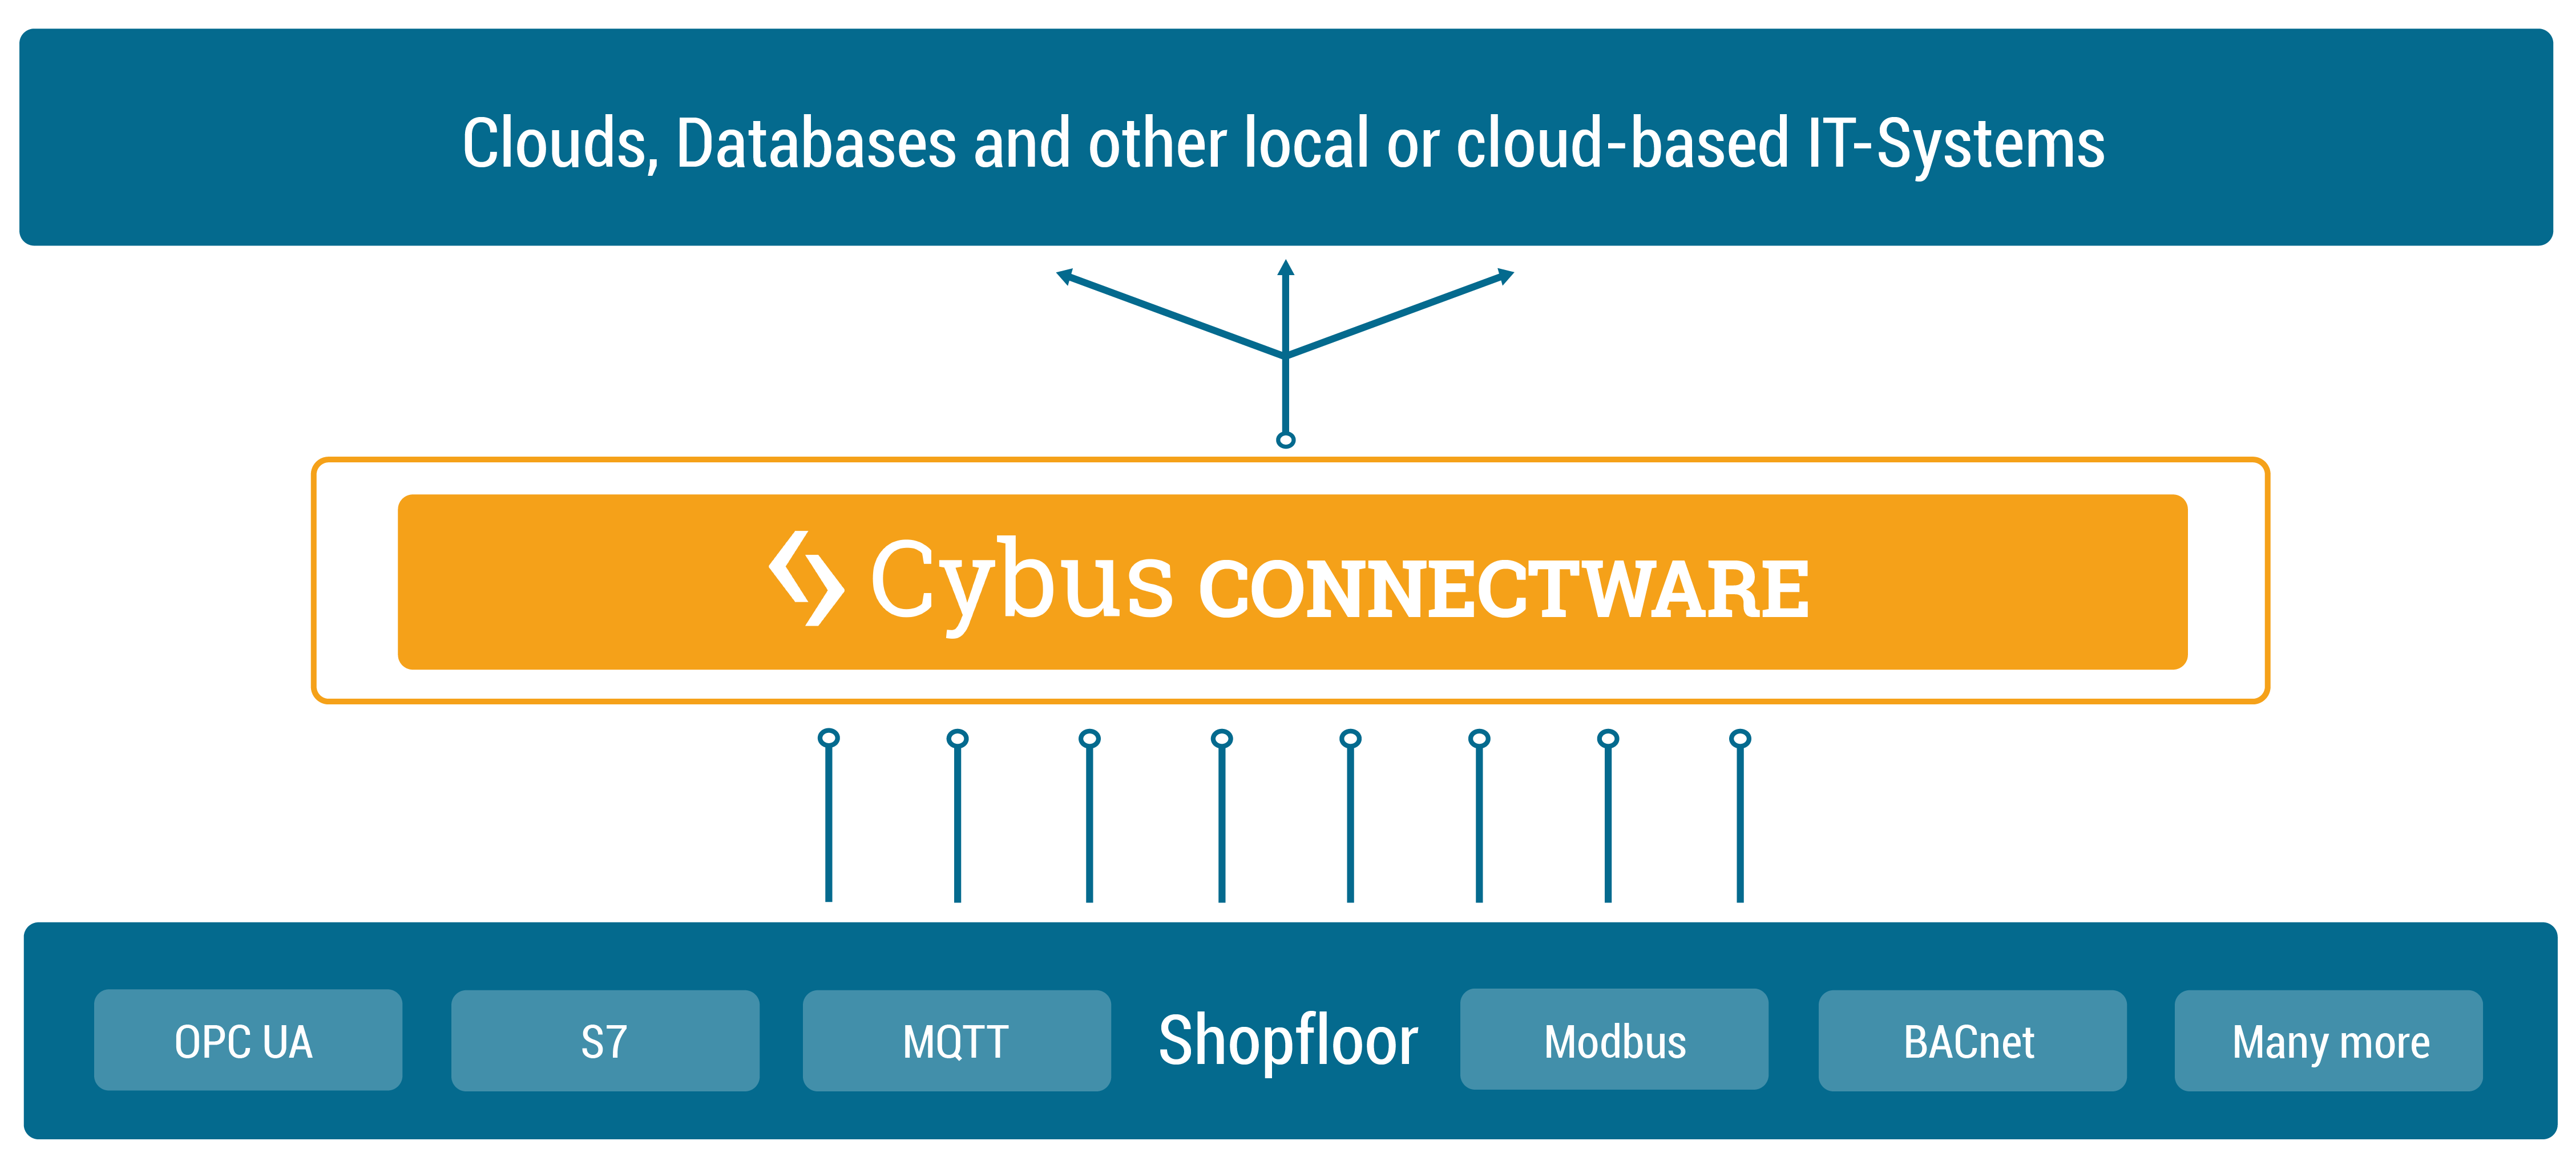
Cybus Connectware is a general and extensible on-premise data gateway that connects different devices, provides data for local systems and cloud based backends and makes data exchange transparent and secure. The components of Connectware include a data broker, protocol adapters for connectivity to standard industry protocols, a management and security layer, as well as a runtime environment to include third-party applications.

Connectware connects to the different endpoints by dedicated connectors (e.g. OPC UA, Modbus-TCP) that run as part of the Protocol Mapper in Connectware. By its microservice and API architecture Connectware supports the option of adding more connectors. And being a modern enterprise-grade IT solution based on Docker, Connectware is suitable to run on either a data centre infrastructure or standalone computers.
Connectware Overview
To begin, we’ll provide an introduction to Connectware’s architecture and its constituent parts. Connectware employs a microservice approach, with individual modules functioning in concert to establish a microservice cluster – namely, Cybus Connectware. Microservices offer numerous advantages, such as flexible scalability for individual modules or the entire application, as well as the capacity to integrate third-party applications, various databases, and even disparate programming languages into a unified application.
Connectware Architecture
In the following we will explore the Connectware architecture more closely and see what the individual microservices do and when they come into play, when we are using Connectware. We will start with a heterogene shopfloor full of data and a cloud to which we want to forward our data to – but no means of a connection between them. So the question is how are we transferring our data out of the factory, into the cloud, in a controllable, extendible and secure way?
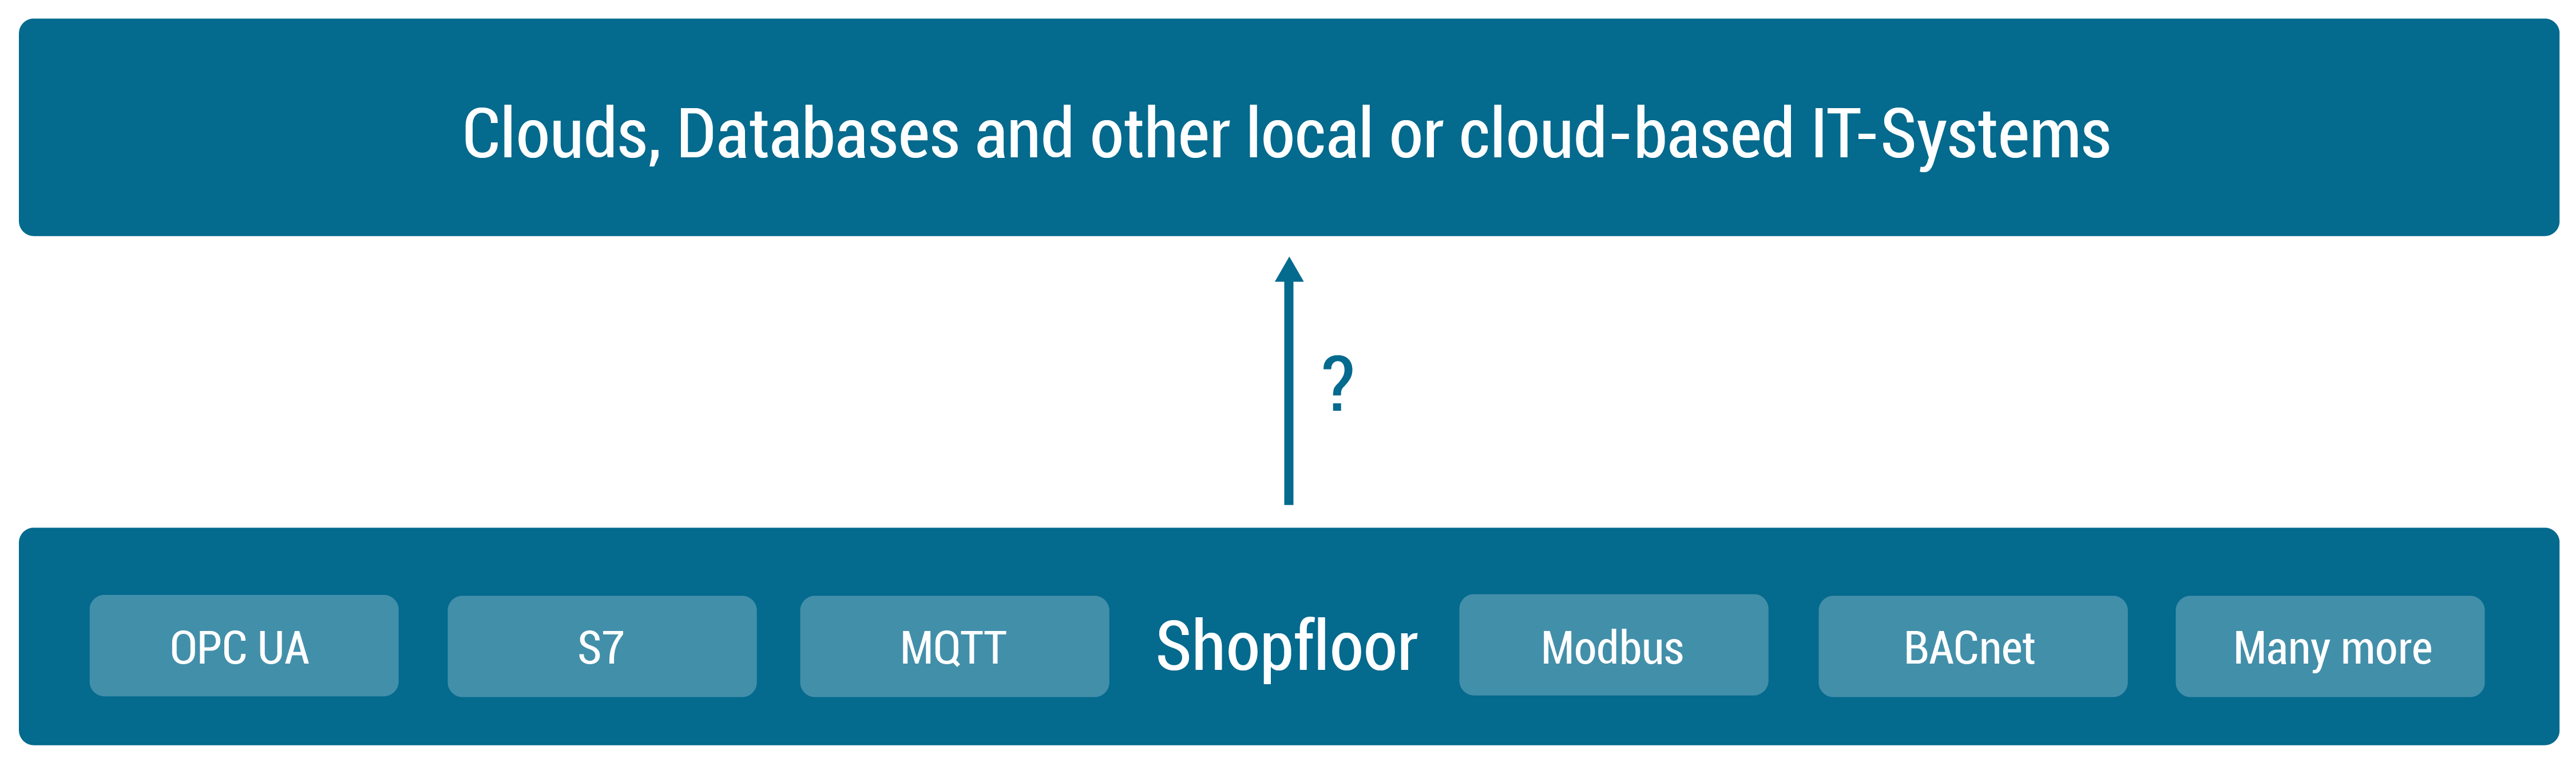
Establishing a Connection
First of all we need to start by establishing a connection between our shopfloor and the cloud application. See the following image to get an overview over the components that we will add in this section to achieve this goal.
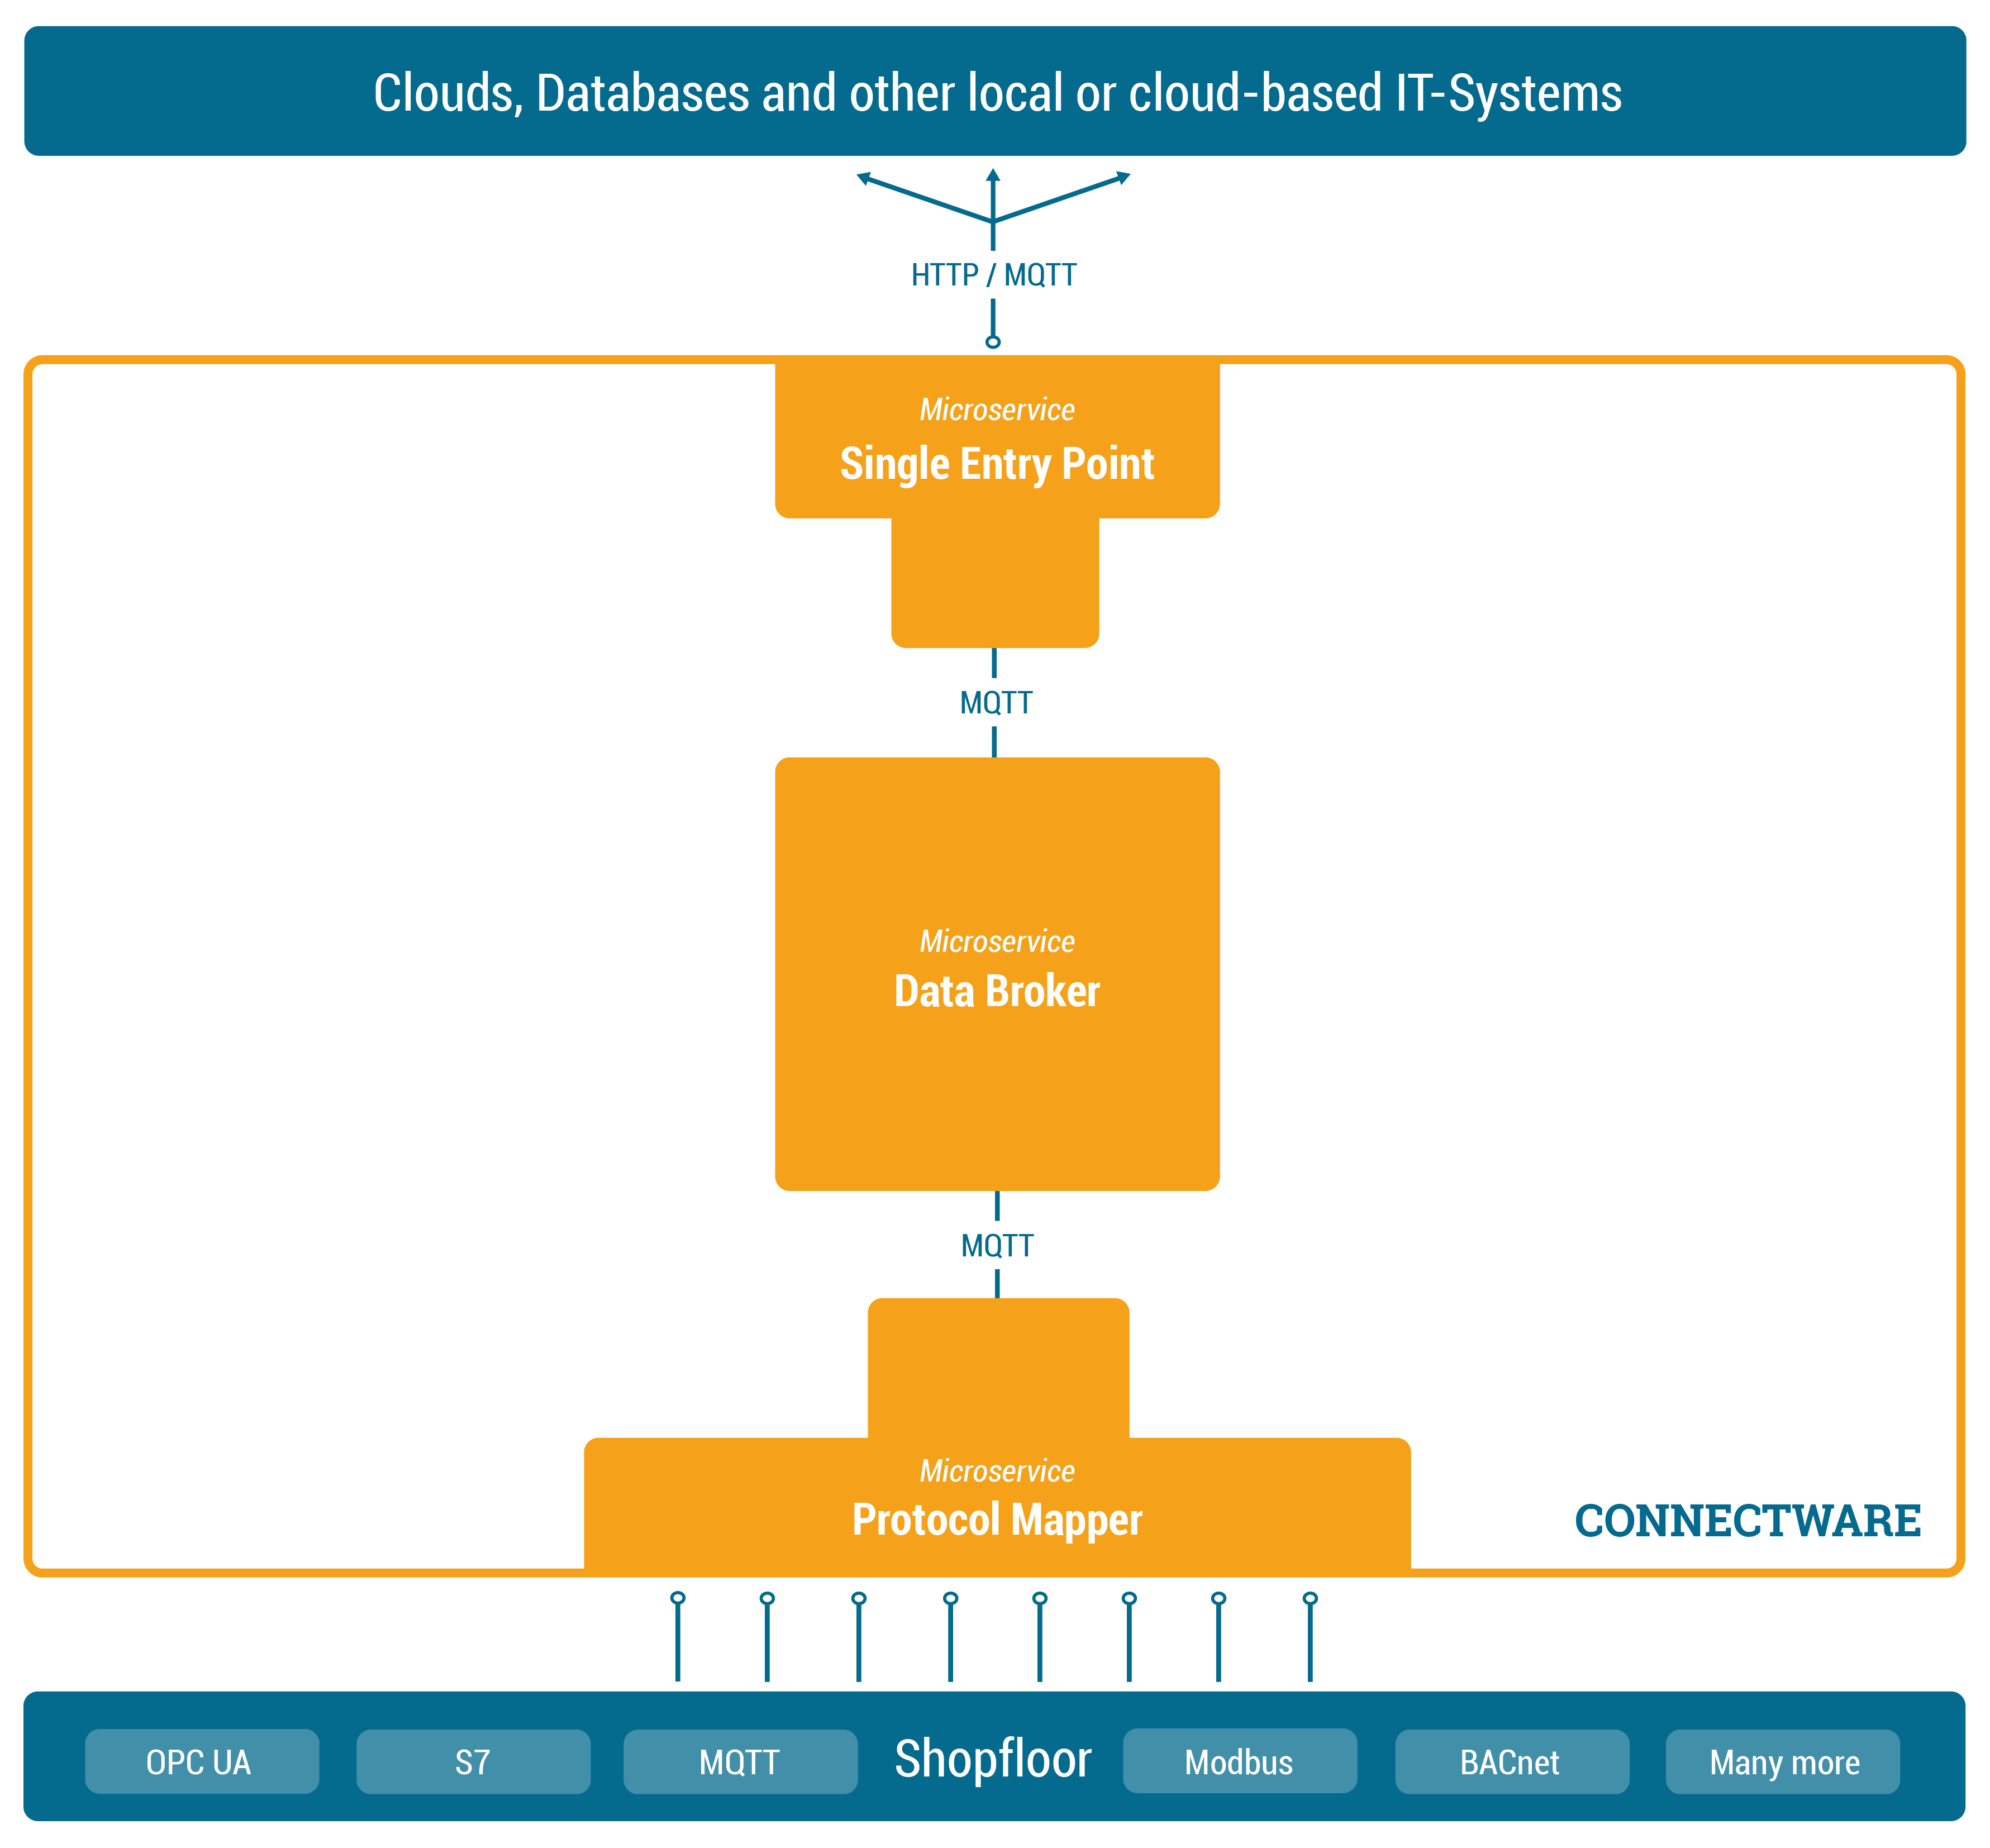
Data Broker
In order to manage and use any of our data, we need to add one central place to Connectware in which we can easily access the data – we could call it a data focal point. This single data hub gives us easy access as well as easy control over all data since all data needs to pass through this central hub. Of course this also means we need to have a Data Broker that is stable, maintainable, scalable, reliable and secure. Further we need to choose a transmission protocol that is widely used and accepted and able to handle large data flows.
The solution is to use MQTT, a standard, lightweight publish-subscribe messaging protocol on top of TCP/IP that is widely used in IoT and industrial applications. Connectware uses a high-performance MQTT broker which scales horizontally and vertically to support a high number of concurrent publishers and subscribers while maintaining low latency and fault tolerance.
So the MQTT Data Broker is the central data hub through which all data passes. Let’s now start connecting our shopfloor to the Data Broker.
Protocol Mapper
How do we get our data from different machines talking different protocols to the Connectware Data Broker? That’s where the Protocol Mapper comes into play. The Protocol Mapper uses a mapping scheme that translates various protocols to a unified MQTT/JSON API and handles the device connection management. Each device is represented by a connection resource which contains endpoints and mappings, which are used to model a MQTT topic hierarchy. All resources are defined in a text-based, human and machine readable YAML file called Commissioning File. To learn more about the configuration of connections see the How to connect to an OPC-UA server article.
Now the MQTT Data Broker is fed directly by our devices from the shopfloor via the Protocol Mapper. The next step is to forward the data to our application.
Single Entry Point
Connectware, which is running on-premise, needs to forward data to local as well as cloud applications. Therefore we need to have an access point through which Connectware can talk to the outside. Here again, it is a good practice to have one place that all the data needs to pass instead of multiple open connections that all need to be monitored. Connectware provides a Single Entry Point (or more technical Reverse Proxy) which bundles all incoming connections. Thus, to the outside the Entry Point abstracts the different microservices to one single access point. The same applies to the microservices from inside Connectware that only need to know one point to talk to when wanting to connect to the outside and forward data. Using a dedicated and high performance Reverse Proxy one can easily control all connections at this point, making a secure internet access easily possible.
Adding Logic – The Rule Engine
At this point we are collecting data from our shopfloor and are able to forward this data to applications outside of Connectware. Connectware itself however is very well capable of applying logic to the data before forwarding it. Preprocessing the data directly on-premise and for example cutting out sensitive information, enriching data by combining data from different sources or aggregating data and send them as in one burst message to reduce costs for cloud services are just a few use-cases the Rule Engine can be used for.
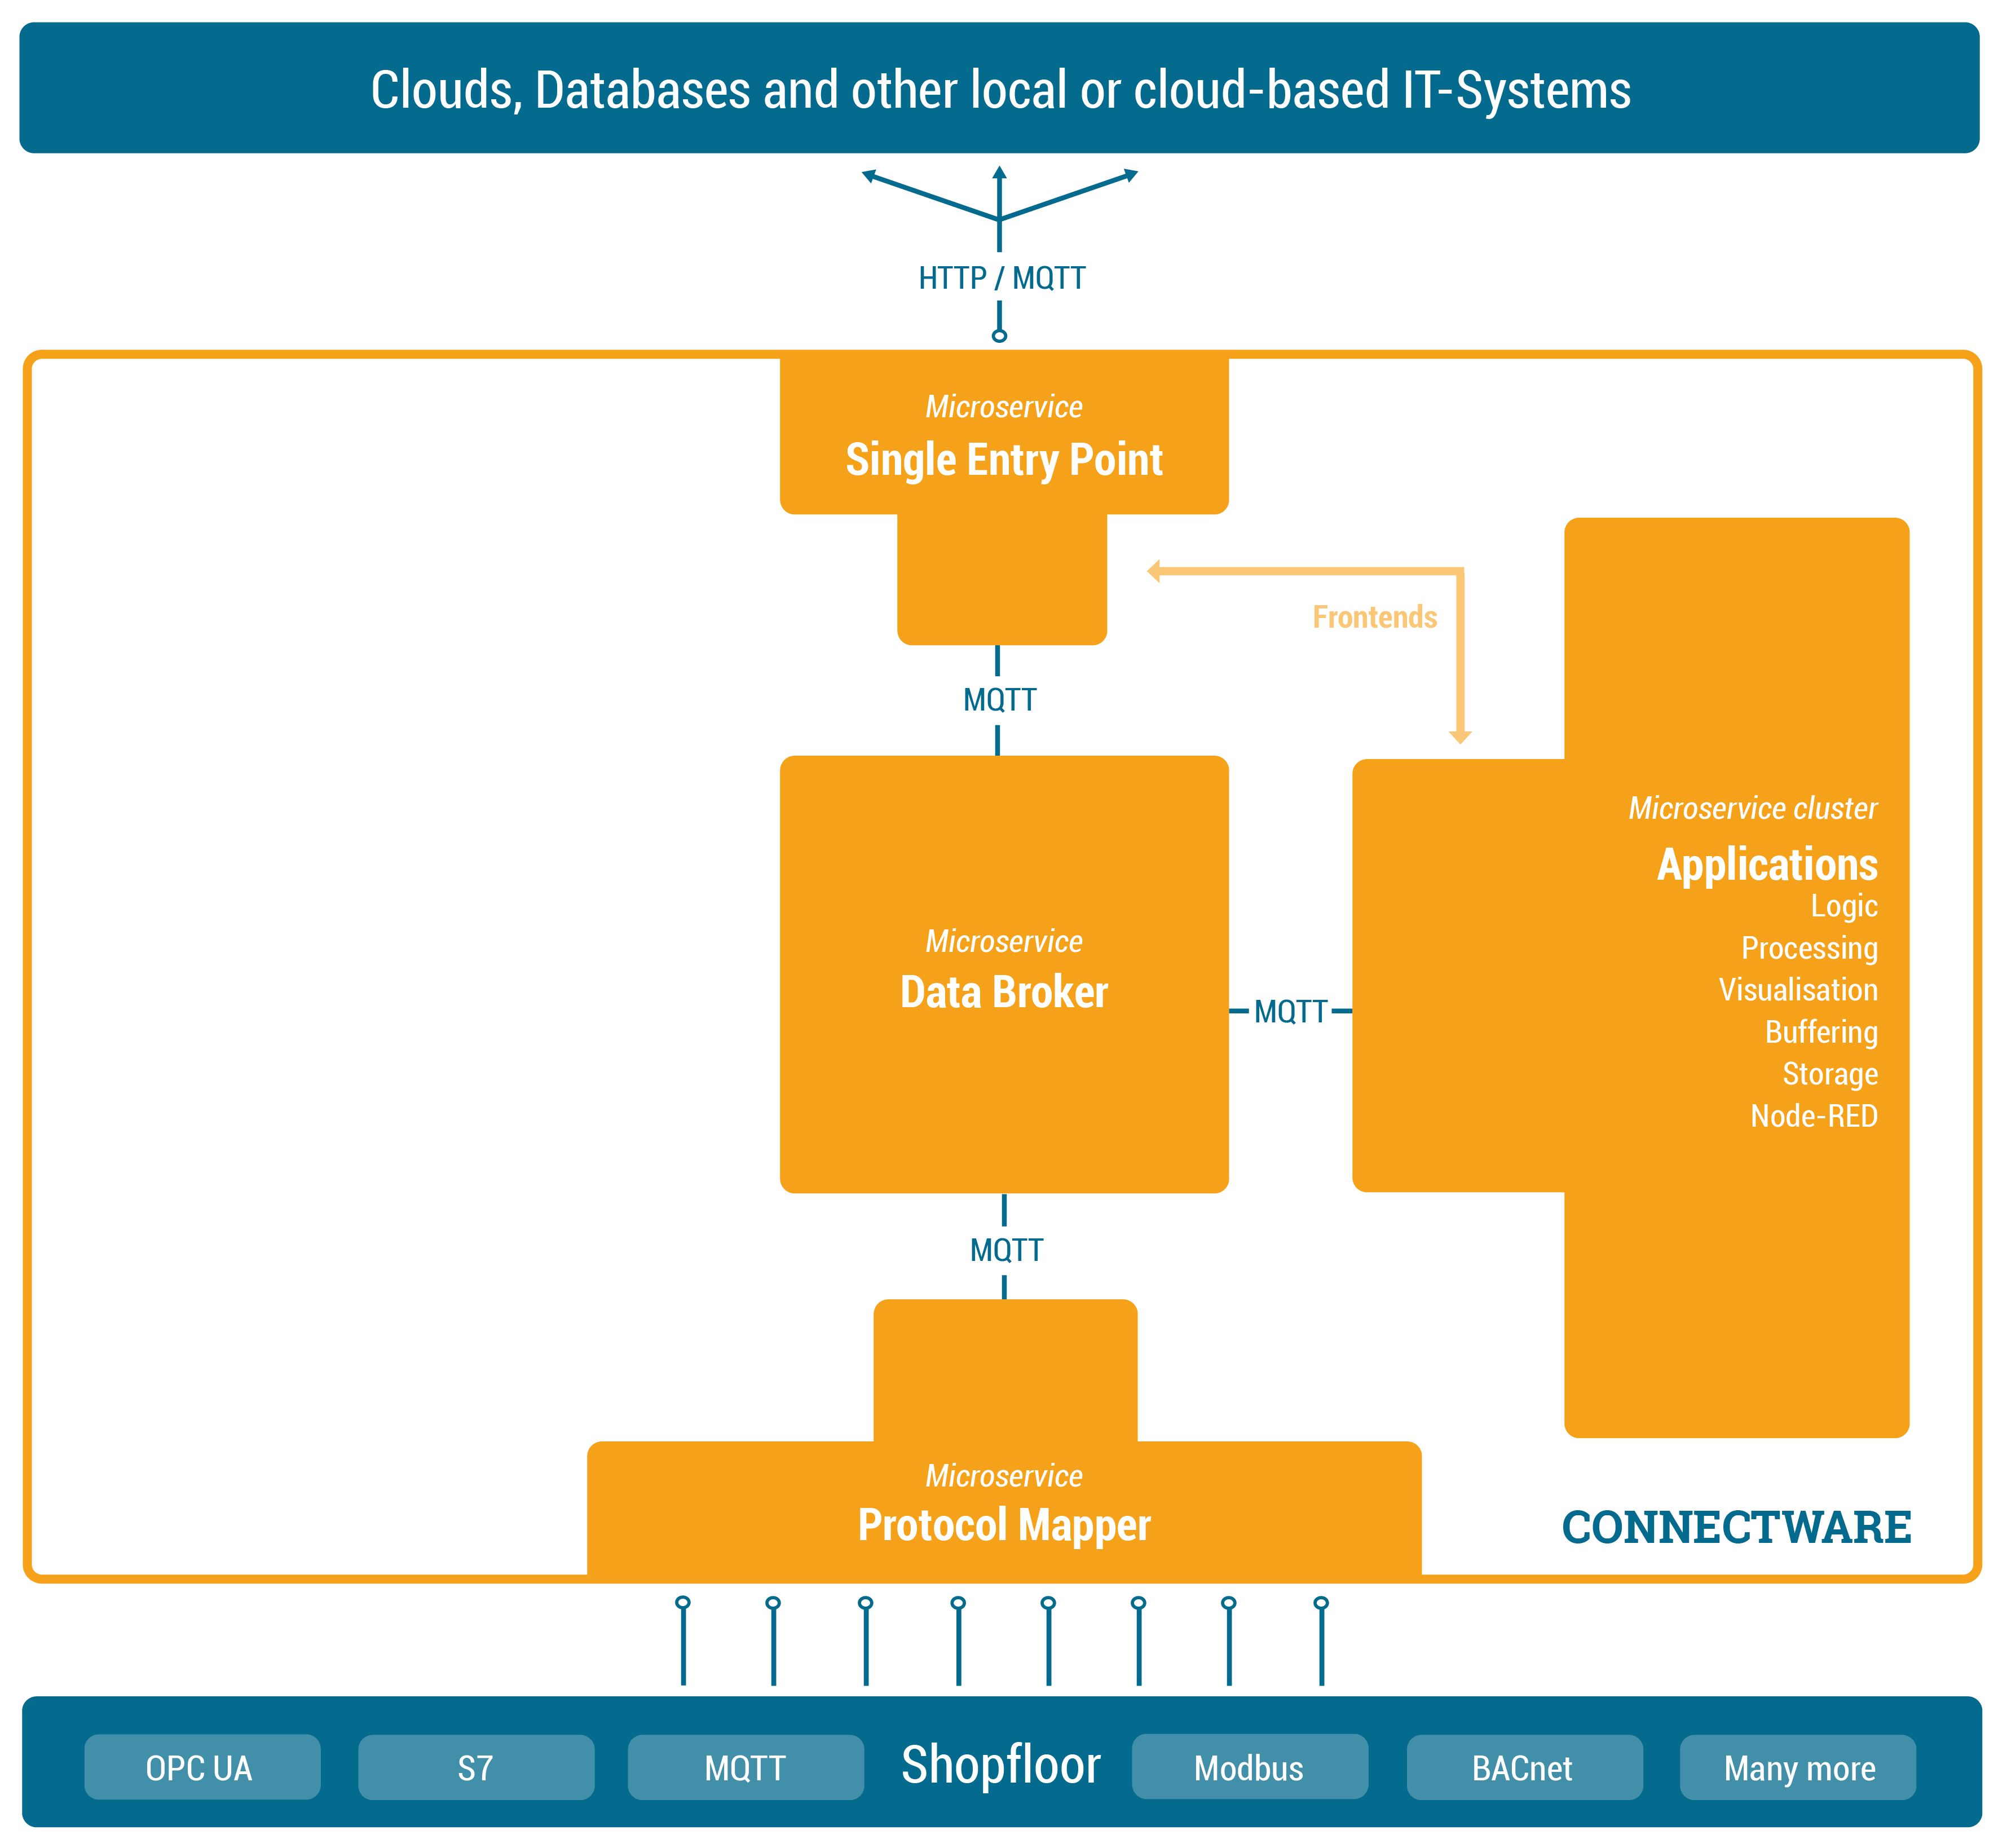
What is a Service?
While Connectware allows to individually perform all settings (like managing grantees, setting permissions, starting containerized applications, etc.) the idea of Services is to bundle all these activities into a single point of configuration and execution. Services are usually built for a specific task and context. They bundle required resources with user/permission management in a easy to handle and shareable package.
How Are They Configured?
The Service configuration is done via a Commissioning File – a YAML based text file. The installation process is simply done by feeding the Commissioning File to Connectware, upon this action Connectware will review and display all the configurations that the specific Service wants to create or consume and one can decide whether or not to grant this permission to the Service (think Google Maps wants to know your location). If all permissions are agreed to then the Service will be deployed. This practice puts you in charge of your data and keeps sensitive data from leaving the factory borders.
Service Uses
Services can have a wide variety of different uses on Connectware, from data storage, preprocessing and applying logic to data on-premise prior to e.g. forwarding it to external applications. Services can also serve front-ends (visualizations, dashboards, etc) that can be used to access and control Services from the outside.
To learn more about the configuration and usage of Services see the Service Basics lesson.
Management Cluster – Making it Secure and Controllable
We are now very far in our journey of getting data out of our shopfloor. We have a Data Broker which is able to receive and forward shopfloor data and we have a runtime in which we can individually process the data. Now let’s add management and security to it.
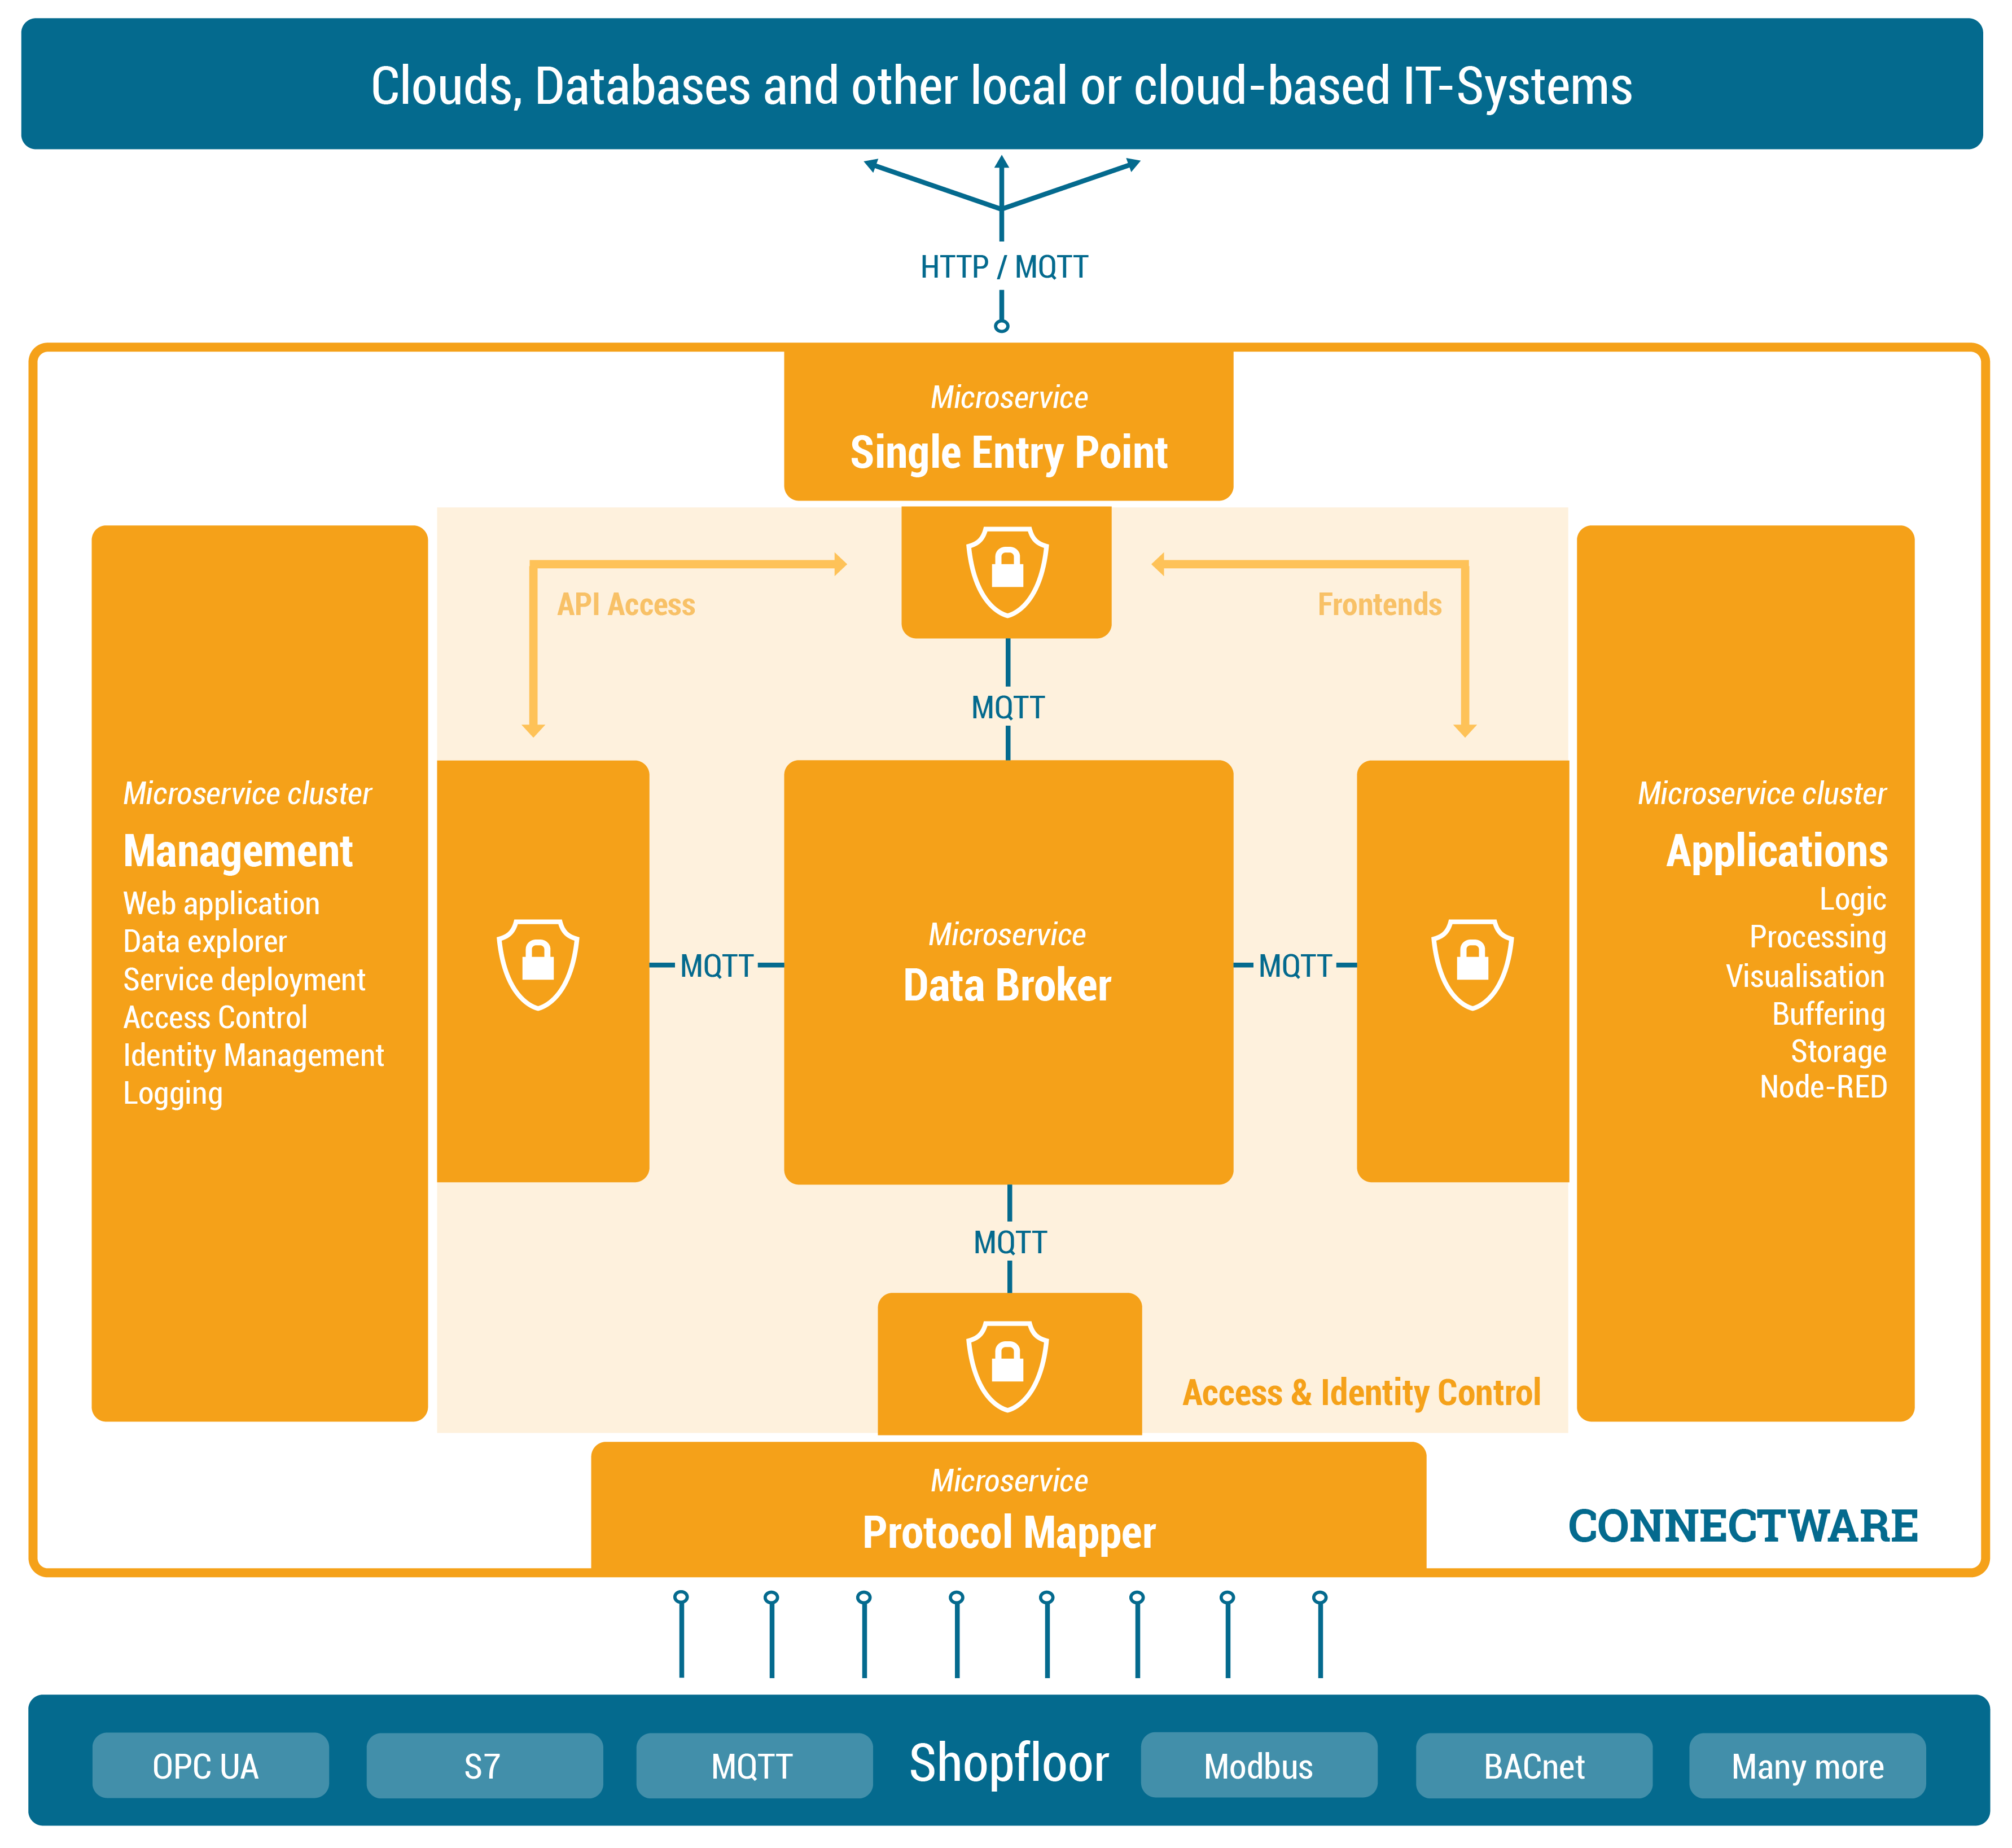
What Does the Management Cluster Do?
The Management Cluster is concerned with managing Connectware by providing the following:
- Data overview
- Supervising orchestration of resources
- Managing access control and identities
- Providing logging capabilities
How Does It Do It?
Managing Connectware is done through a modern web application through which the entire software can be configured. Here you can manage users and services through a graphical user interface. All features of the web interface can also be accessed through a REST API.
Once a client is ready to read or write data tasks like client authentication (through tokens, certificates and pre-shared passwords) and access control (who is allowed to read and write to what) are handled here. Access control is established via a simple, yet powerful control layer that handles read and write access on API endpoints and on the MQTT data broker. If required identity management can also be coupled here to directory services like Active Directory.
Connectware also has logging functionality for all system components and Service applications events. The logs can be viewed and queried via the web application. The log messages can also easily be integrated into external log management systems like ElasticSearch or Splunk.
Summary
This article covered a more technical introduction into the different microservices that build up Connectware. Starting with Connectwares scalable MQTT data broker and the Protocol Mapper which maps different industry protocol to specified MQTT topics in a standardised JSON format. Over the Rule Engine that allows complex data transformations, enriching data by combining different sources and buffering capabilities. To how we can secure and manage all of it with the Single Entry Point and the Management Cluster.
Going Further
This lesson gave overview over the basic Connectware architecture and functionality. In the following lessons we will dive way deeper into Connectware and it’s components, explaining how to connect devices, how to use and build Services yourself and how to manage Connectware. Have a look at the following articles as a starting point:
- Installing Connectware on docker-compose
- How to connect to an OPC-UA Server
Need more help?
Can’t find the answer you’re looking for?
Don’t worry, we’re here to help.