


How to Connect a Machine via Heidenhain DNC Interface
Prerequisites
This lesson assumes that you want to connect to a Heidenhain controller using the DNC interface protocol with the Cybus Connectware. To understand the basic concepts of Connectware, please check out the Technical Overview lesson. To follow along with the example, you will also need a running instance of Connectware. If you don’t have that, learn How to install the Connectware. Additionally it is not required but will be useful to be familiar with the User Management Basics as well as the lesson How To Connect an MQTT Client.
Introduction
This article will teach you the integration of Heidenhain controllers. In more detail, the following topics are covered:
- Setup of the Cybus Heidenhain Agent
- Selecting the methods
- Creating the commissioning file
- Installing the service
- Verifying data in the Connectware Explorer
The commissioning files used in this lesson are made available in the Example Files Repository on GitHub.
About Heidenhain DNC
Heidenhain is a manufacturer of measurement and control technology which is widely used for CNC machines. Their controllers provide the Heidenhain DNC interface, also referred to as „option 18“, which enables vertical integration of devices and allows users to access data and functions of a system. The DNC protocol is based on Remote Procedure Calls (RPC), which means it carries out operations by calling methods on the target device. You can find a list of the available methods in the Cybus Docs.
Cybus Heidenhain Agent
Utilizing Heidenhain DNC with Connectware requires the Cybus Heidenhain Agent running on a Windows machine or server on your network. This agent uses the Heidenhain RemoTools SDK to connect to one or more Heidenhain controllers and communicates to Connectware via MQTT. The Cybus Heidenhain Agent and required dependencies are provided to you by our Support Team.
Prerequisites
The host of the Cybus Heidenhain Agent must meet the following requirements:
- Windows 10 or Windows Server 2019
- Installed Heidenhain SDK
- Windows host must be able to reach controllers (or emulators) via network
- iTNC 530 / TNC 426:
- Windows Host -> Heidenhain Controller: ICMP (Ping)
- Windows Host -> Heidenhain Controller: 19000/TCP
- TNC 640:
- Windows Host -> Heidenhain Controller: ICMP (Ping)
- Windows Host -> Heidenhain Controller: 19003/TCP
- Heidenhain Controller -> Agent-Host: 19010-19015/TCP
- iTNC 530 / TNC 426:
- Windows host must be able to reach Connectware instance via network
- Windows Host -> Connectware: 8883/TCP
Installation
- Start the Cybus Heidenhain Agent installer and follow the installation instructions
- Input Connectware host IP address
After successful installation, a windows system service with name „Cybus Heidenhain Agent“ is up and running. It is already configured to automatically start on windows restart and to restart in case of crash. You can always inspect the status under Windows Services and log messages in the Windows Event Viewer.
Post-Installation Steps
Go to the Connectware Admin User Interface (Admin UI) and log in.
Agent Role (once)
The agent needs to be able to communicate with Connectware by publishing and subscribing on certain MQTT topics, thus we need to grant this permission. Permissions are bundled within Connectware roles (see User Management Basics). Create the following role:
- Name: heidenhain-agent
- Data permission: edge.cybus/# (Read and Write)
Agent Onboarding (per Agent)
- Use the Client Registry (User Management > Client Registry) to onboard the agent (for details see How To Connect an MQTT Client)
- Enable self registration
- Wait for agent to appear
- Check if agent is correct
- Grant access to agent and assign the heidenhain-agent role
Installing and Starting the Heidenhain Emulator
For this lesson we do not have a machine with a TNC 640 controller available so we will utilize the TNC 640 emulator running on a Windows machine.

Download the latest version of TNC 640 Programming Station from heidenhain.com and install it to the same machine as the agent or another Windows machine of known IP address in the same network. After the installation you can start the program with the desktop shortcut TNC 640. Once the program is started and you see the tab Power interrupted you can press the CE button on the Keypad to enter the manual mode. The emulator should now also be available on your network.
Selecting the Methods
The most essential information we need to specify the commissioning file for our Heidenhain DNC application is the set of methods of the controller we want to make available with our Connectware. We could just take the whole list from the Cybus Docs and integrate all of the functions to be available on Connectware but to not lose focus in this lesson we will pick a small set of them for demonstration purposes.
We will integrate the following methods:
- getState
- getPlcData
- getToolTableRow
- transmitFile
- onToolTableChanged
Writing the Commissioning File
The Commissioning File is a set of parameters which describes the resources that are necessary to collect and provide all the data for our application. It contains information about all connections, data endpoints and mappings and is read by Connectware. To understand the file’s anatomy in detail, please consult the Cybus Docs.
To get started, open a text editor and create a new file, e.g. heidenhain-example-commissioning-file.yml. The commissioning file is in the YAML format, perfectly readable for humans and machines! We will now go through the process of defining the required sections for this example:
- Description
- Metadata
- Parameters
- Resources
Description and Metadata
These sections contain more general information about the commissioning file. You can give a short description and add a stack of metadata. Regarding the metadata, only the name is required while the rest is optional. We will just use the following set of information for this lesson:
description: >

  Heidenhain DNC Example Commissioning File
  Cybus Learn - How to connect a machine via Heidenhain DNC interface
  https://learn.cybus.io/lessons/how-to-connect-heidenhain-dnc/

metadata:

  name: Heidenhain DNC Example
  version: 1.0.0
  icon: https://www.cybus.io/wp-content/uploads/2019/03/Cybus-logo-Claim-lang.svg
  provider: Cybus GmbH
  homepage: https://www.cybus.io
Code-Sprache: YAML (yaml)
Parameters
Parameters allow the user to prepare commissioning files for multiple use cases by referring to them from within the commissioning file. Every time a commissioning file is applied or a service reconfigured in Connectware, the user is asked to enter custom values for the parameters or to confirm the default values.
parameters:
  agentId:
    type: string
    description: Agent Identification (Cybus Heidenhain Agent)
    default: <yourAgentId>
  machineIP:
    type: string
    description: IP Address of the machine
    default: <yourMachineAddress>
  cncType:
    type: string
    default: tnc640
    description: >-
      Type of the machine control (DNC Type). Allowed values: tnc640, itnc530,
      itnc426.
    allowedValues:
      - tnc640
      - itnc530
      - tnc426
Code-Sprache: YAML (yaml)
The parameters we define here could vary from setup to setup, so it is just good to make them configurable. The agentId is the name of the agent’s user in Connectware, which was defined during client registration. The machineIP in our example is the address of the Windows machine running the TNC 640 emulator or would be the address of the machine tool you want to connect to. As parameter cncType we define the type of controller we use and additionally we define the currently supported controller types as allowedValues for this parameter.
Resources
In the resources section we declare every resource that is needed for our application. For details about the different resource types and available protocols, please consult the Cybus Docs.
Connection
The first resource we need is a connection to the Heidenhain controller. The connection is defined by its type and its type-specific properties. In the case of Cybus::Connection we declare which protocol and connection parameters we want to use. For the definition of our connection we reference the earlier declared parameters agentId, machineIP and cncType by using !ref.
resources:
  heidenhainConnection:
    type: 'Cybus::Connection'
    properties:
      protocol: Heidenhain
      connection:
        agent: !ref agentId
        ipAddress: !ref machineIP
        cncType: !ref cncType
        plcPassword: <password>
        usrPassword: <password>
        tablePassword: <password>
        sysPassword: <password>
Code-Sprache: YAML (yaml)
The access to your TNC 640 controller is restricted by four preconfigured passwords. If you need help to find out the necessary passwords, feel free to contact our Support Team. For ITNC 530 and TNC 426 no password is required.
Endpoints
The next resources needed are the endpoints which will provide or accept data. All endpoints have some properties in common, namely the protocol defined as Heidenhain, the connection which is referenced to the previously defined connection resource using !ref and the optional topic defining on which MQTT topic the result will be published. In the default case the full endpoint topic will expand to services/<serviceId>/<topic>. For more information on that, please consult the Cybus Docs.
The endpoints will make use of the methods we selected earlier. Those methods are all a bit different so let’s take a look at each of the endpoint definitions.
  getStatePolling:
    type: 'Cybus::Endpoint'
    properties:
      protocol: Heidenhain
      connection: !ref heidenhainConnection
      topic: getState
      subscribe:
        method: getState
        type: poll
        pollInterval: 5000
        params: []
Code-Sprache: YAML (yaml)
The first endpoint makes use of the method: getState, which requests the current machine state. The result should be published on the topic: getState. This endpoint is defined with the property subscribe, which in the context of a Heidenhain connection means that it will request the state in frequency of the defined pollInterval. This is also known as polling and brings us to the definition of the type which therefore is poll.
  getState:
    type: 'Cybus::Endpoint'
    properties:
      protocol: Heidenhain
      connection: !ref heidenhainConnection
      topic: getState
      read:
        method: getState
Code-Sprache: YAML (yaml)
But we could also make use of the method getState by requesting the state only once when it is called. The definition of this endpoint differs from the previous in the property read instead of subscribe. To utilize this endpoint and call the method, you need to publish an MQTT message to the topic services/<serviceId>/<topic>/req. The result of the method will be published on the topic services/<serviceId>/<topic>/res. <topic> has to be replaced with the topic we defined for this endpoint, namely getState. The serviceId will be defined during the installation of the service and can be taken from the services list in the Connectware Admin UI.
  getToolTableRow:
    type: 'Cybus::Endpoint'
    properties:
      protocol: Heidenhain
      connection: !ref heidenhainConnection
      topic: getToolTableRow
      read:
        method: getToolTableRow
Code-Sprache: YAML (yaml)
The previously used method getState did not expect any arguments so we could just call it by issuing an empty message on the req topic. The method getToolTableRow is used to request a specific row of the tool table. To specify which row should be requested, we need to supply the toolId. We will look at an example of this method call in the last section of the article.
  getPlcData:
    type: 'Cybus::Endpoint'
    properties:
      protocol: Heidenhain
      connection: !ref heidenhainConnection
      topic: getPlcData
      read:
        method: getPlcData
Code-Sprache: YAML (yaml)
Using the method getPlcData allows us to request data stored on any memory address of the controller. The arguments that must be handed over are the memoryType and the memoryAddress.
  transmitFile:
    type: 'Cybus::Endpoint'
    properties:
      protocol: Heidenhain
      connection: !ref heidenhainConnection
      topic: transmitFile
      read:
        method: transmitFile
Code-Sprache: YAML (yaml)
The method transmitFile allows us to transmit a file in the form of a base64-encoded buffer to a destination path on the Heidenhain controller. It expects two arguments: the string fileBuffer and another string destinationPath.
  onToolTableChanged:
    type: 'Cybus::Endpoint'
    properties:
      protocol: Heidenhain
      connection: !ref heidenhainConnection
      topic: notify/onToolTableChanged
      subscribe:
        type: notify
        method: onToolTableChanged
Code-Sprache: YAML (yaml)
The last endpoint we define calls the method onToolTableChanged. This is an event method which will send a notification in case of a changed tool table. For this we have to use the property subscribe along with the type notify. This means that we are not polling the method in this context but subscribe to it and wait for a notification on the specified topic. We could trigger a notification by modifying the tool table in the TNC emulator.
Installing the Commissioning File
You now have the commissioning file ready for installation. Head over to the Services tab in the Connectware Admin UI and hit the (+) button to select and upload the commissioning file. You will be asked to specify values for each member of the section parameters or confirm the default values. With a proper written commissioning file, the confirmation of this dialog will result in the installation of a service, which manages all the resources we just defined: The connection to the Heidenhain controller and the endpoints collecting data from the controller. After enabling this service you are good to go on and see if everything works out!
How do all the components we installed and defined work together?
The Heidenhain agent running on the Windows machine tries to connect to Connectware at the IP address that was defined during its installation, as soon as it is started. We recognized these connection attempts when we opened the Connectware client registry and accepted the request of the Heidenhain agent with the name heidenhain-<windows-pc-hostname>. As a result a user with this name was created in Connectware. We manually assigned this user the role heidenhainagent and through that granted the permission to access the MQTT topic for data exchange.
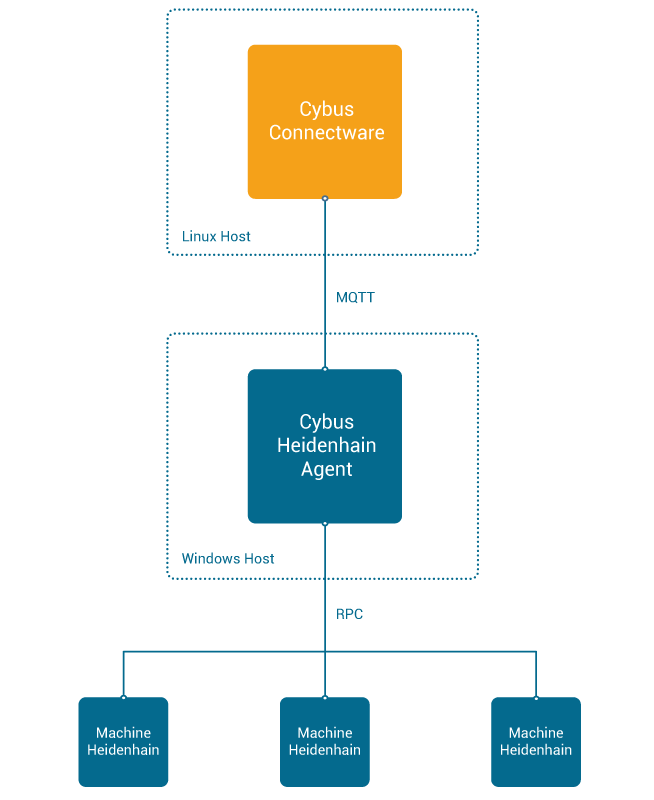
After the installation of the service in Connectware it tries to establish the Heidenhain connection we declared in the resources section of the commissioning file. There we have defined the name of the Heidenhain agent and the IP address of the Heidenhain controller to connect to, or in our case of the emulator, which runs on the same machine as the agent. (Working with a real machine controller that would obviously not be the case.) As soon as the connection to the Heidenhain controller is established the service enables the endpoints which rely on the method calls issued by the agent to the Heidenhain controller via RPC. To address multiple Heidenhain controllers we could utilize the same agent but need to specify separate connection resources for each of them.
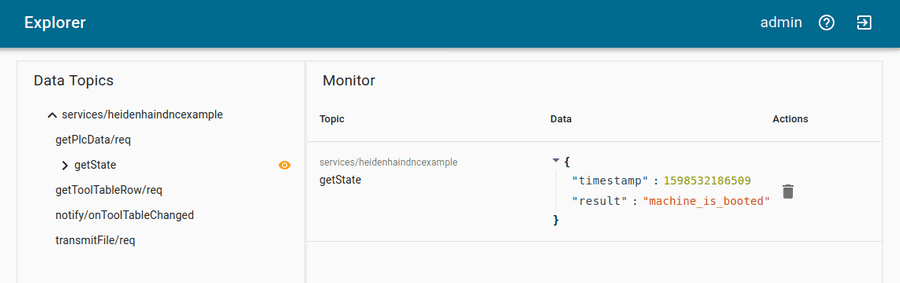
Verifying the Connection
Now that we have a connection established between the Heidenhain controller and Connectware, we can go to the Explorer tab of the Admin UI, where we see a tree structure of our newly created data points. Since we subscribed to the method getState, we should already see data being polled and published on this topic. Find the topic getState under services/heidenhaindncexample.
On MQTT topics the data is provided in JSON format. To utilize a method that expects arguments you would issue a request by publishing a message on the belonging req topic with the arguments as payload. For example to use the endpoint getToolTableRow you could publish the following message to request the tool information of tool table ID 42:
{
  "id": "1",
  "params": [ "42" ]
}
Code-Sprache: YAML (yaml)
The payload must be a valid JSON object and can contain two properties:
id: (optional) User-defined correlation ID which can be used to identify the response. If this property was given, its value will be returned in the return messageparams: Array of parameters required for the used method. If the method requires no parameters, this property is optional, too.
The arguments required for each call are listed along with the methods in the Cybus Docs.
The answer you would receive to this method call could look as follows:
{
  "timestamp":1598534586513,
  "result":
  {
    "CUR_TIME":"0",
    "DL":"+0",
    "DR":"+0",
    "DR2":"+0",
    "L":"+90",
    "NAME":"MILL_D24_FINISH",
    "PLC":"%00000000",
    "PTYP":"0",
    "R":"+12",
    "R2":"+0",
    "T":"32",
    "TIME1":"0",
    "TIME2":"0"
  },
  "id":"1"
}
Code-Sprache: YAML (yaml)
To learn how you can easily test and interact with MQTT topics like in this example, check out the article How to connect MQTT clients. Utilizing the Workbench you could simply hit Import from the menu in the upper right corner and import the nodered-flow.json from the Example Repository to add the test flow shown below. Add your MQTT credentials to the purple subscribe and publish nodes, then trigger requests.
[{"id":"cba40915.308b38","type":"tab","label":"Heidenhain DNC Demo","disabled":false,"info":""},{"id":"bc623e05.ae0f7","type":"inject","z":"cba40915.308b38","name":"Trigger "getState" request (see here for payload)","props":[{"p":"payload"},{"p":"topic","vt":"str"}],"repeat":"","crontab":"","once":false,"onceDelay":0.1,"topic":"","payload":"{"id":"1","params":[]}","payloadType":"json","x":240,"y":200,"wires":[["aff3fdcf.d275d","9fd44184.a11d1"]]},{"id":"f450d307.396ee","type":"comment","z":"cba40915.308b38","name":"Demo for Cybus Learn Article "How to connect a machine via Heidenhain DNC interface"","info":"","x":360,"y":60,"wires":[]},{"id":"aff3fdcf.d275d","type":"mqtt out","z":"cba40915.308b38","name":"","topic":"services/heidenhaindncexample/getState/req","qos":"0","retain":"false","broker":"b7832f1d.e9d4e","x":630,"y":200,"wires":[]},{"id":"ddec5b0c.c0c418","type":"mqtt in","z":"cba40915.308b38","name":"","topic":"services/heidenhaindncexample/getState/res","qos":"0","datatype":"auto","broker":"b7832f1d.e9d4e","x":230,"y":300,"wires":[["e1df9994.c3edc8"]]},{"id":"21f886a8.ac3a2a","type":"debug","z":"cba40915.308b38","name":"","active":true,"tosidebar":true,"console":false,"tostatus":false,"complete":"false","statusVal":"","statusType":"auto","x":650,"y":300,"wires":[]},{"id":"dc2c1840.954bb8","type":"comment","z":"cba40915.308b38","name":"getState request","info":"","x":140,"y":160,"wires":[]},{"id":"668e0f37.4f5","type":"comment","z":"cba40915.308b38","name":"getState response","info":"","x":150,"y":266,"wires":[]},{"id":"ec1150ad.7a23d","type":"inject","z":"cba40915.308b38","name":"Trigger "getToolTableRow" request (see here for payload)","props":[{"p":"payload"},{"p":"topic","vt":"str"}],"repeat":"","crontab":"","once":false,"onceDelay":0.1,"topic":"","payload":"{"id":"2","params":["42"]}","payloadType":"json","x":270,"y":498,"wires":[["d317feb3.3eb0b","4c3ab86e.f653b8"]]},{"id":"d317feb3.3eb0b","type":"mqtt out","z":"cba40915.308b38","name":"","topic":"services/heidenhaindncexample/getToolTableRow/req","qos":"0","retain":"false","broker":"b7832f1d.e9d4e","x":720,"y":498,"wires":[]},{"id":"5a2f9aca.f82724","type":"mqtt in","z":"cba40915.308b38","name":"","topic":"services/heidenhaindncexample/getToolTableRow/res","qos":"0","datatype":"auto","broker":"b7832f1d.e9d4e","x":260,"y":600,"wires":[["3ad07f7c.3bf85"]]},{"id":"b888e063.a8f84","type":"debug","z":"cba40915.308b38","name":"","active":true,"tosidebar":true,"console":false,"tostatus":false,"complete":"false","statusVal":"","statusType":"auto","x":710,"y":600,"wires":[]},{"id":"65db090f.922aa8","type":"comment","z":"cba40915.308b38","name":"getToolTableRow request","info":"","x":170,"y":458,"wires":[]},{"id":"23d593fd.e852ac","type":"comment","z":"cba40915.308b38","name":"getToolTableRow response","info":"","x":170,"y":564,"wires":[]},{"id":"3ad07f7c.3bf85","type":"json","z":"cba40915.308b38","name":"","property":"payload","action":"","pretty":false,"x":550,"y":600,"wires":[["b888e063.a8f84"]]},{"id":"e1df9994.c3edc8","type":"json","z":"cba40915.308b38","name":"","property":"payload","action":"","pretty":false,"x":490,"y":300,"wires":[["21f886a8.ac3a2a"]]},{"id":"9fd44184.a11d1","type":"debug","z":"cba40915.308b38","name":"","active":true,"tosidebar":true,"console":false,"tostatus":false,"complete":"false","statusVal":"","statusType":"auto","x":530,"y":160,"wires":[]},{"id":"4c3ab86e.f653b8","type":"debug","z":"cba40915.308b38","name":"","active":true,"tosidebar":true,"console":false,"tostatus":false,"complete":"false","statusVal":"","statusType":"auto","x":590,"y":460,"wires":[]},{"id":"b7832f1d.e9d4e","type":"mqtt-broker","z":"","name":"Connectware","broker":"connectware","port":"1883","clientid":"","usetls":false,"compatmode":false,"keepalive":"60","cleansession":true,"birthTopic":"","birthQos":"0","birthPayload":"","closeTopic":"","closeQos":"0","closePayload":"","willTopic":"","willQos":"0","willPayload":""}]
Code-Sprache: YAML (yaml)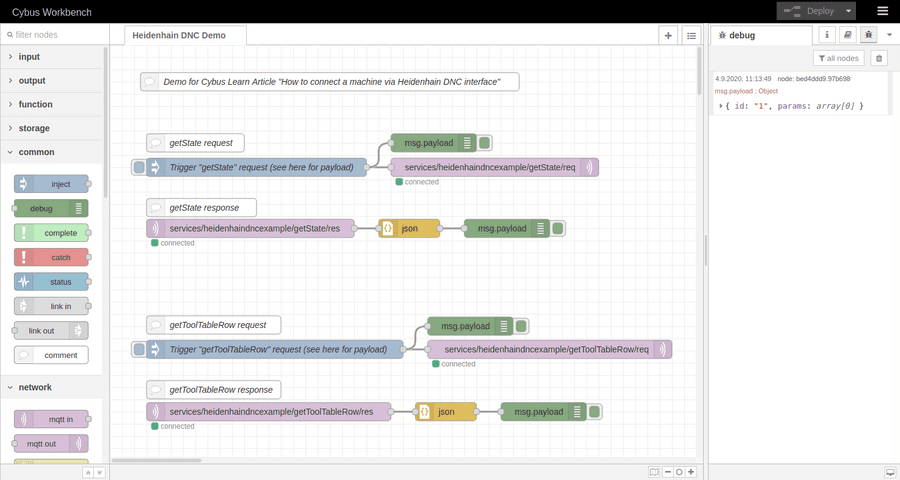
Summary
In this article we went through the process of setting up a connection between a Heidenhain controller and the Cybus Connectware via the Heidenhain DNC interface. This required the Cybus Heidenhain agent to translate between Connectware and Heidenhain DNC by making use of the RemoTools SDK. We wrote the commissioning file that set up the Connectware service which connected to an emulated instance of a TNC 640 and requested and received information about the tool with ID 42. This or any other data from the Heidenhain DNC interface could now securely be vertically integrated along with data from any other interface through the unified API of Connectware.
Where to Go from Here
Connectware offers powerful features to build and deploy applications for gathering, filtering, forwarding, monitoring, displaying, buffering, and all kinds of processing data… why not build a dashboard for instance? For guides check out more of Cybus Learn.
Need more help?
Can’t find the answer you’re looking for?
Don’t worry, we’re here to help.