


How to Connect an MQTT Client to Publish and Subscribe Data
Prerequisites
This lesson will explain how to connect and use an MQTT client utilizing Cybus Connectware. To understand the basic concepts of Connectware, check out the Technical Overview lesson. To follow along with the example, you will also need a running instance of Connectware. If you don’t have that, learn Installing Connectware. And finally this article is all about communication with MQTT clients. So unlikely but if you came here without ever having heard about MQTT, head over to our MQTT Basics lesson.
Introduction
This article will teach you the integration of MQTT clients. In more detail, the following topics are covered:
- Creating client credentials and permissions
- Using the client registration feature
- Establishing connection with a client
- Publishing data
- Subscribing data
Selecting the Tools
In this lesson we will utilize a couple of MQTT clients, each fulfilling a different purpose and therefore all having their right to exist.
Mosquitto
Mosquitto is an open source message broker which also comes with some handy client utilities. Once installed on your system it provides the mosquitto_pub and mosquitto_sub command line MQTT clients which you can use to perform testing or troubleshooting, carried out manually or scripted.
MQTT Explorer
MQTT Explorer is an open-source MQTT client that provides a graphical user interface to communicate with MQTT brokers. It offers convenient ways of configuring and establishing connections, creating subscriptions or publishing on topics. The program presents all data clearly and in well organized sections but also enables the user to select which data should appear on the monitor, should be hid or dumped in a file. Additionally it provides tools to decode the payload of messages, execute scripts or track the broker status.
Workbench
The Workbench is part of the Cybus Connectware. It is a flow-based, visual programming tool running a Node-RED instance to create data flows and data pre-processing on level of Connectware. One way to access data on Connectware utilizing the Workbench is via MQTT. The Workbench provides publish and subscribe nodes which serve as data sources or sinks in the modeled data flow and allows users to build applications for prototyping or debugging. But it is capable of a lot of more useful functions and nodes, for instance creating dashboards.
Configuring Connectware
To connect users to Connectware, they need credentials for authorization. There are two ways to create credentials:
- Via the Edit User dialog.
- Via the client registration feature.
Creating Client Credentials and Permissions
- On the navigation panel, click User.
- Click Add User.
- In the Create User dialog, enter the Username and Password. For this example, we create the following users. The user for our Mosquitto client will be created in the following section using the client registration feature.
- Before a user can access a MQTT topic, the user must be granted
read,write, orreadWritepermissions. These are equivalent to subscribe, publish, or subscribe and publish. In the Users and Roles list, click the user for which you want to add permissions. - In the Edit User dialog, click Advanced Mode.
- Click the + icon to open the Add Permissions panel.
- Click MQTT.
- In the Topic field, enter
clients/#. This gives the selected user access to theclientstopic. The wildcard#gives access to any topic that is hierarchically belowclients. For example,clients/status/active. - Click Add.
- Click Update.
Using the Client Registration Feature
The second way of creating credentials for a user is the client registry process (also referred to as self registration). There are two variants of this process: The implicit form works with any MQTT client while the explicit form is for clients that use the REST API. In this lesson we will only look at the implicit variant. If you want to learn more on self registration and both of its forms, please consult the Reference docs.
We will now step through the process of implicit client registration. At first we need to activate the self registration: In the Connectware Admin UI navigate to User > Client Registry and click Unlock. This will temporarily unlock the self registration for clients. The next step is that the client tries to connect to Connectware with a username that does not yet exist.
We utilize the mosquitto_sub client for this which is especially easy because we just need to use the command mosquitto_sub -h localhost -p 1883 -u Mosquitto -P 123456 -t clients assuming we are running Connectware on our local machine and want to register the user Mosquitto with the password 123456 (you should of course choose a secure password). The topic we chose using option -t is not relevant, this option is just required for issuing the command. We will explain this command in detail in the section about subscribing data.
Shortly after we have issued this command and it exited with the message „Connection error: Connection Refused: not authorized.“ we can look at the Client Registry in the Admin UI and see the connection attempt of our Mosquitto client.
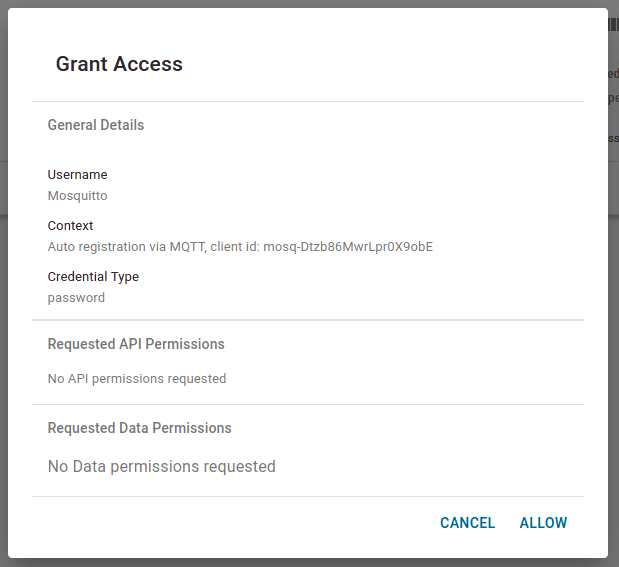
Clicking an entry in the list opens the Grant Access dialog. This summarizes the details of the request and the permissions requested. You can only request permissions using the explicit method. To grant access to this client and create a user, click Allow.
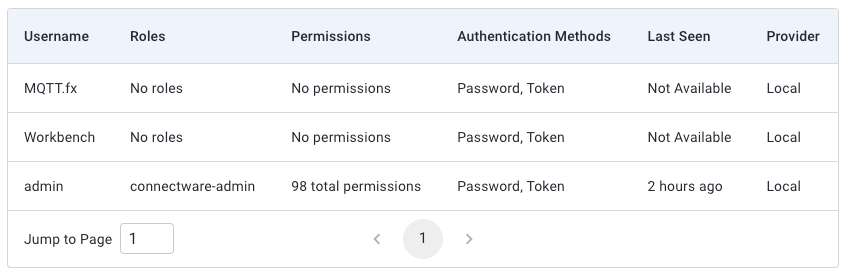
On the navigation bar, click User to see the newly created user „Mosquitto“. Since we are using the implicit method we now need to manually add permissions to the accessible topics as we did before.
Establishing Connection with a Client
We are now ready to connect our clients to Connectware via MQTT.
Mosquitto
We already made use of the client functions of Mosquitto by utilizing it for our self registration example. That also suggested that we do not explicitly need to establish a connection before subscribing or publishing, this process is included in the mosquitto_sub and mosquitto_pub commands and we supply the credentials while issuing.
MQTT Explorer
Using MQTT Explorer, we need to configure the connection.
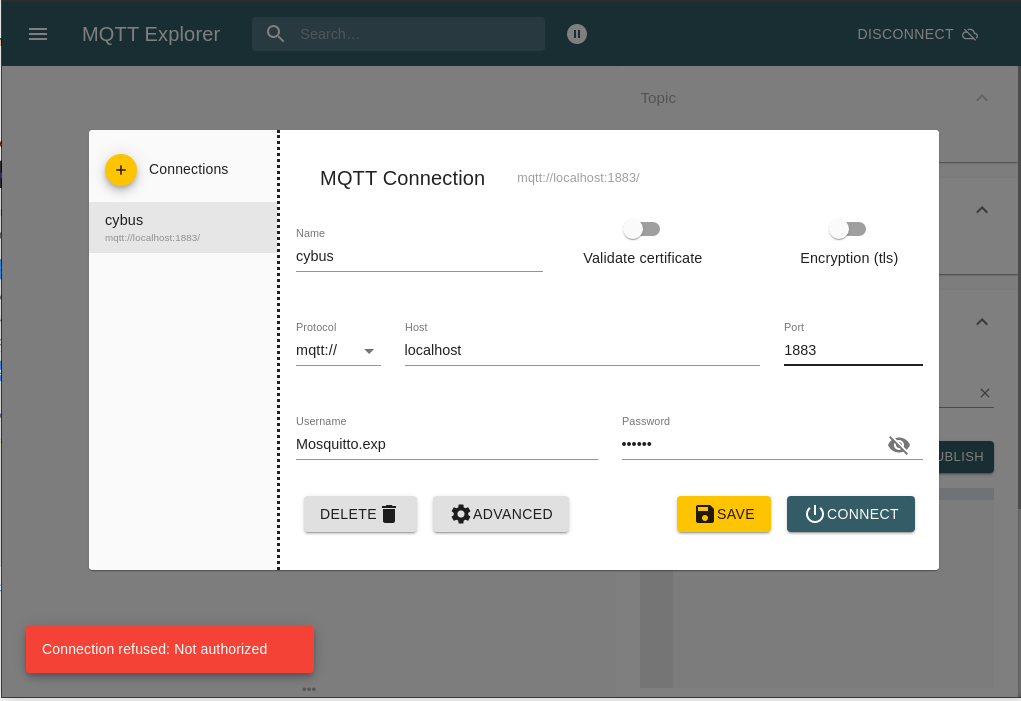
First we create a new connection by clicking the plus (+) in the top left corner. We name the new profile „cybus“ and define the host as „localhost“ (exchange this with the address you are running your Connectware on). Then fill out the user credentials. All other settings can remain default for this example. We also need to perform client registry since it is another client otherwise we get an error as show at the bottom left corner.
Workbench
The Workbench can be accessed through the Admin UI by clicking Workbench in the navigation bar. A new tab will open showing the most recent edited flow of our Workbench. If it is empty you can use this otherwise click the (+) button to the upper right of the actual shown flow. If you are new to the Workbench, we won’t go into details about the functions and concepts in this lesson but it will demonstrate the most simple way of monitoring data with it.
Take a look at the left bar: There you see the inventory of available nodes. Scrolling down you will find the section network containing two MQTT nodes among others. The so-called mqtt in and mqtt out nodes represent the subscribe and publish operations. Drag the mqtt out node and drop it on your flow, double-clicking it will show you its properties. The drop-down-menu of the Server property will allow you to add a new mqtt broker by clicking the pencil symbol next to it.
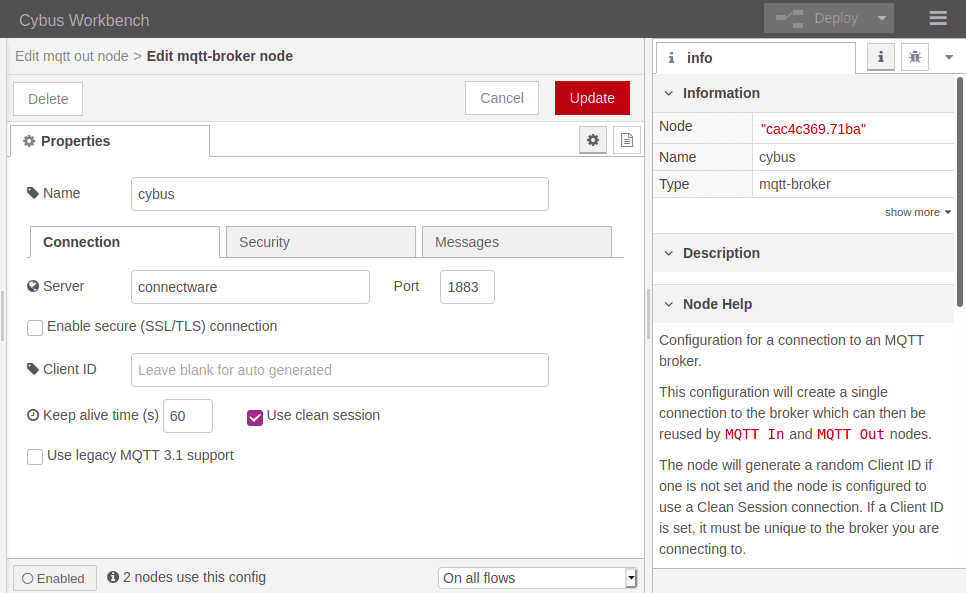
We name this new connection „cybus“ and define the server address as connectware. This is the way to address the local running Connectware, you won’t be able to access it using localhost! Now switch to the Security tab and fill in username and password. Save your changes by clicking Add in the upper right corner. Make sure the just created configuration is active for the Server property. For the property Topic we choose the topic we selected for our clients: clients/workbench. The other properties will keep their default settings. Click Done in the upper right corner.
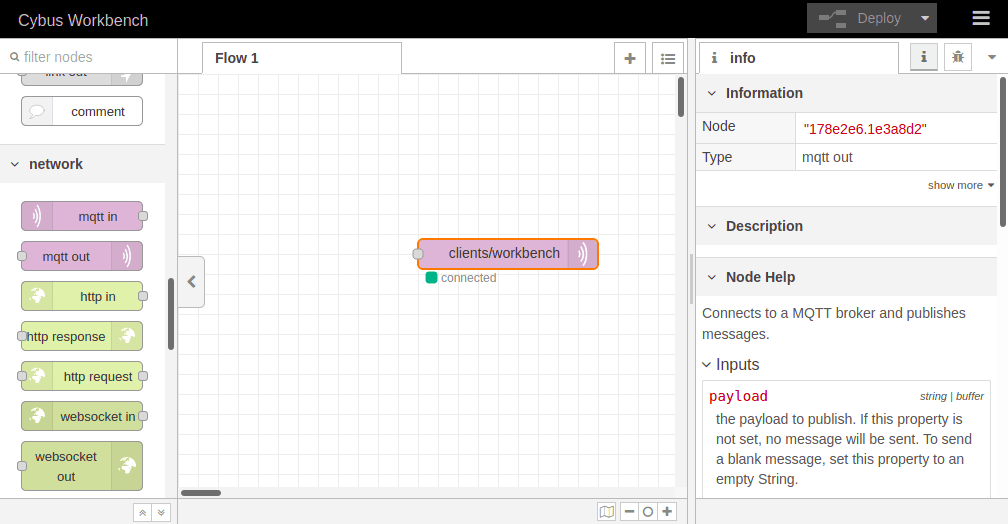
To apply the changes we just made click the button Deploy in the upper right corner. This will reset our flow and start it with the latest settings. You will now see that the MQTT node is displayed as „connected“, assuming everything was configured correctly. We successfully established a connection between the Workbench and our Connectware.
Publishing Data
Publishing data allows us to make it available. It does not necessarily mean that someone is actually receiving it but anyone with the permission to subscribe on the concerning topic could.
Mosquitto
Using Mosquitto publishing data can be achieved by a single command line utilizing mosquitto_pub. For this example we want to connect to Connectware using the following options:
- Host to connect to:
-h localhost - Port to connect to:
-p 1883 - Username:
-u Mosquitto - Password:
-P 123456 - Topic to publish on:
-t clients/mosquitto - Message:
-m "Hello World"
mosquitto_pub -h localhost -p 1883 -u Mosquitto -P 123456 -t clients/mosquitto -m "Hello World"
If successful the command will complete without any feedback message. We could not confirm yet if our message arrived where we expected it. But we will validate this later when coming to subscribing data.
MQTT Explorer
Publishing with MQTT.fx is even simpler once the connection is configured and a connection is established (indicated by the gray/green circle in the upper right corner). If the indicator shows green, we are connected and ready to shoot some messages.
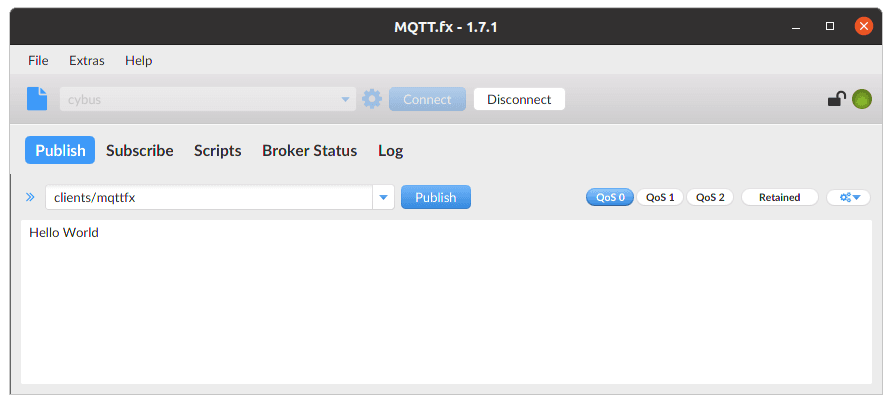
Switch to the Publish section. In the input line next to the Publish-button you define the topic you want to publish to. We will go for the topic clients/mqttfx. Then you click the big, blank box below and type a message, e.g. „Hello World“. To publish this message click Publish.
Again we have no feedback if our message arrived but we will take care of this in the Subscribing data section.
Configure the Workbench as Data Source
We already added a publishing node to our flow when we established a connection to Connectware and configured it to publish on clients/workbench. Having this set the Workbench is ready to publish but the messages are still missing.
At this point we want to create a data source in our flow which periodically publishes data through the mqtt out node. We simply drag an inject node from the nodes bar into our flow and drop it left to the mqtt out node. Now we can draw a connection from the small gray socket of one to the other node.
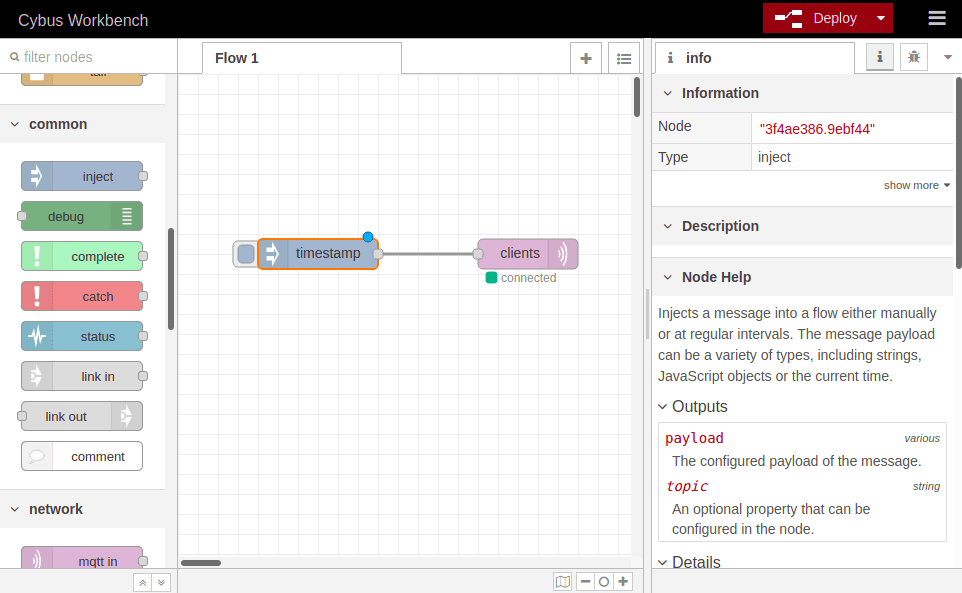
Double-clicking the inject node, which is now labeled „timestamp“, shows its properties. We can define the payload, but we will keep „timestamp“, declare a topic to publish to, which we leave blank because we defined the topic in out MQTT node, and we can set if and how often repeated the message should be injected in our flow. If we do not define repeating a message will be injected only if we click the button on the left of the inject node in our flow.
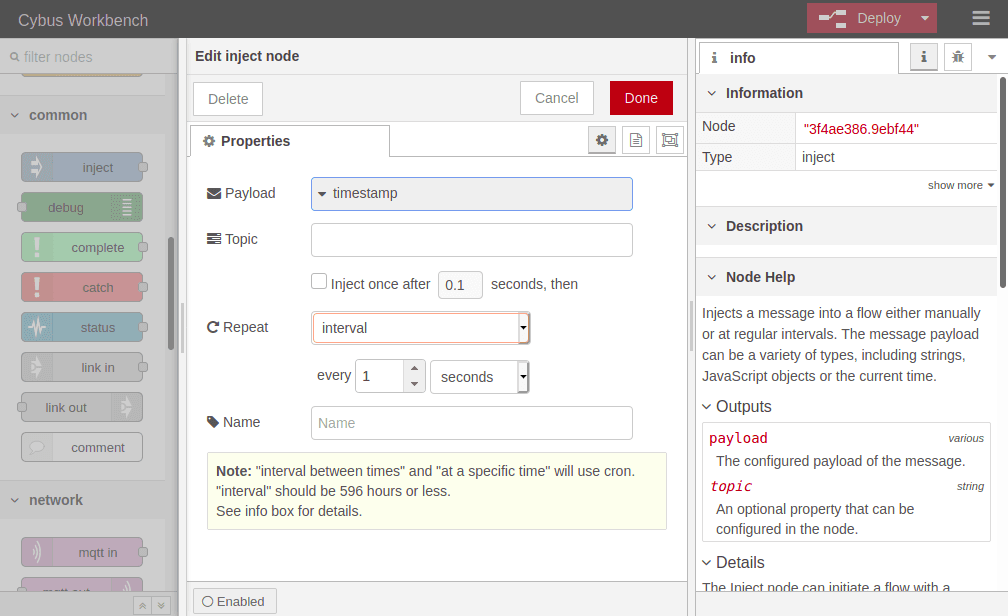
We set repeating to an „interval“ of every second and confirm the settings by clicking Done in the upper right corner. Now we have to Deploy again to apply our changes. We still have no confirmation that everything works out but we are confident enough to go on and finally subscribe to the data we are generating.
Subscribing Data
Subscribing data means that the client will be provided with new data by the broker as soon as it is available. Still we do not have a direct connection to the publisher, the broker is managing the data flow.
Mosquitto
We already used mosquitto_sub to self register our client as a user. We could have also used mosquitto_pub for this but now we want to make use of the original purpose of mosquitto_sub: Subscribing to an MQTT broker. Not any broker but the broker of our Connectware.
We are using the following options:
- Host to connect to:
-h localhost - Port to connect to:
-p 1883 - Username:
-u Mosquitto - Password:
-P 123456 - Topic:
-t clients/workbench
mosquitto_sub -h localhost -p 1883 -u Mosquitto -P 123456 -t clients/workbench
Again make sure that you have specified the address of your Connectware as host which does not necessarily have to be your local machine! We will subscribe to the topic clients/workbench where we are publishing the messages from our Workbench.
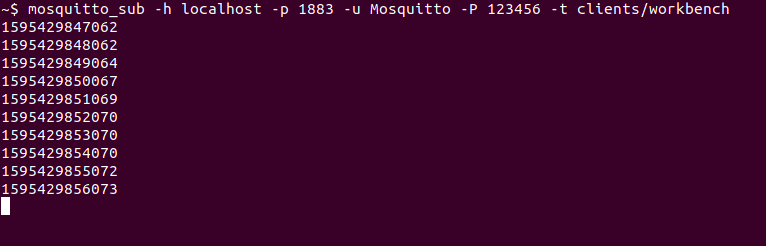
And Tada! The mosquitto client now shows us every new message published on this topic – in this case the timestamps generated by our Workbench.
MQTT Explorer
Already having the connection to our Connectware established it is a piece of cake to subscribe to a topic. On the left side under localhost, we can see the messages coming:
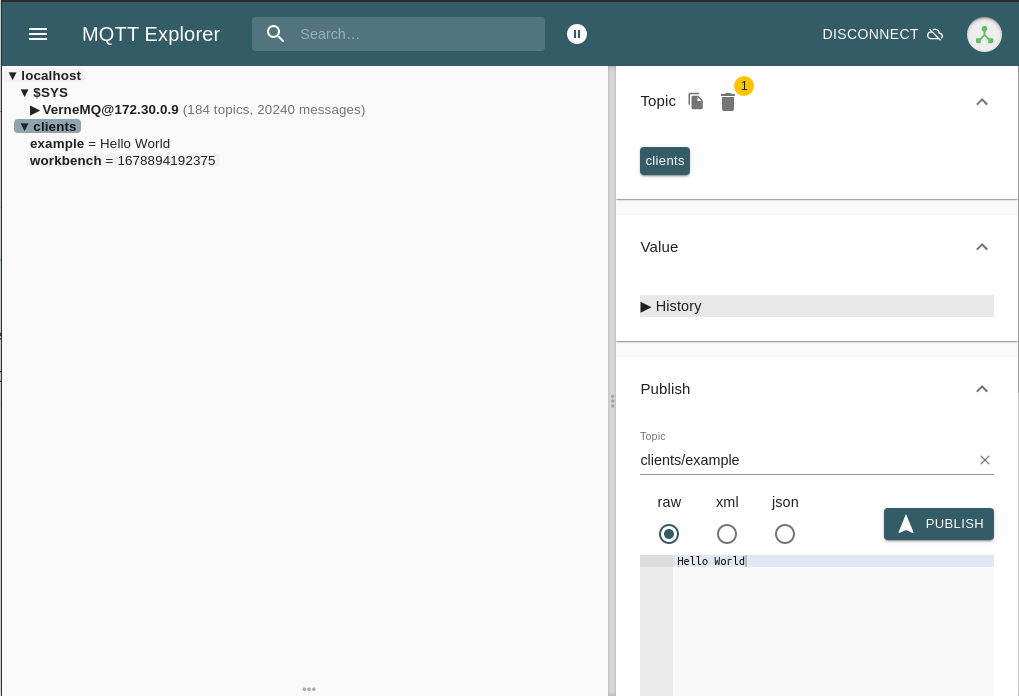
And there you see finely presented all the data flying in. You can also add more topics to be monitored simultaneously and manage which should be presented to you or be dumped in a file.
Workbench
Eventually we will utilize the Workbench to monitor our data. But why just monitor it? The Workbench has a lot more to offer and exploring it will quickly give you a hint which possibilities lie ahead. But we will focus on that in another lesson.
At first we add an mqtt in node to the flow where we already created the data generator. Double-clicking it we choose the previously configured server „cybus“ and the topic clients/#. The wildcard # defines, that we subscribe to every topic under clients. Be careful using wildcards since you could accidentally subscribe to a lot of topics which could possibly cause very much traffic and a message output throwing data from all the topics in a muddle. Confirm the node properties by clicking Done and add a debug node to the flow. Draw a connection from the mqtt in to the debug node and Deploy the flow.
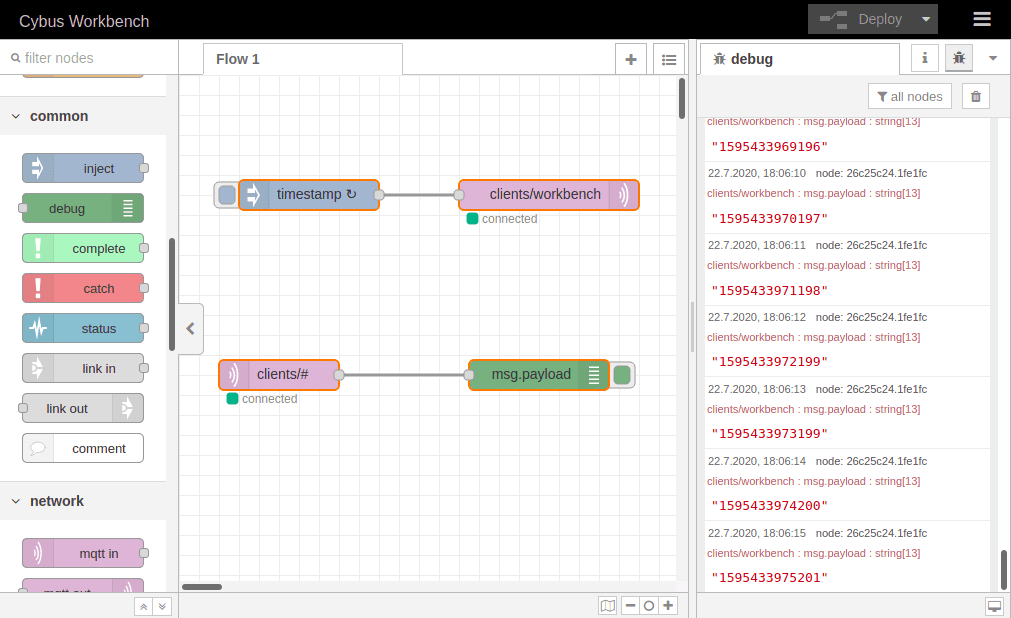
Click the bug symbol in the upper right corner of the information bar on the right. We see there are already messages coming in: They are the timestamp messages created in the very same flow but taking a detour via the MQTT broker before plopping in our debug window. They are messing up the show so let us just cut the connection between the „timestamp“ node and the publish node by selecting the connection line and pressing Del and Deploy the flow one more time.
Now that we have restored the quiet, let us finally validate if publishing with mosquitto_pub and MQTT.fx even works out. So issue the mosquitto_pub command again and also open MQTT.fx and publish a message like we did in the section before.
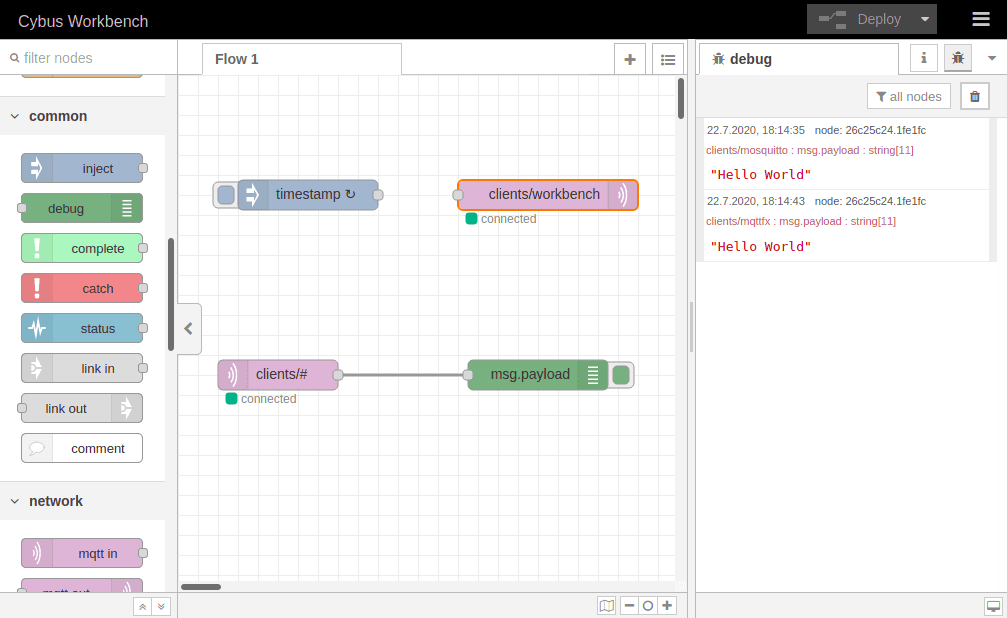
Et voilà! We can see two „Hello World“ messages in our debug window and looking at the topics they were published on (written small in red right above the message text) we learn that one came from Mosquitto and the other from MQTT.fx.
Summary
This was quite a journey! We started in the realms of Connectware, created credentials and permissions, learned about the magic of self registration and the trinity of MQTT clients. We went on and established connections between clients and brokers and sent messages to unobserved topics, struggling with the uncertainty of whether their destinations will ever be reached. But we saw light when we discovered the art of subscribing and realized that our troubles had not been in vain. In the end we received the relieving and liberating call of programmers: „Hello World“!
Where to Go from Here
Connectware offers powerful features to build and deploy applications for gathering, filtering, forwarding, monitoring, displaying, buffering, and all kinds of processing data… why not build a dashboard for instance? For guides check out more of Cybus Learn.
Need more help?
Can’t find the answer you’re looking for?
Don’t worry, we’re here to help.