


Custom Connectors
Connectware supports a wide range of communication protocols out of the box. However, if you need to connect to a device or sensor that is not yet supported by the Protocol Mapper, you can develop a custom connector.
Custom connectors allow you to add custom connection and endpoint resources to integrate self-developed or less common protocols. You can develop custom connectors, deploy and test them to finally integrate them.
Related Links
Connectware Connectivity Portfolio
Prerequisites
This article assumes that you are familiar with the following topics:
Architecture of Custom Connectors
Custom connectors are based on the base image of the Protocol Mapper. You can deploy and start custom connectors as agents.
- Base image of the Protocol Mapper
The Protocol Mapper base image is a Docker image of the Protocol Mapper without pre-built communication protocols, but with the ability to communicate with Connectware via MQTT. This image allows you to implement your specific communication protocol methods and send data to Connectware. - Agents
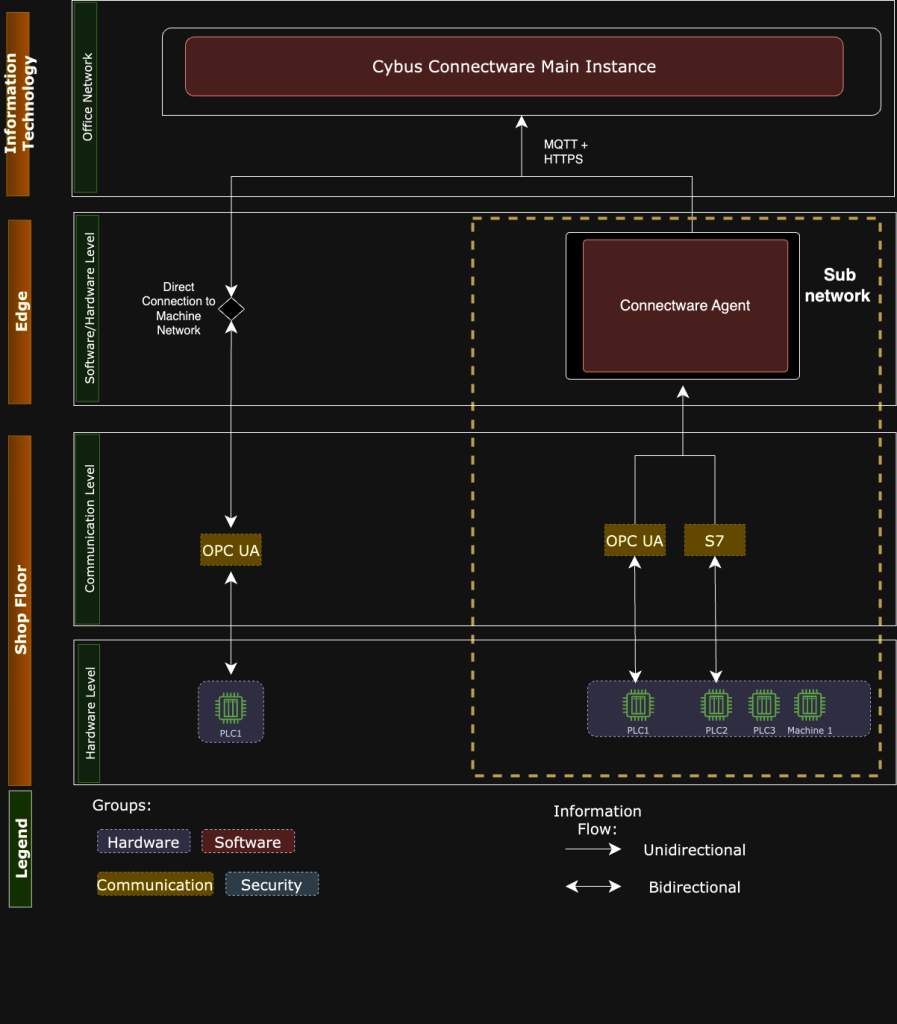
Agents are additional components of Connectware that you can deploy and start individually, usually somewhere outside of your central Connectware installation. For example, on an edge device near a machine or on the shop floor.
You can use agents to communicate with machines that are not on the centralized Connectware network, to distribute the data load across multiple edge devices, or to implement custom connectors. Agents must be on a network that allows them to connect to both the Connectware instance and the machine or sensor that you want to read.
Related Links
Example of the Connectware Architecture
Below is a typical Connectware architecture that uses agents to reach subnetworks or production lines that the main Connectware instance cannot reach.
Developing Custom Connectors
Note: For the following custom connector development example, we provide a sample base repository on GitHub. We recommend that you clone the base repository and follow the custom connector development guide below.
Sample base repository:
https://github.com/cybusio/custom-connector-tcp-example
Code-Sprache: YAML (yaml)
This base repository has the following structure:
├── Dockerfile
├── examples
│   └── service.yaml
├── package.json
├── package-lock.json
├── README.md
└── src
    ├── CustomConnection.js
    ├── CustomConnection.json
    ├── CustomEndpoint.js
    ├── CustomEndpoint.json
    └── index.js
Code-Sprache: YAML (yaml)service.yamlis the sample service commissioning file.CustomConnection.jsandCustomEndpoint.jscontain the basic connection and data handling methods.CustomConnection.jsonandCustomEndpoint.jsonare the JSON Schemas that contain the configuration parameters.
Methods for Custom Connectors
To implement a custom connector, you need to implement certain methods. The most common methods are Connection and DataHandle.
Connection Methods
Connection methods establish connections to machines and handle disconnect and reconnect scenarios. Your protocol connection must typically implement the following Connection methods:
handleConnecthandleDisconnecthandleReconnect
DataHandle Methods
To handle the data, implement the following DataHandle methods:
handleReadhandleWritehandleSubscribe/handleUnsubscribe(optional, otherwise a cron-based polling ofread()is provided)
Implementing Connection Methods
To update the process with the correct state, the Connection methods handleConnect, handleDisconnect, and handleReconnect must call the appropriate transition methods of the base class.
The image below shows the different state machines and how they relate to the handle methods:
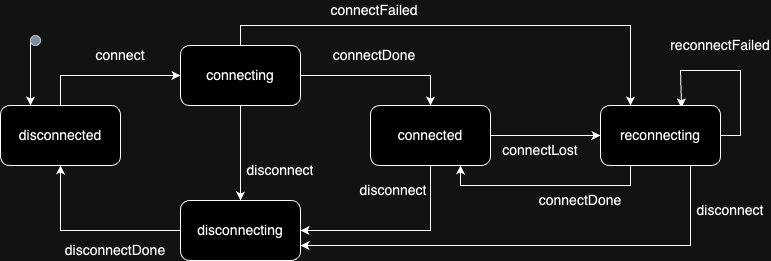
Example: Your handleConnect method will probably start a network operation that receives a callback method that is called when the operation completes successfully or unsuccessfully. In this callback, you must call this.connectDone or this.connectFailed to trigger the correct state transition so that all other hooks and event listeners follow up correctly.
Connection Methods With and Without a Disconnect Method
You need to consider two types of Connection methods: The ones that require both a connect and a disconnect method and the ones that require only a connect method, even when reconnecting.
Connect and Disconnect
- To create variables and objects on connection, add them to your
handleConnectmethod. - To delete variables and objects on disconnection or before a new connection attempt, add them to your
handleDisconnectmethod. - To delete variables and objects first and then recreate them when reconnecting, add them to your
handleReconnectmethod.
It is recommended that you add a private method to your class that creates the variables and objects, another private method that deletes them, and call them via the handleConnect, handleDisconnect, and handleReconnect methods.
Connect without Disconnect
- To create variables and objects that are static, add them to the
constructorof your derived implementation class.
Reconnecting
- Depending on what your client protocol library does, it can be sufficient to listen to all error events from your client, pass them to the connection state machine by calling e.g.
this.connectLost, and implement thehandleReconnectmethod with correct deletion and recreation of your connection objects. However, pay attention to what your client library is doing. The reconnect mechanism of the connection state machine will just start callinghandleReconnectwith an increasing delay (as configured by the connectionStrategy section in the user parameters).
Code Example for Implementing Connection Methods
The following code example uses the host and port parameters to establish a TCP connection in the CustomConnection.js file. First, you specify the host and port, then you define your handleConnect method, which calls the createConnection method and opens a TCP connection.
You can call the different states with the following methods:
connectFailedreconnectFailedconnectDone
class CustomConnection extends Connection {
    constructor(params) {
        super(params)
        this._host = params.connection.host
        this._port = params.connection.port
        this._client = new Client()
        this._client
            .on('error', err => { console.log('err:', err.message) })
            .on('close', this._onClose.bind(this))
    }

    // Protocol implementation interface method
    async handleConnect() {
        await this._createConnection();
    }

    async _createConnection() {
        try {
            await this._client.connect(this._host, this._port)
        } catch (err) {
            switch (this.getState()) {
                case 'connecting':
                    this.connectFailed(err.message)
                    break
                case 'reconnecting':
                    this.reconnectFailed(err.message)
                    break
            }
            return
        }

        this.connectDone()
    }
Code-Sprache: YAML (yaml)
Implementing DataHandle Methods
There are 2 sets of DataHandle methods:
handleRead/handleWritefor single-message data (similar to POST and GET behavior)handleSubscribe/handleUnsubscribefor data subscriptions (similar to MQTT behavior)
If you implement data subscription in your client library, you must implement the handleSubscribe/handleUnsubscribe method pair. Again, this is optional because we can achieve similar behavior by calling the handleRead on schedule. Those receive the address object from the configuration file as first parameter, which in turn was defined in the JSON Schema (CustomEndpoint.json).
Your actual protocol addresses are in the properties of this object according to your JSON Schema. The second argument is the JavaScript callback method which must be called on each data reception, i.e. just like an event listener method. In order to properly unregister that method, your handleUnsubscribe method will receive the same callback method argument so that you can properly unregister it if needed.
Code Example for Implementing DataHandling Methods (1)
async handleSubscribe (address, onData) {
  this._log.info(address, 'handleSubscribe')
  this._client.on(address, onData)
  return this._client.subscribe(address)
}

async handleUnsubscribe (address, onData) {
  this._log.info(address, 'handleUnsubscribe')
  this._client.removeListener(address, onData)
  return this._client.unsubscribe(address)
}
Code-Sprache: YAML (yaml)
For single-message data read and write, you need to implement handleRead/handleWrite, which similarly receives the address as defined in the JSON Schema (CustomEndpoint.json) and the callback that needs to be called with the result.
Code Example for Implementing DataHandling Methods (2)
// Protocol implementation interface method (called for READ and SUBSCRIBE Endpoints)
async handleRead(address, requestData = {}) {
    const data = await this._client.read(address.address)
    return data
}

// Protocol implementation interface method (called for WRITE Endpoints)
async handleWrite(address, writeData) {
    const data = await this._client.write(address.address, writeData)
    return data
}
Code-Sprache: YAML (yaml)
Specifying Custom Configuration Parameters
The set of all available parameters for each class is described using a JSON Schema. The following code example contains JSON Schemas for all properties (connection parameters) that you can configure in all Connectware resources.
The JSON Schema descriptions are stored in files next to the JavaScript files but with a .json suffix. For example, for Connection.js, the properties are described in the file Connection.json file right next to the JavaScript file. For each derived protocol connection, there must also be JSON Schema files for connection and endpoint.
Related Links
Creating a JSON Schema (json-schema.org)
Code Example for Specifying Custom Configuration Parameters
For the derived connection classes, you must implement a static getCustomSchema method, as shown in the following code example:
const schema = require('./CustomConnection.json');

class CustomConnection extends Connection {
    constructor(params) {
        ....
    }

    // Protocol implementation interface method
    static getCustomSchema() {
        return { ...schema };
    }
Code-Sprache: YAML (yaml)
The JSON Schemas of the derived classes will contain the properties that are specific to that particular connection.
Note: We recommend to add descriptions to all properties.
The object with all properties from the JSON Schema will be passed into the constructor in the base classes, which is then available as this._connection member variable (or this._address in the endpoint) during runtime.
Deploying Custom Connectors
Since a custom connector is based on a pre-built Docker image, you must pass the image tag to the build command. In the code example, the recent BASEIMAGE_VERSION tag is 1.1.1.
- To start and deploy your custom connector, write a
docker-compose.ymlfile. The following code example starts the agent with a server:
docker-compose build --build-arg BASEIMAGE_VERSION=1.1.1
Code-Sprache: YAML (yaml)
version: "2.4"
services:
# Run the example server
server:
build: .
network_mode: host # Using host network
entrypoint: ''
command: sh -c 'cd /app/src/protocols/custom/utils && node runServer.js'
agent:
build: .
network_mode: host # Using host network
volumes:
- agentData:/data
environment:
CYBUS_MQTT_HOST: localhost # Asuming Cybus Connectware to be reachable on local system
CYBUS_AGENT_MODE: distributed
CYBUS_AGENT_NAME: CustomConnectorAgent
CYBUS_LOG_LEVEL: info
volumes:
agentData:
Code-Sprache: YAML (yaml)- To start your custom connector, use the following code:
docker-compose up -d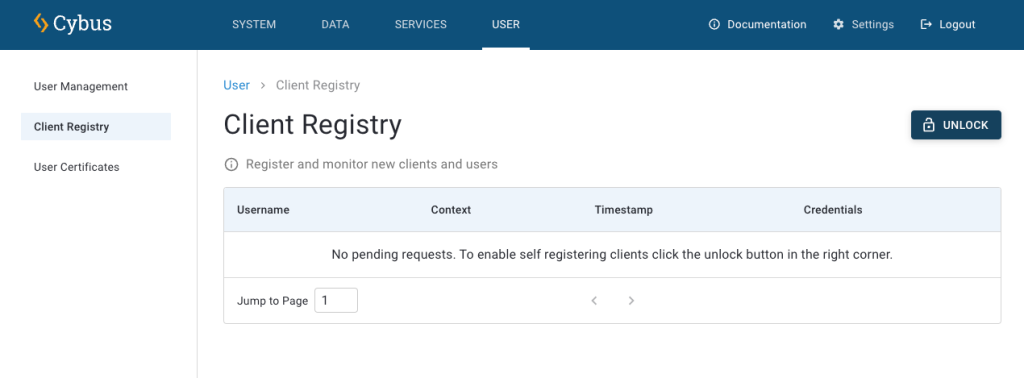
Code-Sprache: YAML (yaml)- To register the custom connector as an agent in Connectware, log into Connectware and select User > Client Registry.
- Click Unlock to allow the agent to register with Connectware.
- Once the client is registered, click it.
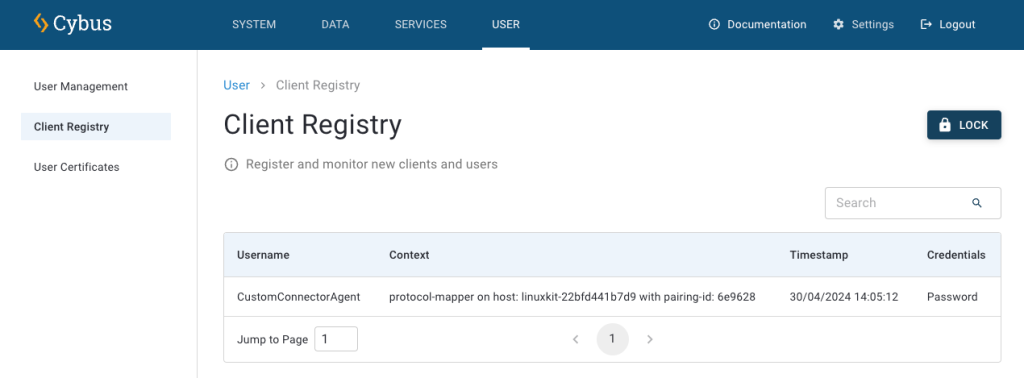
- In the Grant Access dialog, click Allow. By default, the default permissions are assigned to the client.
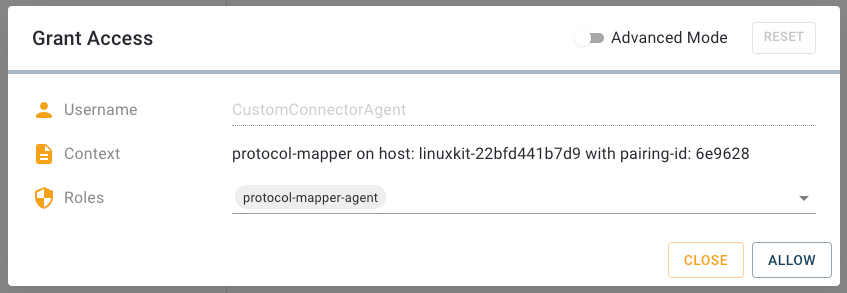
Result: You can now use your custom connector.
Using Custom Connectors
You can use your custom connectors via service commissioning files, just like you use agents.
Code Example of a Service Commissioning File Template
In this example, you establish the connection via the agent and use the endpoints to fill in the required parameters for the corresponding protocol. Make sure that the agent name matches the agent name that you have specified in the docker-compose.yml file above.
Now, you can develop your data model on the MQTT broker in Connectware like any other service, for example, via mappings.
parameters:

  agentName:
    type: string
    description: Agent Name
    default: custom-connectware-agent # make sure it matches CYBUS_AGENT_NAME

resources:

  customConnection:
    type: Cybus::Connection
    properties:
      protocol: custom-protocol
      agentName: !ref agentName
      connection:
        host: localhost
        port: 50001


  ReadStatus:
    type: Cybus::Endpoint
    properties:
      protocol: custom-connector
      connection: !ref customConnection
      subscribe:
        function: read_status
        interval: 1000
Code-Sprache: YAML (yaml)Need more help?
Can’t find the answer you’re looking for?
Don’t worry, we’re here to help.