This Cybus Docker guide provides a detailed procedure to help admins adjust the persistent volume content permissions to ensure a smooth upgrade to Connectware 1.5.0 in Docker Compose environments.
Important: Connectware 1.5.0 introduces a significant change regarding container privileges. Now, containers are started without root privileges. This change causes an issue where files that persisted on volumes that were created by a user other than the one accessing them, cannot easily have their permissions changed. As a result, this upgrade requires the admin to manually update the permissions.
Attention: The following protocols may not operate as expected in some constellations:
If you experience problems with these protocols after upgrading to Connectware 1.5.0 (or higher), these affected services may require root permissions and are no longer supported by the internal protocol-mapper or agents without root permissions.
In this case, you should transfer the service that uses these protocols to a separate agent. This agent can have higher permissions but in a controlled manner.
To learn how to configure an agent to run with root permissions, see the section on agent orchestration.
As an additional step to this upgrade, we provide a docker-compose.override.yml file to help you configure volume permissions.
The upgrade procedure consists of the following steps:
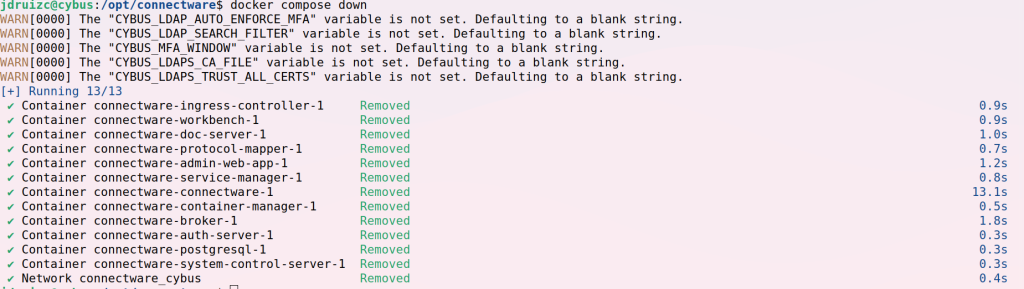
docker-compose.override.yml in the same folder as your Connectware docker-compose.yml.docker-compose.override.yml file.connectware-online-installer.sh script./opt/connectware), run docker compose down.sudo or directly as the user root.All containers should be stopped and removed:
docker-compose.override.yml with the following content:version: "2.0"
services:
connectware-fix-permissions:
user: root
image: registry.cybus.io/cybus/connectware-fix-permissions:1.5.0
volumes:
- certs:/mnt/connectware_certs
- brokerLog:/mnt/connectware_brokerLog
- brokerData:/mnt/connectware_brokerData
- postgresql:/mnt/connectware_postgresql
- service-manager:/mnt/connectware_service-manager
- systemControlServerData:/mnt/connectware_systemControlServerData
- workbench:/mnt/connectware_workbench
admin-web-app:
profiles:
- do-not-start
auth-server:
profiles:
- do-not-start
broker:
profiles:
- do-not-start
connectware:
profiles:
- do-not-start
container-manager:
profiles:
- do-not-start
doc-server:
profiles:
- do-not-start
ingress-controller:
profiles:
- do-not-start
postgresql:
profiles:
- do-not-start
protocol-mapper:
profiles:
- do-not-start
service-manager:
profiles:
- do-not-start
system-control-server:
profiles:
- do-not-start
workbench:
profiles:
- do-not-start
Code-Sprache: YAML (yaml)Download: upgrade-1-5-docker-compose.override.yml
If you already have a docker-compose.override.yml file for your Connectware installation, make sure to rename it before saving it as docker-compose.override.yml.
docker compose up.
sudo or directly as the user root.Example output:
[+] Building 0.0s (0/0)
[+] Running 1/0
✔ Container connectware-connectware-fix-permissions-1  Created                              0.0s
Attaching to connectware-connectware-fix-permissions-1
connectware-connectware-fix-permissions-1  | Found directory: connectware_brokerData. Going to change permissions
connectware-connectware-fix-permissions-1  | Found directory: connectware_brokerLog. Going to change permissions
connectware-connectware-fix-permissions-1  | Found directory: connectware_certs. Going to change permissions
connectware-connectware-fix-permissions-1  | Found directory: connectware_postgresql. Going to change permissions
connectware-connectware-fix-permissions-1  | Postgresql volume identified, using postgresql specific permissions
connectware-connectware-fix-permissions-1  | Found directory: connectware_service-manager. Going to change permissions
connectware-connectware-fix-permissions-1  | Found directory: connectware_systemControlServerData. Going to change permissions
connectware-connectware-fix-permissions-1  | Found directory: connectware_workbench. Going to change permissions
connectware-connectware-fix-permissions-1  | All done. Found 7 volumes.
connectware-connectware-fix-permissions-1 exited with code 0
Code-Sprache: YAML (yaml)docker compose down to remove the temporary permissions fix container.
sudo or directly as the user root.docker-compose.override.yml file.
docker-compose.override.yml for your Connectware before this update, restore your original file.wget https://download.cybus.io/1.5.0/connectware-online-installer.sh
chmod +x connectware-online-installer.sh
./connectware-online-installer.sh
Code-Sprache: YAML (yaml)sudo or directly as the user root.Note: You may need sudo access to install/update Connectware, this is normal, however the new Connectware containers will not have root access once they are running.
After upgrading, you can start Connectware as usual.
Optional: To verify that Connectware services are running with an unprivileged user, you can run this command:
docker ps -qf="label=io.cybus.connectware=core" | xargs -I % docker exec % sh -c 'echo "$(hostname) runs with user ID $(id -u)"'
Code-Sprache: YAML (yaml)
Only the service container-manager should use the user ID 0.
Connectware agents are ideally orchestrated using docker-compose as described in agent orchestration.
To upgrade your agents, do one of the following:
To benefit from the security improvements, we recommend that you adjust volume permissions rather than continuing to run with elevated privileges.
Important: If you are experiencing problems after upgrading to Connectware 1.5.0 (or higher), the affected services may require root permissions. In such cases, it is advisable to choose to run your agents with elevated privileges (see below).
Similar to adjusting permissions for the Connectware instance, we provide a docker-compose.override.yml to help you adjust volume permissions.
The upgrade consists of the following steps:
docker-compose.override.yml in the same folder as your agent’s docker-compose.yml.docker-compose.override.yml file.docker-compose.yml file.docker compose down.
sudo or directly as the user root.docker-compose.override.yml with the following content:version: '2.0'
services:
connectware-fix-permissions:
user: root
image: registry.cybus.io/cybus/connectware-fix-permissions:1.5.0
volumes:
- protocol-mapper-agent:/mnt/connectware_agent_data
protocol-mapper-agent:
profiles:
- do-not-start
Code-Sprache: YAML (yaml)Download: upgrade-1-5-agent-docker-compose.override.yml
If you use a different name for your agent Docker service and volume than our example, you need to adjust the name of the agent to your actual agent’s name (lines 7 and 8 of the example above) and its volume in your docker-compose.yml file.
docker compose up.Example output:
[+] Building 0.0s (0/0)
[+] Running 2/2
✔ Network agent_default                          Created                                                                                                0.1s
✔ Container agent-connectware-fix-permissions-1  Created                                                                                                0.1s
Attaching to agent-connectware-fix-permissions-1
agent-connectware-fix-permissions-1  | Found directory: connectware_agent_data. Going to change permissions.
agent-connectware-fix-permissions-1  | All done. Found 1 volumes.
agent-connectware-fix-permissions-1 exited with code 0
Code-Sprache: YAML (yaml)docker compose down to remove the temporary permissions fix container.
sudo or directly as the user root.docker-compose.override.yml.
docker-compose.override.yml for your agent before this update, restore your original file.1.5.0. If you have not yet upgraded Connectware to at least version 1.5.0, do so now.Example of an agent YAML file for agent running 1.5.0:
version: '2.0'
services:
  protocol-mapper-agent:
    image: registry.cybus.io/cybus/protocol-mapper:1.5.0
    environment:
      CYBUS_AGENT_MODE: distributed
      CYBUS_AGENT_NAME: myAgent
      CYBUS_MQTT_HOST: 172.17.0.1
    volumes:
      - protocol-mapper-agent:/data
    restart: unless-stopped
    network_mode: host
    hostname: myAgent
volumes:
  protocol-mapper-agent:
Code-Sprache: YAML (yaml)
You can now start your agent as usual, for example by running docker compose up -d.
As an alternative to modifying volume permissions, or if you are using a protocol that requires elevated permissions, you can modify your agent’s docker-compose.yml file to specify the user which is used for the container.
user: root to the docker compose service of your agent and set the image tag to the same tag that your current Connectware installation uses.For example (see line 4):
version: '2.0'
services:
  protocol-mapper-agent:
    user: root
    image: registry.cybus.io/cybus/protocol-mapper:1.5.0
    environment:
      CYBUS_AGENT_MODE: distributed
      CYBUS_AGENT_NAME: myAgent
      CYBUS_MQTT_HOST: 172.17.0.1
    volumes:
      - protocol-mapper-agent:/data
    restart: unless-stopped
    network_mode: host
    hostname: myAgent
volumes:
  protocol-mapper-agent:
Code-Sprache: YAML (yaml)docker compose up -d.docker run command, you can add --user=root to the command.Now you know all the prerequisites you need! So we can start with the installation of Connectware. Installing Connectware is made easy using the prebuilt installer script provided by Cybus. To download and use the script follow the steps below.
https://download.cybus.io/<VERSION>/connectware-online-installer.sh
To clarify, in the example below we will use the latest version of Connectware.
$ wget -O ./connectware-online-installer.sh https://download.cybus.io/latest/connectware-online-installer.sh
Code-Sprache: YAML (yaml)$ cat connectware-online-installer.sh
Code-Sprache: YAML (yaml)$ chmod +x ./connectware-online-installer.sh
Code-Sprache: YAML (yaml)The installer script is now ready to be executed.
$ sudo ./connectware-online-installer.sh
Code-Sprache: YAML (yaml)/opt/connectwareIf all requirements are met then you should be able to see the following output:
Running preflight checks.
=========================
Validating write permission to installation location /opt/connectware: [OK]
Checking whether this system has systemd: [YES]
Validating required utility installation: [OK]
Validating Cybus docker-registry connection: [OK]
Validating Docker installation: [OK]
Validating Docker Compose installation: [OK]
Validating that no former Connectware is running: [OK]
Preflight checks finished successfully!
Code-Sprache: YAML (yaml)Verifying license key...
Login succeeded.
Code-Sprache: YAML (yaml)Please choose the startup behavior
-------------------------------------------
Start automatically on boot via system-service? [y/N]
Code-Sprache: YAML (yaml)By following the previously mentioned example, you should be able to see the following output:
Please review and confirm the following Connectware configuration:
------------------------------------------------------------------
Connectware license key:       [VALID]
Installation directory:       /opt/connectware
Autostart as systemd service: true
Accept configuration? [Y/n]
Connectware license key:       [VALID]
Code-Sprache: YAML (yaml)-----------------------------------------
Removing old Docker images
-----------------------------------------
The following Docker images are from previous Connectware versions and can be removed:
REPOSITORY TAG IMAGE ID CREATED SIZE
registry.cybus.io/cybus/admin-web-app *********** e561383a5 24 hours ago 21.5MB
REPOSITORY TAG IMAGE ID CREATED SIZE
registry.cybus.io/cybus/auth-server *********** a65b7f32f 24 hours ago 165MB
REPOSITORY TAG IMAGE ID CREATED SIZE
registry.cybus.io/cybus/broker *********** 80dd0fb24 24 hours ago 56.7MB
(...)
-----------------------------------------
Should the above docker images be removed from your local computer (pruned)? [Y/n]
Code-Sprache: YAML (yaml)If you followed our example, you will get this output in the last step:
Successfully installed Connectware!
===================================
You can find the installation directory at /opt/connectware.
In order to stop type:
systemctl stop connectware
Code-Sprache: YAML (yaml)
Congratulations, you have successfully installed the Cybus Connectware for the first time.
Running the installer with the -s or --silent flag will start the installation in an automated mode without the need of user interaction.
If you want to use this way of deploying Connectware, the license key has to be provided using the --license-key flag.
This deploys Connectware in a minimal configuration to the default /opt/connectware directory without installing the systemd service.
You can further personalize your installation using the supported installation flags. To see a full list of options just run the installation script with the --help flag.
Updating an existing Connectware is just as easy as installing a new one. All you need to do is download the new installer script by following the same steps described above and install in the same directory where Connectware is running.
All your custom settings like license key or network settings will automatically be migrated. If you are asked for your license key during the update, you might have specified a different installation directory. If this is the case, please cancel the update and ensure you choose the correct installation path.
If you had previously installed Connectware using elevated privileges, remember to execute the new script also using sudo.
The easiest way to update to a newer version is to run the update in silent mode. All you have to do is to start the installer script using the silent -s and directory -d flags.
$ ./connectware-online-installer.sh -s -d <PATH/TO/YOUR/CONNECTWARE/FOLDER>
Code-Sprache: YAML (yaml)In case you need to update or change the certificate files (for example if you renewed them using certbot with Let’s Encrypt or want to add a self-signed certificate) you can do this by copying them to Connectware:
$ docker cp -L <path-to/your-key-file.key> <your-connectware-container>:/connectware_certs/cybus_server.key
$ docker cp -L <path-to/your-cert-file.crt> <your-connectware-container>:/connectware_certs/cybus_server.crt
Code-Sprache: YAML (yaml)
The name of your Connectware container depends on the directory it was installed to and is rendered as <your-connectware-directory>_connectware_1. By default Connectware is installed to /opt/connectware/ which results in the container name connectware_connectware_1.
Restart the Connectware proxy to apply the changed files.
$ docker restart <your-connectware-container>
Code-Sprache: YAML (yaml)Removing Connectware from your system is a manual process. Follow the steps below in your terminal to remove Connectware.
systemctl stop connectware. Otherwise change into your installation directory and manually stop the running instance with docker-compose down. $ systemctl stop connectware
$ systemctl disable connectware
$ rm /etc/systemd/system/connectware.service
Code-Sprache: YAML (yaml)$ rm -rf /opt/connectware
Code-Sprache: YAML (yaml)List all images, containers, volumes and networks:
$ docker images -a
$ docker container ls -a
$ docker volume ls
$ docker network ls
Code-Sprache: YAML (yaml)
For removing a specific:
container
$ docker container rm <CONTAINER-NAME>
Code-Sprache: YAML (yaml)
image
$ docker image rm <IMAGE-NAME>
Code-Sprache: YAML (yaml)
volume
$ docker volume rm <VOLUME-NAME>
Code-Sprache: YAML (yaml)
network
$ docker network rm <NETWORK-NAME>
Code-Sprache: YAML (yaml)
If you have no docker applications other than Connectware running on your system, you can also simply remove all artifacts by running
$ docker system prune -a -f
Code-Sprache: YAML (yaml)
Please keep in mind that this will remove all currently unused docker resources, not only those created by Connectware.
Congratulations, after following all the steps above Connectware is now installed. You can access the Admin UI by opening your browser and entering the host’s IP address directly:
https://<HOST-IP>
The initial login credentials are:
username: admin
password: admin
In this lesson we will walk you through all the measures necessary to be taken so PRTG is able to connect to a remote Docker socket.
As a prerequisite, it is necessary to have Docker installed on your system as well as an instance of PRTG with access to that host.
We assume you have at least a basic understanding of Docker and Linux. If you want to refresh your knowledge, we recommend looking at the lesson Docker Basics.
Explaining Linux would be far out of scope for this lesson, but it’s likely an answer to any Linux related question is out there on the internet. Anyway, if you read carefully, the listed commands should work with only minor adjustments.
Monitoring your IT infrastructure has a lot of benefits, discovering bottlenecks and gaining insights for predictive measures being only the tip of the iceberg.
PRTG is a solid monitoring solution already present and actively used in a lot of IT departments. Because there are a lot of different monitoring solutions out there, this article is targeted to be compatible with the way PRTG handles Docker Container Monitoring.
PRTG requires the Docker Socket to be exposed to the network, which is not the case on a default setup. The reason for the port not being exposed by default is because of security reasons.
An exposed and unsecured port could lead to a major security issue! Whoever is able to connect to the docker socket could easily gain full control on the system – meaning root access.
Therefore it is really important to handle these configurations with care. The measurement we are going to take is to secure the remote access by using TLS certificates. You can read more about this in the Docker docs.
A guide on the PRTG Docker Container Sensor can be found here.
First of all we need to create a bunch of certificates. There are basically two options for doing this.
We are going to use the second option, which means all certificates are going to be self-signed, but that’s totally fine for the purpose of this lesson.
All instructions for the creation of the certificates can be found in the docker docs. To simplify this a little bit, we created a small script that executes all the commands for you.
All the steps below assume you are going to use the script. The script is non-interactive, meaning you do not have to enter anything during execution. The generated certificates won’t be password protected and are valid for 50 years.
Create a directory called .docker in your home directory. This directory is the default directory where the Docker CLI stores all its information.
$ mkdir -p ~/.docker
Code-Sprache: YAML (yaml)
Clone the script into the previously created directory.
$ git clone https://gist.github.com/6f6b9a85e136b37cd52983cb88596158.git ~/.docker/
Code-Sprache: YAML (yaml)
Change into the directory.
$ cd ~/.docker/
Code-Sprache: YAML (yaml)
Make the script executable.
$ chmod +x genCerts.sh
Code-Sprache: YAML (yaml)
Then we need to adjust a few things within the script.
$ nano genCerts.sh
Code-Sprache: YAML (yaml)
Adjust the HOST to match your hostname and the last IP of the HOSTS string to match your host ip address.
This is how it looks for my setup.
HOST="cybus.io"
HOSTS="DNS:$HOST,IP:127.0.0.1,IP:172.16.0.131"
Code-Sprache: YAML (yaml)
Now we are ready to execute the script.
$ sh genCerts.sh
Code-Sprache: YAML (yaml)
The output should be somewhat like this.
# Start

# Generate CA private and public keys
Generating RSA private key, 4096 bit long modulus (2 primes)
.................................................................................................................................................................................................................................................................................................................................................................................................................................................................................................++++
...............++++
e is 65537 (0x010001)

Create a server key
Generating RSA private key, 4096 bit long modulus (2 primes)
.++++
..........................................................................++++
e is 65537 (0x010001)

Create certificate signing request

Sign the public key with CA
Signature ok
subject=CN = cybus.io
Getting CA Private Key

Create a client key and certificate signing request
Generating RSA private key, 4096 bit long modulus (2 primes)
.................................................................................................................................++++
...............................................................................................................................................................................................................................................................................................................++++
e is 65537 (0x010001)

Make the key suitable for client authentication

Generate the signed certificate
Signature ok
subject=CN = client
Getting CA Private Key

Remove the two certificate signing requests and extensions config
removed 'client.csr'
removed 'server.csr'
removed 'extfile.cnf'
removed 'extfile-client.cnf'
Code-Sprache: YAML (yaml)
To verify all certificates have been generated successfully we inspect the content of the directory.
$ ls
Code-Sprache: YAML (yaml)
These files should be present. If there are more files than this, that’s no issue.
ca-key.pem  ca.pem  ca.srl  cert.pem  genCerts.sh  key.pem  server-cert.pem  server-key.pem
Code-Sprache: YAML (yaml)
The last step is to locate the full path to where the certificates live.
$ pwd
Code-Sprache: YAML (yaml)
This is the output in my case. Yours will look a little bit different.
/home/jan/.docker
Code-Sprache: YAML (yaml)With all the necessary certificates in place, we have to assign them to the docker daemon. We can find the location of the configuration file by checking the status of the docker service.
$ sudo systemctl status docker.service
Code-Sprache: YAML (yaml)
As stated in the output, the configuration file is located at /lib/systemd/system/docker.service
● docker.service - Docker Application Container Engine
       Loaded: loaded (/lib/systemd/system/docker.service; enabled; vendor preset: enabled)
       Active: active (running) since Mon 2022-05-02 10:26:56 EDT; 33s ago
  TriggeredBy: ● docker.socket
       Docs: https://docs.docker.com   Main PID: 468 (dockerd)
        Tasks: 9
       Memory: 109.2M
          CPU: 307ms     CGroup: /system.slice/docker.service
               └─468 /usr/bin/dockerd -H fd:// --containerd=/run/containerd/containerd.sock
Code-Sprache: YAML (yaml)
To adjust the configuration to our needs, we are going to open the configuration using sudo privileges.
$ sudo nano /lib/systemd/system/docker.service
Code-Sprache: YAML (yaml)
Find the line starting with ExecStart=/usr/bin/dockerd -H fd:// and add the following content to it. Be sure to use the correct path for your setup.
-H tcp://0.0.0.0:2376 --tlsverify=true --tlscacert=/home/jan/.docker/ca.pem --tlscert=/home/jan/.docker/server-cert.pem --tlskey=/home/jan/.docker/server-key.pem
Code-Sprache: YAML (yaml)
For me the complete line looks like this.
ExecStart=/usr/bin/dockerd -H fd:// -H tcp://0.0.0.0:2376 --tlsverify=true --tlscacert=/home/jan/.docker/ca.pem --tlscert=/home/jan/.docker/server-cert.pem --tlskey=/home/jan/.docker/server-key.pem --containerd=/run/containerd/containerd.sock
Code-Sprache: YAML (yaml)
Flush the changes and restart the docker service.
$ sudo systemctl daemon-reload
$ sudo systemctl restart docker
Code-Sprache: YAML (yaml)
Now we can verify our changes did take effect.
$ sudo systemctl status docker.service
Code-Sprache: YAML (yaml)
● docker.service - Docker Application Container Engine
Loaded: loaded (/lib/systemd/system/docker.service; enabled; vendor preset: enabled)
Active: active (running) since Tue 2022-05-03 04:56:12 EDT; 2min 32s ago
TriggeredBy: ● docker.socket
Docs: https://docs.docker.com
Main PID: 678 (dockerd)
Tasks: 9
Memory: 40.8M
CPU: 236ms
CGroup: /system.slice/docker.service
└─678 /usr/bin/dockerd -H fd:// -H tcp://0.0.0.0:2376 --tlsverify=true --tlscacert=/home/jan/.docker/ca.pem --tlscert=/home/jan/.docker/server-cert.pem --tlskey=/home/jan/.docker/server-key.pem --containerd=/run/containerd/containerd.sock
Code-Sprache: YAML (yaml)Now we can use the Docker CLI to connect to the Docker Daemon using the specified port. The important part is to use –tlsverify=true as this tells the Docker CLI to use the generated certificates located in our home directory ( ~/.docker).
Remember to adjust the IP address in the second line with your individual one.
$ docker -H 127.0.0.1:2376 --tlsverify=true version
$ docker -H 172.16.0.131:2376 --tlsverify=true version
Code-Sprache: YAML (yaml)
This is the output of both commands on my system.
Client: Docker Engine - Community
Version:           20.10.14
API version:       1.41
Go version:        go1.16.15
Git commit:        a224086
Built:             Thu Mar 24 01:48:21 2022
OS/Arch:           linux/amd64
Context:           default
Experimental:      true

Server: Docker Engine - Community
Engine:
  Version:          20.10.14
  API version:      1.41 (minimum version 1.12)
  Go version:       go1.16.15
  Git commit:       87a90dc
  Built:            Thu Mar 24 01:46:14 2022
  OS/Arch:          linux/amd64
  Experimental:     false
containerd:
  Version:          1.5.11
  GitCommit:        3df54a852345ae127d1fa3092b95168e4a88e2f8
runc:
  Version:          1.0.3
  GitCommit:        v1.0.3-0-gf46b6ba
docker-init:
  Version:          0.19.0
  GitCommit:        de40ad0
Code-Sprache: YAML (yaml)The last and final step is to install the docker sensor inside of PRTG. This should be fairly easy to accomplish by following the provided instructions from https://www.paessler.com/manuals/prtg/docker_container_status_sensor.
This article covers Docker, including the following topics:
Maybe this sounds familiar. You have been assigned a task in which you had to deploy a complex software onto an existing infrastructure. As you know there are a lot of variables to this which might be out of your control; the operating system, pre-existing dependencies, probably even interfering software. Even if the environment is perfect at the moment of the deployment what happens after you are done? Living systems constantly change. New software is introduced while old and outdated software and libraries are getting removed. Parts of the system that you rely on today might be gone tomorrow.
This is where virtualization comes in. It used to be best practice to create isolated virtual computer systems, so called virtual machines (VMs), which simulate independent systems with their own operating systems and libraries. Using these VMs you can run any kind of software in a separated and clean environment without the fear of collisions with other parts of the system. You can emulate the exact hardware you need, install the OS you want and include all the software you are dependent on at just the right version. It offers great flexibility.
It also means that these VMs are very resource demanding on your host system. The hardware has to be powerful enough to create virtual hardware for your virtual systems. They also have to be created and installed for every virtual system that you are using. Even though they might run on the same host, sharing resources between them is just as inconvenient as with real machines.
Introducing the container approach and one of their main competitors, Docker. Simply put, Docker enables you to isolate your software into containers (Check the picture below). The only thing you need is a running instance of Docker on your host system. Even better: All the necessary resources like OS and libraries cannot only be deployed with your software, they can even be shared between individual instances of your containers running on the same system! This is a big improvement above regular VMs. Sounds too good to be true?
Well, even though Docker comes with everything you need, it is still up to you to assure consistency and reproducibility of your own containers. In the following article, I will slowly introduce you to Docker and give you the basic knowledge necessary to be part of the containerized world.
Before we can start creating containers we first have to get Docker running on our system. Docker is available for Linux, Mac and just recently for Windows 10. Just choose the version that is right for you and come back right here once you are done:
Please notice that the official documentation contains instructions for multiple Linux distributions, so just choose the one that fits your needs.
Even though the workflow is very similar for all platforms, the rest of the article will assume that you are running an Unix environment. Commands and scripts can vary when you are running on Windows 10.
Got Docker installed and ready to go? Great! Let’s get our hands on creating the first container. Most tutorials will start off by running the tried and true „Hello World“ example but chances are you already did it when you were installing Docker.
So let’s start something from scratch! Open your shell and type the following:
  docker run -p 8080:80 httpd
Code-Sprache: YAML (yaml)
If everything went well, you will get a response like this:
  Unable to find image 'httpd:latest' locally
  latest: Pulling from library/httpd
  f17d81b4b692: Pull complete
  06fe09255c64: Pull complete
  0baf8127507d: Pull complete
  07b9730387a3: Pull complete
  6dbdee9d6fa5: Pull complete
  Digest: sha256:90b34f4370518872de4ac1af696a90d982fe99b0f30c9be994964f49a6e2f421
  Status: Downloaded newer image for httpd:latest
  AH00558: httpd: Could not reliably determine the server's fully qualified domain name, using 172.17.0.2. Set the 'ServerName' directive globally to suppress this message
  AH00558: httpd: Could not reliably determine the server's fully qualified domain name, using 172.17.0.2. Set the 'ServerName' directive globally to suppress this message
  [Mon Nov 12 09:15:49.813100 2018] [mpm_event:notice] [pid 1:tid 140244084212928] AH00489: Apache/2.4.37 (Unix) configured -- resuming normal operations
  [Mon Nov 12 09:15:49.813536 2018] [core:notice] [pid 1:tid 140244084212928] AH00094: Command line: 'httpd -D FOREGROUND'
Code-Sprache: YAML (yaml)
Now there is a lot to go through but first open a browser and head over to: localhost:8080
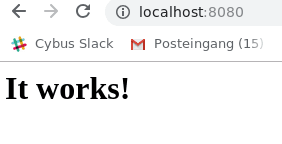
What we just achieved is, we set up and started a simple http server locally on port 8080 within less than 25 typed characters. But what did we write exactly? Let’s analyze the command a bit closer:
docker – This states that we want to use the Docker command line interface (CLI).run – The first actual command. It states that we want to run a command in a new container.-p 8080:80 – The publish flag. Here we declare what Docker internal port (our container) we want to publish to the host (the pc you are sitting at). the first number declares the port on the host (8080) and the second the port on the Docker container (80).httpd – The image we want to use. This contains the actual server logic and all dependencies.IMAGES
Okay, so what is an image and where does it come from? Quick answer: An image is a template that contains instructions for creating a container. Images can be hosted locally or online. Our httpd image was hosted on the Docker Hub. We will talk more about the official docker registry in the Exploring the Docker Hub part of this lesson.
HELP
The Docker CLI contains a thorough manual. So whenever you want more details about a certain command just add --help behind the command and you will get the man page regarding the command.
Now that we understand what we did we can take a look at the output.
  Unable to find image 'httpd:latest' locally
  latest: Pulling from library/httpd
  f17d81b4b692: Pull complete
  06fe09255c64: Pull complete
  0baf8127507d: Pull complete
  07b9730387a3: Pull complete
  6dbdee9d6fa5: Pull complete
  Digest: sha256:90b34f4370518872de4ac1af696a90d982fe99b0f30c9be994964f49a6e2f421
  Status: Downloaded newer image for httpd:latest
Code-Sprache: YAML (yaml)
The httpd image we used was not found locally so Docker automatically downloaded the image and all dependencies for us. It also provides us with a digest for our just created container. This string starting with sha256 can be very useful for us! Imagine that you create software that is based upon a certain image. By binding the image to this digest you make sure that you are always pulling and using the same version of the container and thus ensuring reproducibility and improving stability of your software.
While the rest of the output is internal output from our small webserver, you might have noticed that the command prompt did not return to input once the container started. This is because we are currently running the container in the forefront. All output that our container generates will be visible in our shell window while we are running it. You can try this by reloading the webpage of our web server. Once the connection is reestablished, the container should log something similar to this:
172.17.0.1 - - [12/Apr/2023:12:25:08 +0000] "GET / HTTP/1.1" 200 45
Code-Sprache: YAML (yaml)
You might have also noticed that the ip address is not the one from your local machine. This is because Docker creates containers in their own Docker network. Explaining Docker networks is out of scope for this tutorial so I will just redirect you to the official documentation about Docker networks for the time being.
For now, stop the container and return to the command prompt by pressing ctrl+c while the shell window is in focus.
Now that we know how to run a container it is clear that having them run in an active window isn’t always practical. Let’s start the container again but this time we will add a few things to the command:
  docker run --name serverInBackground -d -p 8080:80 httpd
Code-Sprache: YAML (yaml)
When you run the command you will notice two things: First the command will execute way faster then the first time. This is because the image that we are using was already downloaded the last time and is currently hosted locally on our machine. Second, there is no output anymore besides a strange string of characters. This string is the ID of our container. It can be used to refer to its running instance.
So what are those two new flags?
--name – This is a simple one. It attaches a human readable name to our container instance. While the container ID is nice to work with on a deeper level, attaching an actual name to it makes it easier to distinguish between running containers for us as human beings. Just keep in mind that IDs are unique and your attached name might not!-d – This stands for detach and makes our container run in the background. It also provides us with the container ID.Sharing resources: If you want to you can execute the above command with different names and ports as many times as you wish. While you can have multiple containers running httpd they will all be sharing the same image. No need to download or copy what you already have on your host.
So now that we started our container, make sure that it is actually running. Last time we opened our browser and accessed the webpage hosted on the server. This time let’s take another approach. Type the following in the command prompt:
  docker ps
Code-Sprache: YAML (yaml)
The output should look something like this:
  CONTAINER ID    IMAGE    COMMAND              CREATED             STATUS           PORTS                  NAMES
  018acb9dbbbd    httpd    "httpd-foreground"   11 minutes ago      Up 11 minutes    0.0.0.0:8080->80/tcp   serverInBackground
Code-Sprache: YAML (yaml)
ps – The ps command prints all running container instances including information about ID, image, ports and even name. The output can be filtered by adding flags to the command. To learn more just type docker ps --help.Another important ability is to get low level information about the configuration of a certain container. You can get these information by typing:
  docker inspect serverInBackground
Code-Sprache: YAML (yaml)
Notice that it does not matter if you use the attached name or the container ID. Both will give you the same result.
The output of this command is huge and includes everything from information about the image itself to network configuration.
Note: You can execute the same command using an image ID to inspect the template configuration of the image.
To learn more about inspecting docker containers please refer to the official documentation.
We can even go in deeper and interact with the internals of the container. Say we want to try changes to our running container without having to shut it down and restart it every time. So how do we approach this?
Like a lot of Docker images, httpd is based upon a Linux image itself. In this case httpd is running a slim version of Debian in the background. So being a Linux system, we can access a shell inside the container. This gives us a working environment that we are already familiar with. Let’s jump in and try it:
  docker exec -it -u 0 serverInBackground bash
Code-Sprache: YAML (yaml)
There are a few new things to talk about:
exec – This allows us to execute a command inside a running container.-it – These are actually two flags. -i -t would have the same result. While i stands for interactive (we need it to be interactive if we want to use the shell) t stands for TTY and creates a pseudo version of the Teletype Terminal. A simple text based terminal.-u 0 – This flag specifies the UID of the user we want to log in as. 0 opens the connection as root user.serverInBackground – The container name (or ID) that we want the command to run in.bash – At the end we define what we actually want to run in the container. In our case this is the bash environment. Notice that bash is installed in this image. This might not always be the case! To be safe you can add sh instead of bash. This will default back to a very stripped down shell environment by default.When you execute the command you will see a new shell inside the container. Try moving around in the container and use commands you are familiar with. You will notice that you are missing a lot of capabilities. This has to be expected on a distribution that is supposed to be as small as possible. Thankfully httpd includes the apt packaging manager so you can expand the capabilities. When you are done, You can exit the shell again by typing exit.
Sometimes something inside your containers just won’t work and you can’t find out why by blindly stepping through your configuration. This is where the Docker logs come in.
To see logs from a running container just type this:
  docker logs serverInBackground -f --tail 10
Code-Sprache: YAML (yaml)
Once again there are is a new command and a few new flags for us:
logs – This command fetches the logs printed by a specific container.-f – Follow the log output. This is very handy for debugging. With this flag you get a real time update of the container logs while they happen.--tail – Chances are your container is running for days if not months. Printing all the logs is rarely necessary if not even bad practice. By using thetail flag you can specify the amount of lines to be printed from the bottom of the file.You can quit the log session by pressing ctrl+c while the shell is in focus.
If you have to shut down a running container the most graceful way is to stop it. The command is pretty straight forward:
  docker stop serverInBackground
Code-Sprache: YAML (yaml)
This will try to shutdown the container and kill it, if it is not responding. Keep in mind that the stopped container is not gone! You can restart the container by simply writing:
  docker start serverInBackground
Code-Sprache: YAML (yaml)Sometimes if something went really wrong, your only choice is to take down a container as quickly as possible.
  docker kill serverInBackground
Code-Sprache: YAML (yaml)
Note: Even though this will get the job done, killing a container might lead to unwanted side effects due to not shutting it down correctly.
As we already mentioned, stopping a container does not remove it. To show that a stopped container is still managed in the background just type the following:
  docker container ls -a
Code-Sprache: YAML (yaml)
container – This accesses the container interaction.ls – Outputs a list of containers according to the filters supplied.-a – Outputs all containers, even those not running.CONTAINER ID IMAGE COMMAND CREATED STATUS PORTS NAMES
ee437314785f httpd "httpd-foreground" About a minute ago Exited (0) 8 seconds ago serverInBackground
Code-Sprache: YAML (yaml)As you can see even though we stopped the container it is still there. To get rid of it we have to remove it.
Just run this command:
  docker rm serverInBackground
Code-Sprache: YAML (yaml)
When you now run docker container ls -a again you will notice that the container tagged serverInBackground is gone. Keep in mind that this only removes the stopped container! The image you used to create the container will still be there.
The time might come when you do not need a certain image anymore. You can remove an image the same way you remove a container. To get the ID of the image you want to remove you can run the docker image ls command from earlier. Once you know what you want to remove type the following command:
  docker rmi <IMAGE-ID>
Code-Sprache: YAML (yaml)
This will remove the image if it is not needed anymore by running docker instances.
You might have asked yourself where this mysterious httpd image comes from or how I know which Linux distro it is based on. Every image you use has to be hosted somewhere. This can either be done locally on your machine or a dedicated repository in your company or even online through a hosting service. The official Docker Hub is one of those repositories. Head over to the Docker Hub and take a moment to browse the site. When creating your own containers it is always a good idea not to reinvent the wheel. There are thousands of images out there spreading from small web servers (like our httpd image) to full fledged operating systems ready at your disposal. Just type a keyword in the search field at the top of the page (web server for example) and take a stroll through the offers available or just check out the httpd repo. Most of these images hosted here offer help regarding dependencies or installation. Some of them even include information about something called a Dockerfile..
While creating containers from the command line is pretty straight forward, there are certain situations in which you do not want to configure these containers by hand. Luckily enough we have another option, the Dockerfile. If you have already taken a look at the example files provided for httpd you might have an idea about what you can expect.
So go ahead and create a new file called ‚Dockerfile‘ (mind the capitalization). We will add some content to this file:
FROM httpd:2.4
COPY ./html/ /usr/local/apache2/htdocs/
Code-Sprache: YAML (yaml)
This is a very barebone Dockerfile. It basically just says two things:
FROM– Use the provided image with the specified version for this container.COPY– Copy the content from the first path on the host machine to the second path in the container.So what the Dockerfile currently says is: Use the image known as httpd in version 2.4, copy all the files from the sub folder ‚./html‘ to ‚/usr/local/apache2/htdocs/‘ and create a new image containing all my changes.
For extra credit: Remember the digest from before? You can use the digest to pin our new image to the httpd image version we used in the beginning. The syntax for this is:
FROM <IMAGENAME>@<DIGEST-STRING>
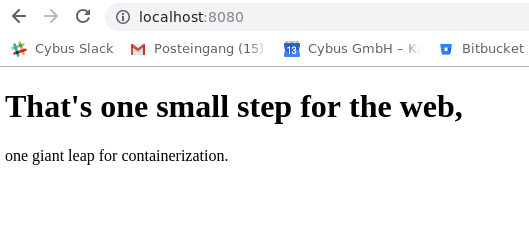
Code-Sprache: YAML (yaml)Now, it would be nice to have something that can actually be copied over. Create a folder called html and create a small index.html file in there. If you don’t feel like writing one on your own just use mine:
<!DOCTYPE html>
<html>
  <body>
    <h1>That's one small step for the web,</h1>
    <p>one giant leap for containerization.</p>
  </body>
</html>
Code-Sprache: YAML (yaml)
Open a shell window in the exact location where you placed your Dockerfile and html folder and type the following command:
  docker build . -t my-new-server-image
Code-Sprache: YAML (yaml)build– The command for building images from Dockerfiles. – The build command expects a path as second parameter. The dot refers to the current location of the shell prompt.-t – The tag flag sets a name for the image that it can be referred by.The shell output should look like this:
  Sending build context to Docker daemon  3.584kB
  Step 1/2 : FROM httpd:2.4
  ---> 55a118e2a010
  Step 2/2 : COPY ./html/ /usr/local/apache2/htdocs/
  ---> Using cache
  ---> 867a4993670a
  Successfully built 867a4993670a
  Successfully tagged my-new-server-image:latest
Code-Sprache: YAML (yaml)
You can make sure that your newly created image is hosted on your local machine by running
  docker image ls
Code-Sprache: YAML (yaml)
This will show you all images hosted on your machine.
We can finally run our modified httpd image by simply typing:
  docker run --name myModifiedServer -d -p 8080:80 my-new-server-image
Code-Sprache: YAML (yaml)
This command should look familiar by now. The only thing we changed is that we are not using the httpd image anymore. Instead we are referring to our newly created ‚my-new-server-image‘.
Let’s see if everything is working by opening the Server in a browser.
By the time you reach these lines you should be able to create, monitor and remove containers from pre-existing images as well as create new ones using Dockerfiles. You should also have a basic understanding of how to inspect and debug running containers.
As was to be expected from a basic lesson there is still a lot to cover. A good place to start is the Docker documentation itself. Another topic we didn’t even touch is Docker Compose, which provides an elegant way to orchestrate groups of containers.
Sie müssen den Inhalt von reCAPTCHA laden, um das Formular abzuschicken. Bitte beachten Sie, dass dabei Daten mit Drittanbietern ausgetauscht werden.
Mehr InformationenSie sehen gerade einen Platzhalterinhalt von Turnstile. Um auf den eigentlichen Inhalt zuzugreifen, klicken Sie auf die Schaltfläche unten. Bitte beachten Sie, dass dabei Daten an Drittanbieter weitergegeben werden.
Mehr InformationenSie sehen gerade einen Platzhalterinhalt von Facebook. Um auf den eigentlichen Inhalt zuzugreifen, klicken Sie auf die Schaltfläche unten. Bitte beachten Sie, dass dabei Daten an Drittanbieter weitergegeben werden.
Mehr InformationenSie sehen gerade einen Platzhalterinhalt von HubSpot. Um auf den eigentlichen Inhalt zuzugreifen, klicken Sie auf die Schaltfläche unten. Bitte beachten Sie, dass dabei Daten an Drittanbieter weitergegeben werden.
Mehr InformationenSie sehen gerade einen Platzhalterinhalt von Hubspot Meetings. Um auf den eigentlichen Inhalt zuzugreifen, klicken Sie auf die Schaltfläche unten. Bitte beachten Sie, dass dabei Daten an Drittanbieter weitergegeben werden.
Mehr InformationenSie sehen gerade einen Platzhalterinhalt von Instagram. Um auf den eigentlichen Inhalt zuzugreifen, klicken Sie auf die Schaltfläche unten. Bitte beachten Sie, dass dabei Daten an Drittanbieter weitergegeben werden.
Mehr InformationenSie sehen gerade einen Platzhalterinhalt von X. Um auf den eigentlichen Inhalt zuzugreifen, klicken Sie auf die Schaltfläche unten. Bitte beachten Sie, dass dabei Daten an Drittanbieter weitergegeben werden.
Mehr Informationen

