In this lesson we will set up a local Cybus Connectware Instance which only has internet connection via a corporate proxy.
As a prerequisite, it is necessary to have Docker and Docker Compose installed on your system as well as a valid Connectware License on hand.
You can also install Docker and Docker Compose during this lesson, as you probably need some of the explained settings for the installation to work.
We assume you have at least a basic understanding of Docker and Linux. If you want to refresh your knowledge, we recommend looking at the lesson Docker Basics.
Explaining Linux would be far out of scope for this lesson, but it’s likely an answer to any Linux related question is out there on the internet.
Anyway, if you read carefully the listed commands should work with only minor adjustments.
If you are unlucky and find yourself behind a Corporate Proxy, things might get a little bit more complicated and unpredictable then during a usual installation. This guide is intended to pinpoint a few possible pitfalls and tries to demystify the behavior of different proxy settings.
First of all, it is important to know that there is no de facto standard when dealing with the various environment variables for proxy settings.
Some applications might use the environment variables like http_proxy, https_proxy and no_proxy (all lowercase), whereas others might use them in all caps like HTTP_PROXY and so on. Some applications even consider both and prioritize one over the other and some do have their own way of proxy configuration.
When it comes to the actual environment variable values things are getting even worse.
If you are interested to read more on this topic, there is a good article over at GitLab.
There are a few takeaways:
With that in mind, I will guide you through configuring your system, Docker and Cybus Connectware. Not all of these steps are mandatory and may differ a bit depending on your operating system and the configuration of your proxy server.
For the purpose of writing this, I am using Debian 11 and a Proxy Server without authentication and restrictions.
The IP address of the Proxy Server in my case is 192.168.56.103 and the port is 8080. Make sure to adjust these settings to your individual ones.
Just to be transparent, this is what I am running on.
$ uname -a
Code-Sprache: YAML (yaml)
Linux cybus 5.10.0-13-amd64 #1 SMP Debian 5.10.106-1 (2022-03-17) x86_64 GNU/Linux
Code-Sprache: YAML (yaml)As already mentioned, for me the Proxy Server is reachable on 192.168.56.103, so I am going to quickly check if I am able to reach it.
$ ping -c 1 192.168.56.103
Code-Sprache: YAML (yaml)
On a reachable server the output should look something like this.
PING 192.168.56.103 (192.168.56.103) 56(84) bytes of data.
64 bytes from 192.168.56.103: icmp_seq=1 ttl=64 time=0.204 ms

--- 192.168.56.103 ping statistics ---
1 packets transmitted, 1 received, 0% packet loss, time 0ms
rtt min/avg/max/mdev = 0.204/0.204/0.204/0.000 ms
Code-Sprache: YAML (yaml)For most applications it is sufficient to set a couple of proxy environment variables.
However this is not a requirement for running Cybus Connectware.
If you are going to use the Cybus Connectware Installation Script from this article, it is recommended to follow the instructions below.
First we are going to create a new file, which will contain our proxy settings.
The /etc/profile.d directory holds shell scripts that are likely to be executed at launch of your shell.
$ sudo nano /etc/profile.d/proxy.sh
Code-Sprache: YAML (yaml)
This is a basic example configuration. Adjust this to your needs. If these settings are recognized by any application, all traffic except for loopbacks will be forwarded to the proxy server. This even applies to servers within the same network.
export http_proxy="http://192.168.56.103:8080/"
export https_proxy="http://192.168.56.103:8080/"
export no_proxy="127.0.0.1,localhost"

export HTTP_PROXY="http://192.168.56.103:8080/"
export HTTPS_PROXY="http://192.168.56.103:8080/"
export NO_PROXY="127.0.0.1,localhost"
Code-Sprache: YAML (yaml)
Next we are going to make the script executable.
$ sudo chmod +x /etc/profile.d/proxy.sh
Code-Sprache: YAML (yaml)
If you log out of your shell and back in, all the settings should be applied. You can verify like this:
$ env | grep -i proxy
Code-Sprache: YAML (yaml)Even if you have followed the instructions above your settings will not persist for any sudo-command. You can quickly observe this by running:
$ sudo env
Code-Sprache: YAML (yaml)
To fix this you can edit your configuration for sudo.
$ sudo nano /etc/sudoers.d/env_keep_proxy
Code-Sprache: YAML (yaml)
The content of the file should look like this:
Defaults        env_keep += "http_proxy https_proxy no_proxy HTTP_PROXY HTTPS_PROXY NO_PROXY"
Code-Sprache: YAML (yaml)
Verify your changes:
$ sudo env
Code-Sprache: YAML (yaml)The APT package manager application on Debian Systems has its own set of variables for proxy configuration. You can configure the proxy like this.
Doing this is again not required for running Cybus Connectware, but without this you won’t be able to install any software using APT.
$ sudo nano /etc/apt/apt.conf.d/80proxy
Code-Sprache: YAML (yaml)
Acquire::http::proxy "http://192.168.56.103:8080/";
Acquire::https::proxy "http://192.168.56.103:8080/";
Acquire::ftp::proxy "http://192.168.56.103:8080/";
Code-Sprache: YAML (yaml)If you don’t have Docker and Docker Compose installed already, you should now be able to do so.
Setting the Proxy Server for the Docker Daemon is mandatory if you want to download any Docker Images from the internet. This includes all Cybus Connectware related images from registry.cybus.io as well as images from Docker Hub.
The settings applied to the daemon do not affect the settings of any executed container.
Below are all the required steps. A full documentation can be found at https://docs.docker.com/config/daemon/systemd/
Create a systemd drop-in directory for the docker service:
$ sudo mkdir -p /etc/systemd/system/docker.service.d
Code-Sprache: YAML (yaml)
$ sudo nano /etc/systemd/system/docker.service.d/http-proxy.conf
Code-Sprache: YAML (yaml)[Service]
Environment="HTTP_PROXY=http://192.168.56.103:8080/"
Environment="HTTPS_PROXY=http://192.168.56.103:8080/"
Environment="NO_PROXY=localhost,127.0.0.1"
Code-Sprache: YAML (yaml)Flush the changes and restart Docker:
$ sudo systemctl daemon-reload
$ sudo systemctl restart docker
Code-Sprache: YAML (yaml)
Confirming the properties:
$ sudo systemctl show --property=Environment docker
Code-Sprache: YAML (yaml)
Should show something like this:
Environment=HTTP_PROXY=http://192.168.56.103:8080/ HTTPS_PROXY=http://192.168.56.103:8080/ NO_PROXY=localhost,127.0.0.1
Code-Sprache: YAML (yaml)
Testing image download from Docker Hub
$ docker pull hello-world
Code-Sprache: YAML (yaml)
Using default tag: latest
latest: Pulling from library/hello-world
2db29710123e: Pull complete
Digest: sha256:10d7d58d5ebd2a652f4d93fdd86da8f265f5318c6a73cc5b6a9798ff6d2b2e67
Status: Downloaded newer image for hello-world:latest
docker.io/library/hello-world:latest
Code-Sprache: YAML (yaml)If you need internet access from within any executed container you can globally set the proxy environment variables. Docker will pass these variables to every container. This is not necessary or recommended. You are always free to pass these environment variables manually on container startup as needed.
If you choose to go this way, you can read more at Docker https://docs.docker.com/network/proxy/
For Cybus Connectware to run properly, it is required to list all Cybus Connectware Container Names in the noProxy property. This is because the microservices need to be able to communicate between each other.
$ mkdir -p ~/.docker
Code-Sprache: YAML (yaml)
$ nano ~/.docker/config.json
Code-Sprache: YAML (yaml){
"proxies":
{
"default":
{
"httpProxy": "<a href="http://192.168.56.103:8080/%22" target="_blank" rel="noreferrer noopener">http://192.168.56.103:8080/"</a>,
"httpsProxy": "<a href="http://192.168.56.103:8080/%22" target="_blank" rel="noreferrer noopener">http://192.168.56.103:8080/"</a>,
"noProxy": "127.0.0.1,localhost,admin-web-app,auth-server,broker,container-manager,connectware,ingress-controller,postgresql,protocol-mapper,service-manager,system-control-server,workbench"
}
}
}
Code-Sprache: YAML (yaml)If you have successfully followed the steps above, you should be able to install Cybus Connectware just like on any other system https://www.cybus.io/learn/installing-the-connectware/.
Before starting Cybus Connectware there is one additional step to do. We have to announce the Proxy Server to Cybus Connectware by adjusting the corresponding environment file.
By default the environment file is located in your installation directory.
$ sudo nano /opt/connectware/.env
Code-Sprache: YAML (yaml)
If you are prompted with an empty file, you are not in your Cybus Connectware Installation Directory.
The part for the proxy configuration should look something like this:
# Proxy Configuration
CYBUS_PROXY=http://192.168.56.103:8080/CYBUS_NO_PROXY=
Code-Sprache: YAML (yaml)You sign in to your Connectware account with your username and password. For an extra layer of security, you can use multi-factor authentication in addition to your Connectware password. Depending on the Connectware settings of your organization, signing in via multi-factor authentication can be optional or required.
Related Links
Make sure to choose a strong password that you do not use for other accounts. The minimum password length is five characters. For an extra layer of security, you can use multi-factor authentication in addition to your Connectware password.
Note: If you are an LDAP user, you cannot change your password via the Connectware user interface.
Related Links
Multi-factor authentication (MFA), also known as 2-factor authentication, allows you to add an extra layer of security to your Connectware account. With MFA, you need a one-time code generated by an authentication app in addition to your main Connectware password to sign in.
If you do not have access to your authentication device, you can use backup codes to sign in or ask a Connectware admin to disable your MFA. Connectware admins can disable MFA for each user individually.
If you have no access to your multi-factor authentication app, you can use backup codes instead of a one-time 6-digit code to sign in to Connectware. Backup codes are displayed when you set up multi-factor authentication.
This gives you access to Connectware in case you have misplaced your authentication device, uninstalled your authentication app or removed Connectware from your authentication app.
Note You can use each backup code only once.
You must have access to your authentication app to disable multi-factor authentication.
Note: If you do not have access to your authentication app, ask a Connectware admin to disable your multi-factor authentication.
As a Connectware admin, you can set multi-factor authentication to be the mandatory login method for individual users.
Note: For LDAP users, you can set a flag to make multi-factor authentication the mandatory login method for all new LDAP users.
You must have access to your authentication app to regenerate multi-factor authentication backup codes.
In this lesson you will learn how to install Cybus Connectware directly onto a Linux system. The following topics are covered by this article:
This lesson assumes that you already have an account for the Cybus Portal. If you have no valid credentials, please contact our sales team.
If you want to refresh your knowledge of Docker before starting this lesson see Docker Basics Lesson.
Docker and Docker Compose must also be installed and running on your host. During the installation an internet connection is required to download Docker images fromregistry.cybus.io.
If Docker is not installed, start here:
If Docker Compose is not installed, then see here https://docs.docker.com/compose/install/
During the installation you will be asked to enter your Connectware license key. Follow these steps to obtain your license key.


Installing Connectware is made easy using the prebuilt installer script provided by Cybus. To download and use the script follow the steps below.
download.cybus.io/<VERSION>/connectware-online-installer.sh. In the example below we will use the latest version of Connectware.$ wget -O ./connectware-online-installer.sh https://download.cybus.io/latest/connectware-online-installer.sh
Code-Sprache: YAML (yaml)$ cat connectware-online-installer.sh
Code-Sprache: YAML (yaml)$ chmod +x ./connectware-online-installer.sh
Code-Sprache: YAML (yaml)The installer script is now ready to be run.
$ sudo ./connectware-online-installer.sh
Code-Sprache: YAML (yaml)/opt/connectwareIf all requirements are met then you should see the following output.
Running preflight checks.
=========================
Validating write permission to installation location /opt/connectware: [OK]
Checking whether this system has systemd: [YES]
Validating required utility installation: [OK]
Validating Cybus docker-registry connection: [OK]
Validating Docker installation: [OK]
Validating Docker Compose installation: [OK]
Validating that no former Connectware is running: [OK]
Preflight checks finished successfully!
Code-Sprache: YAML (yaml)Verifying license key...
Login succeeded.
Code-Sprache: YAML (yaml)Please review and confirm the following Connectware configuration:
------------------------------------------------------------------
Connectware license key: [VALID]
Installation directory: /opt/connectware
Autostart as systemd service: true
Accept configuration? [Y/n]
Code-Sprache: YAML (yaml)-----------------------------------------
Removing old Docker images
-----------------------------------------
The following Docker images are from previous Connectware versions and can be removed:
REPOSITORY TAG IMAGE ID CREATED SIZE
registry.cybus.io/cybus/admin-web-app *********** e561383a5 24 hours ago 21.5MB
REPOSITORY TAG IMAGE ID CREATED SIZE
registry.cybus.io/cybus/auth-server *********** a65b7f32f 24 hours ago 165MB
REPOSITORY TAG IMAGE ID CREATED SIZE
registry.cybus.io/cybus/broker *********** 80dd0fb24 24 hours ago 56.7MB
(...)
-----------------------------------------
Should the above docker images be removed from your local computer (pruned)? [Y/n]
Code-Sprache: YAML (yaml)Successfully installed Connectware!
===================================
You can find the installation directory at /opt/connectware.
In order to stop type:
systemctl stop connectware
Code-Sprache: YAML (yaml)Running the installer with the -s or --silent flag will start the installation in an automated mode without the need of user interaction.
To use this way of deploying Connectware the license key has to be supplied using the --license-key flag.
This deploys Connectware in a minimal configuration to the default /opt/connectware directory without installing the systemd service.
You can further personalize your installation using the supported installation flags. To see a full list of options just run the installation script with the --help flag.
To perform an update of an existing Connectware installation is just as easy as installing a new one.
All you need to do is to obtain the new installer script by following the same steps as described in the chapters Prepare Installer Script.
To upgrade an existing installation just choose the same folder your Connectware is currently running in.
All your custom settings like license key or network settings will automatically be migrated.
If you are asked for your license key during the update, you might have specified a wrong installation directory. If this is the case, please cancel the update and ensure you choose the correct installation path.
Remember that if your existing Connectware used elevated privileges during installation to also run the update using sudo.
The easiest way to update to a newer version is to run the update in silent mode. All you have to do is to start the installer script using the silent -s and directory -d flags.
$ ./connectware-online-installer.sh -s -d <PATH/TO/YOUR/CONNECTWARE/FOLDER>
Code-Sprache: YAML (yaml)In case you need to update or change the certificate files (for example if you renewed them using certbot with Let’s Encrypt or want to add a self-signed certificate) you can do this by copying them to Connectware:
$ docker cp -L <path-to/your-key-file.key> <your-connectware-container>:/connectware_certs/cybus_server.key
$ docker cp -L <path-to/your-cert-file.crt> <your-connectware-container>:/connectware_certs/cybus_server.crtCode-Sprache: YAML (yaml)
The name of your Connectware container depends on the directory it was installed to and is rendered as <your-connectware-directory>_connectware_1. By default Connectware is installed to /opt/connectware/ which results in the container name connectware_connectware_1.
Restart the Connectware proxy to apply the changed files.
$ docker restart <your-connectware-container>
Code-Sprache: YAML (yaml)
Removing Connectware from your system is a manual process. Follow the steps below in your terminal to remove Connectware.
systemctl stop connectware. Otherwise change into your installation directory and manually stop the running instance with docker-compose down.$ systemctl stop connectware
$ systemctl disable connectware
$ rm /etc/systemd/system/connectware.service
Code-Sprache: YAML (yaml)$ rm -rf /opt/connectware
Code-Sprache: YAML (yaml)List all images, containers, volumes and networks:
$ docker images -a
$ docker container ls -a
$ docker volume ls
$ docker network ls
Code-Sprache: YAML (yaml)
To remove a specific container:
$ docker container rm <CONTAINER-NAME>
Code-Sprache: YAML (yaml)
Remove a specific image:
$ docker image rm <IMAGE-NAME>
Code-Sprache: YAML (yaml)
For removing a specific volume:
$ docker volume rm <VOLUME-NAME>Remove a specific network:
$ docker network rm <NETWORK-NAME>
Code-Sprache: YAML (yaml)
If you have no docker applications other then Connectware running on your system you can also simply remove all artifacts by running
$ docker system prune -a -f
Code-Sprache: YAML (yaml)
Please keep in mind that this will remove all currently unused docker resources not only those created by Connectware.
After following all the steps above, Connectware is now installed. You can access the Admin UI by opening your browser and entering the host’s IP address directly: https://<HOST-IP>.
The initial login credentials are
Username: admin
Password: admin
If you would like to learn more how to use Connectware, check out our docs at https://docs.cybus.io/ or see more guides here.
This lesson requires basic knowledge of
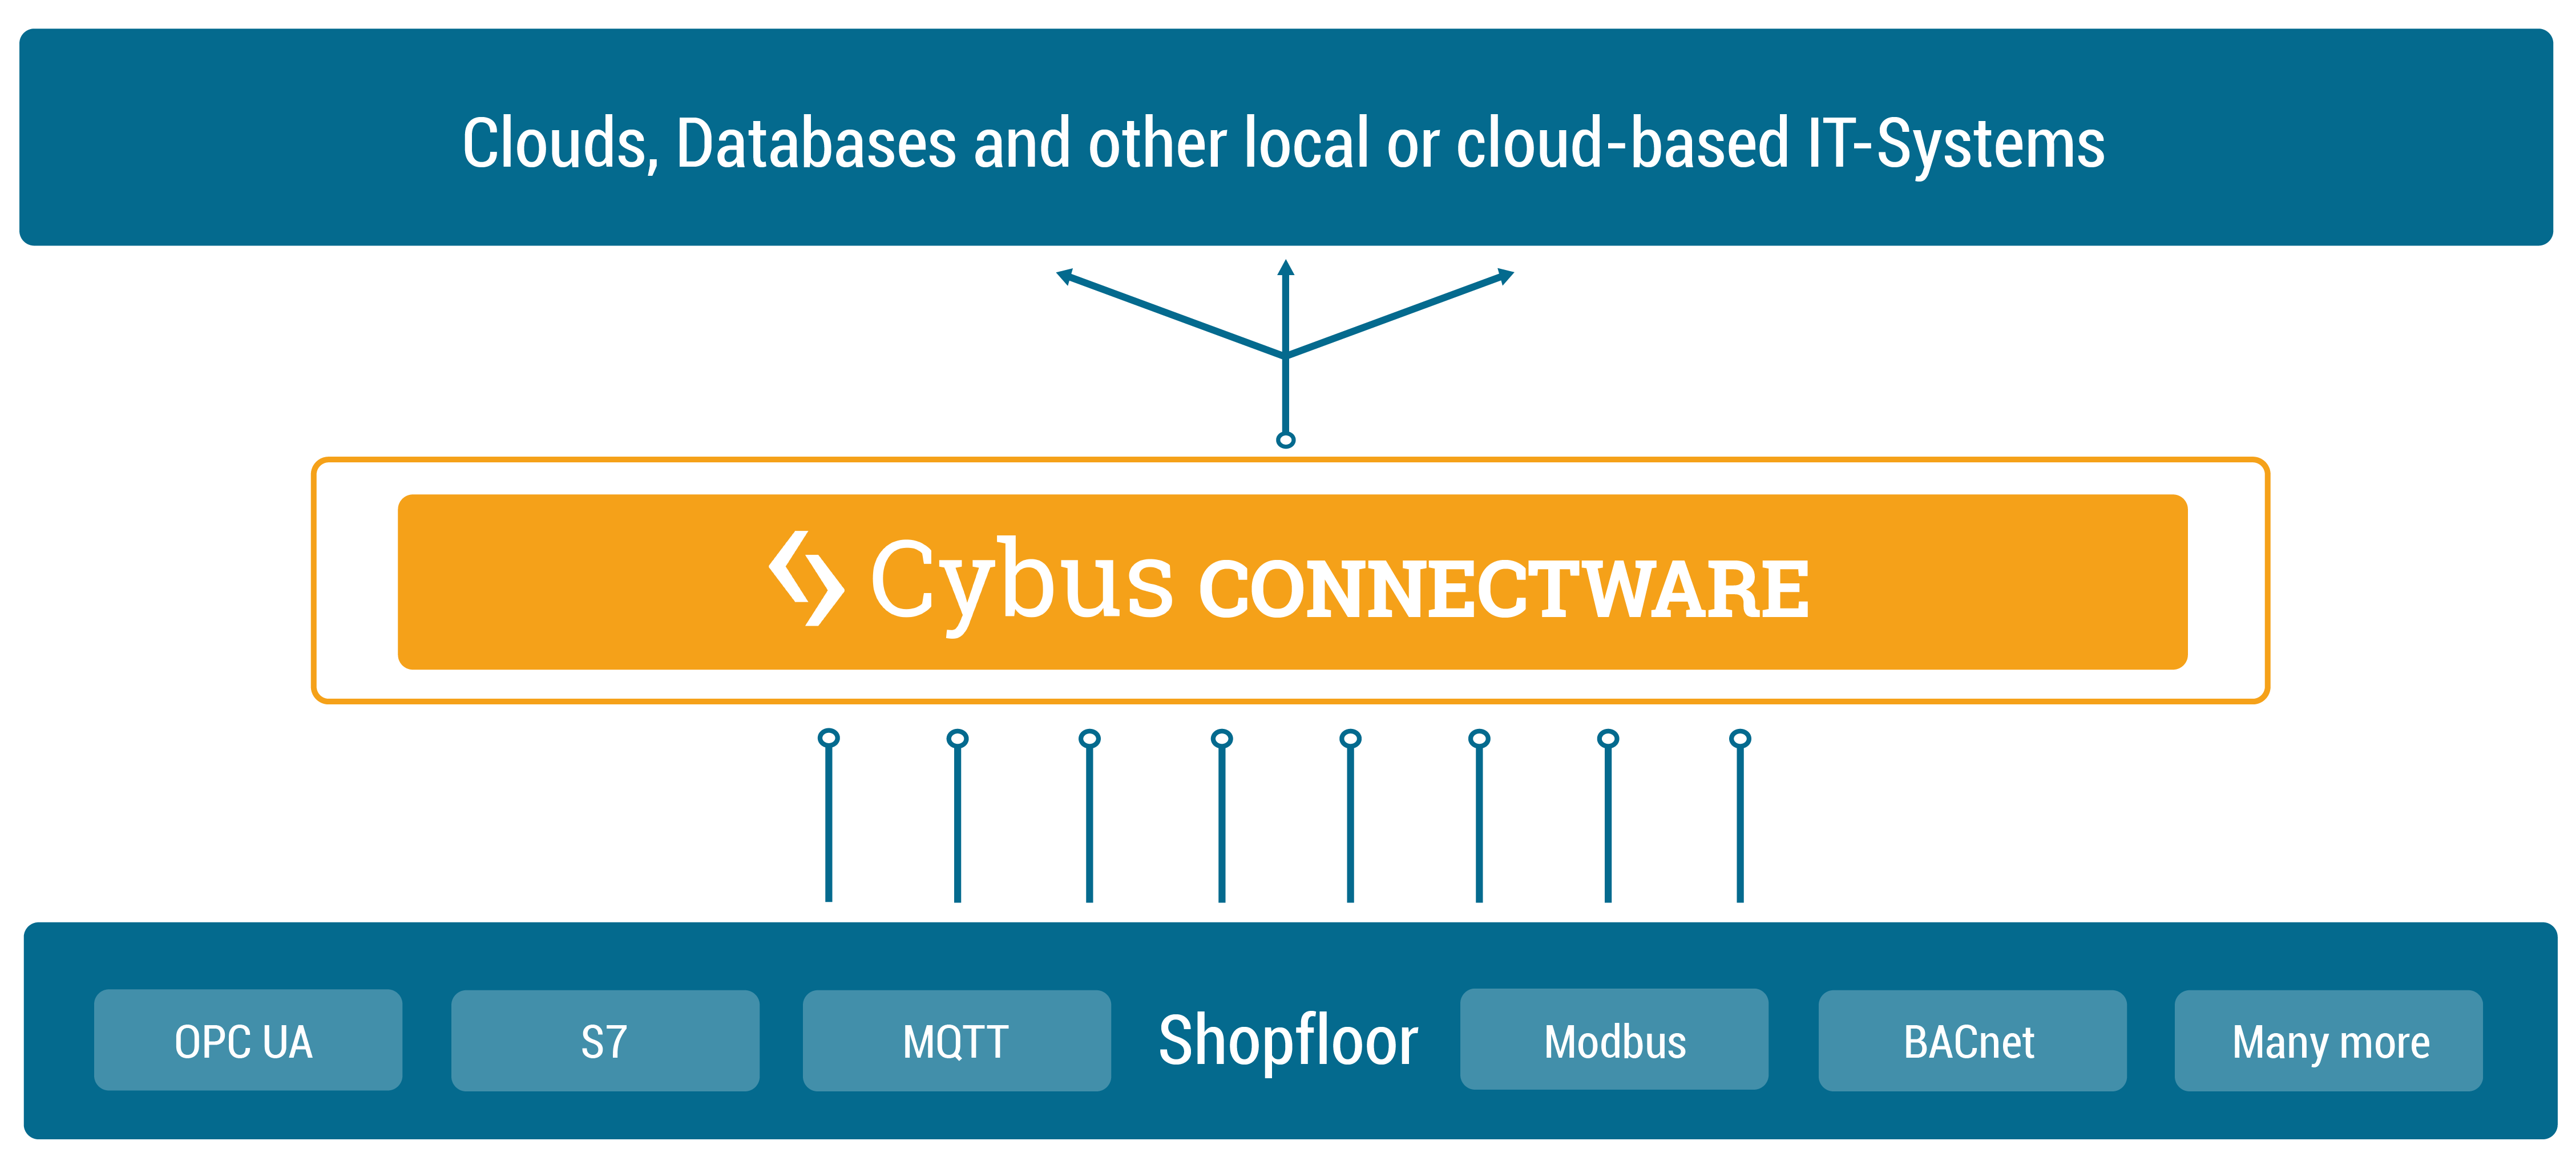
Cybus Connectware is a general and extensible on-premise data gateway that connects different devices, provides data for local systems and cloud based backends and makes data exchange transparent and secure. The components of Connectware include a data broker, protocol adapters for connectivity to standard industry protocols, a management and security layer, as well as a runtime environment to include third-party applications.

Connectware connects to the different endpoints by dedicated connectors (e.g. OPC UA, Modbus-TCP) that run as part of the Protocol Mapper in Connectware. By its microservice and API architecture Connectware supports the option of adding more connectors. And being a modern enterprise-grade IT solution based on Docker, Connectware is suitable to run on either a data centre infrastructure or standalone computers.
To begin, we’ll provide an introduction to Connectware’s architecture and its constituent parts. Connectware employs a microservice approach, with individual modules functioning in concert to establish a microservice cluster – namely, Cybus Connectware. Microservices offer numerous advantages, such as flexible scalability for individual modules or the entire application, as well as the capacity to integrate third-party applications, various databases, and even disparate programming languages into a unified application.
In the following we will explore the Connectware architecture more closely and see what the individual microservices do and when they come into play, when we are using Connectware. We will start with a heterogene shopfloor full of data and a cloud to which we want to forward our data to – but no means of a connection between them. So the question is how are we transferring our data out of the factory, into the cloud, in a controllable, extendible and secure way?
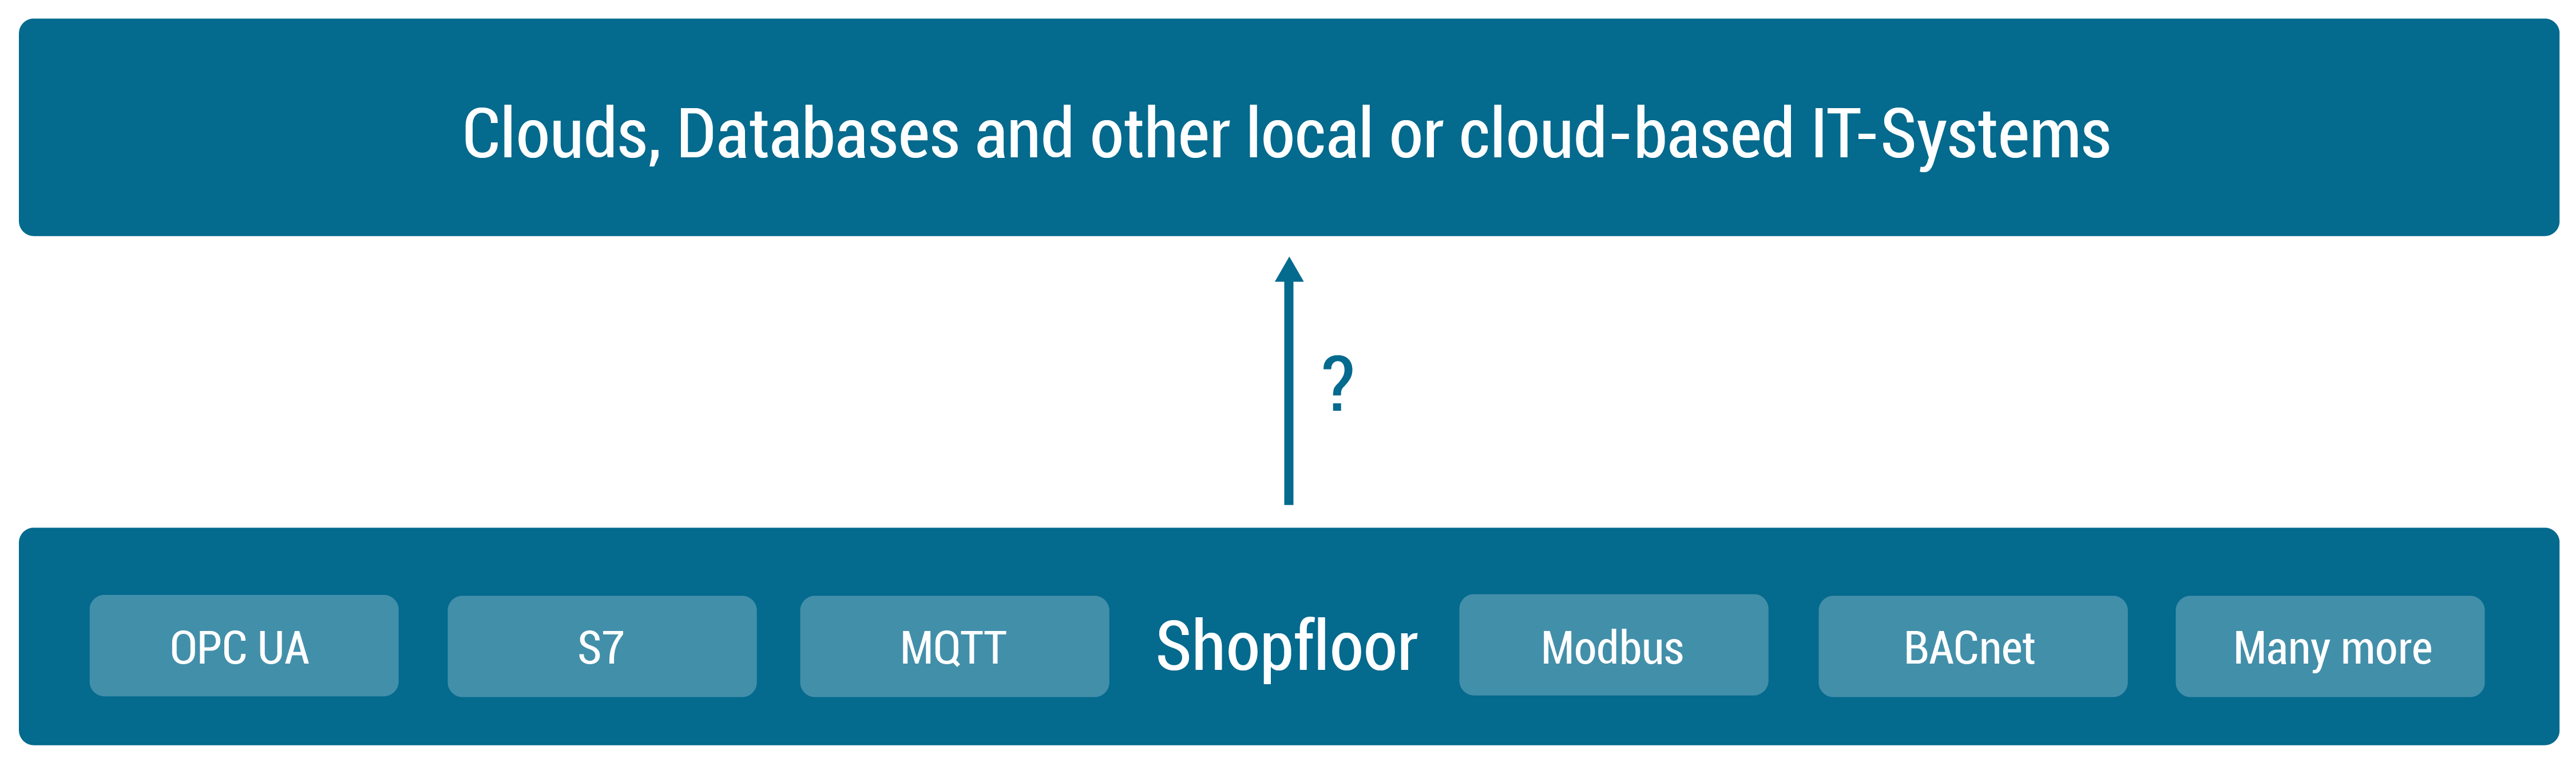
First of all we need to start by establishing a connection between our shopfloor and the cloud application. See the following image to get an overview over the components that we will add in this section to achieve this goal.
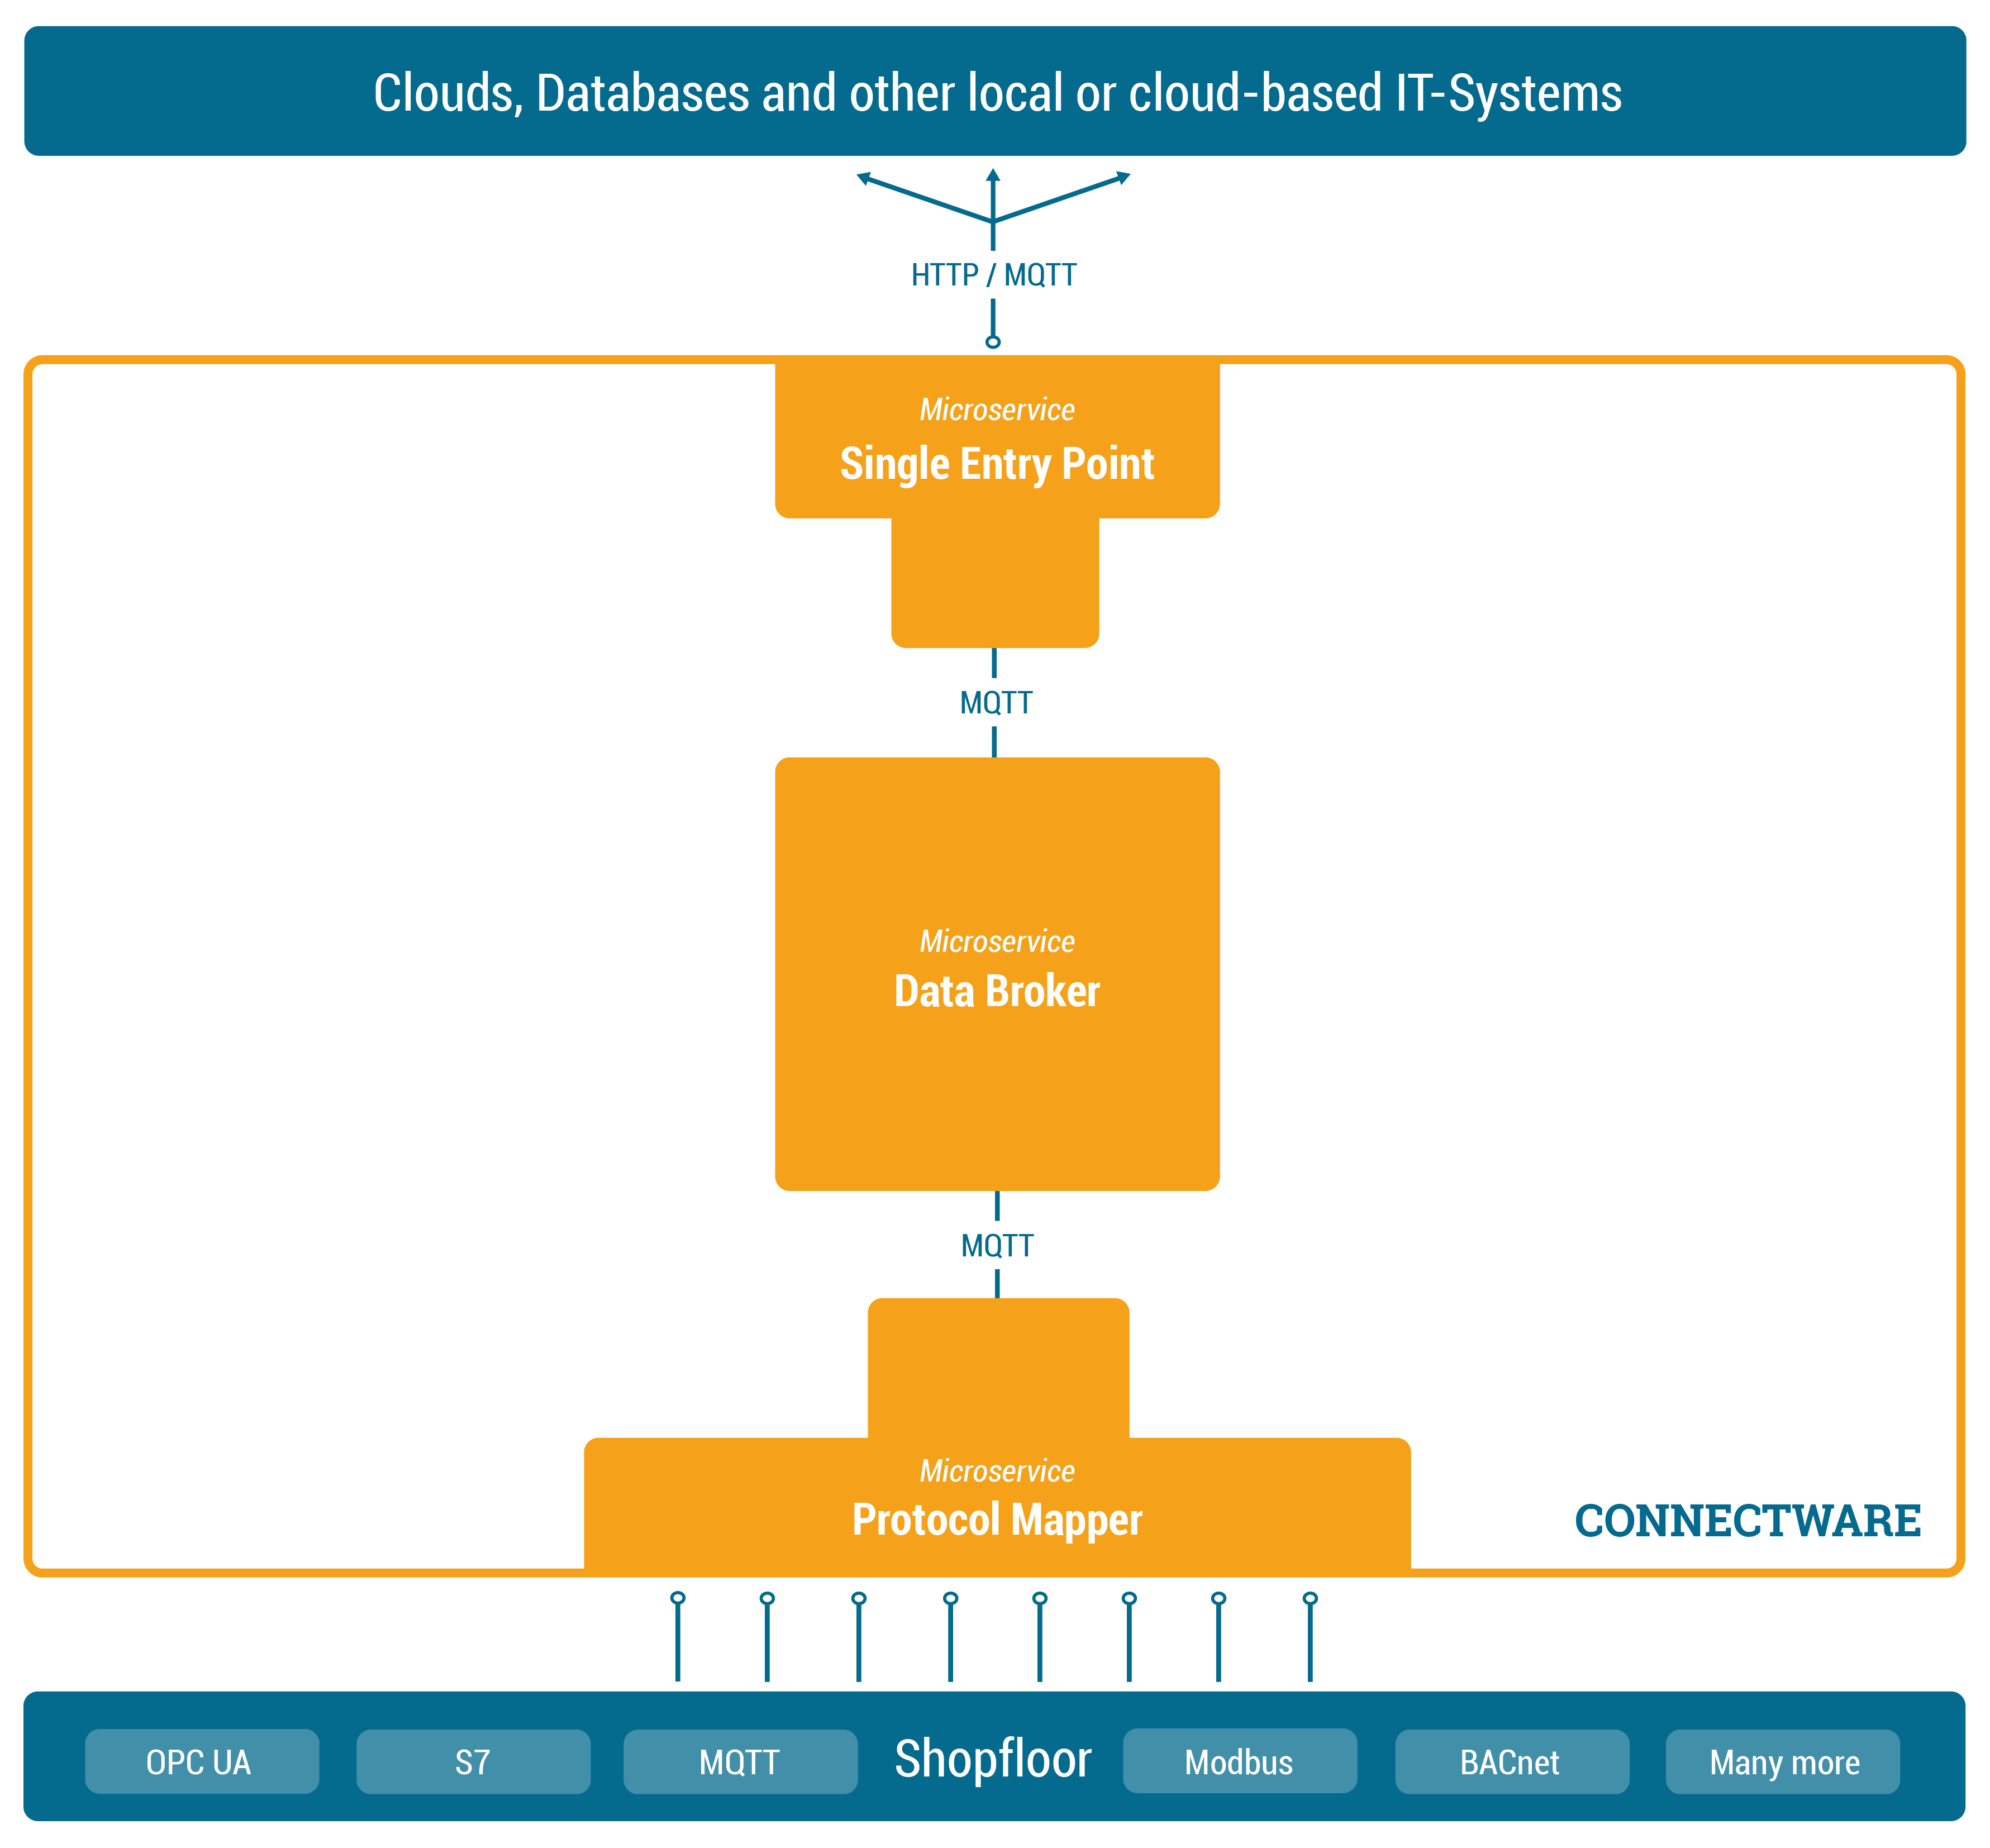
In order to manage and use any of our data, we need to add one central place to Connectware in which we can easily access the data – we could call it a data focal point. This single data hub gives us easy access as well as easy control over all data since all data needs to pass through this central hub. Of course this also means we need to have a Data Broker that is stable, maintainable, scalable, reliable and secure. Further we need to choose a transmission protocol that is widely used and accepted and able to handle large data flows.
The solution is to use MQTT, a standard, lightweight publish-subscribe messaging protocol on top of TCP/IP that is widely used in IoT and industrial applications. Connectware uses a high-performance MQTT broker which scales horizontally and vertically to support a high number of concurrent publishers and subscribers while maintaining low latency and fault tolerance.
So the MQTT Data Broker is the central data hub through which all data passes. Let’s now start connecting our shopfloor to the Data Broker.
How do we get our data from different machines talking different protocols to the Connectware Data Broker? That’s where the Protocol Mapper comes into play. The Protocol Mapper uses a mapping scheme that translates various protocols to a unified MQTT/JSON API and handles the device connection management. Each device is represented by a connection resource which contains endpoints and mappings, which are used to model a MQTT topic hierarchy. All resources are defined in a text-based, human and machine readable YAML file called Commissioning File. To learn more about the configuration of connections see the How to connect to an OPC-UA server article.
Now the MQTT Data Broker is fed directly by our devices from the shopfloor via the Protocol Mapper. The next step is to forward the data to our application.
Connectware, which is running on-premise, needs to forward data to local as well as cloud applications. Therefore we need to have an access point through which Connectware can talk to the outside. Here again, it is a good practice to have one place that all the data needs to pass instead of multiple open connections that all need to be monitored. Connectware provides a Single Entry Point (or more technical Reverse Proxy) which bundles all incoming connections. Thus, to the outside the Entry Point abstracts the different microservices to one single access point. The same applies to the microservices from inside Connectware that only need to know one point to talk to when wanting to connect to the outside and forward data. Using a dedicated and high performance Reverse Proxy one can easily control all connections at this point, making a secure internet access easily possible.
At this point we are collecting data from our shopfloor and are able to forward this data to applications outside of Connectware. Connectware itself however is very well capable of applying logic to the data before forwarding it. Preprocessing the data directly on-premise and for example cutting out sensitive information, enriching data by combining data from different sources or aggregating data and send them as in one burst message to reduce costs for cloud services are just a few use-cases the Rule Engine can be used for.
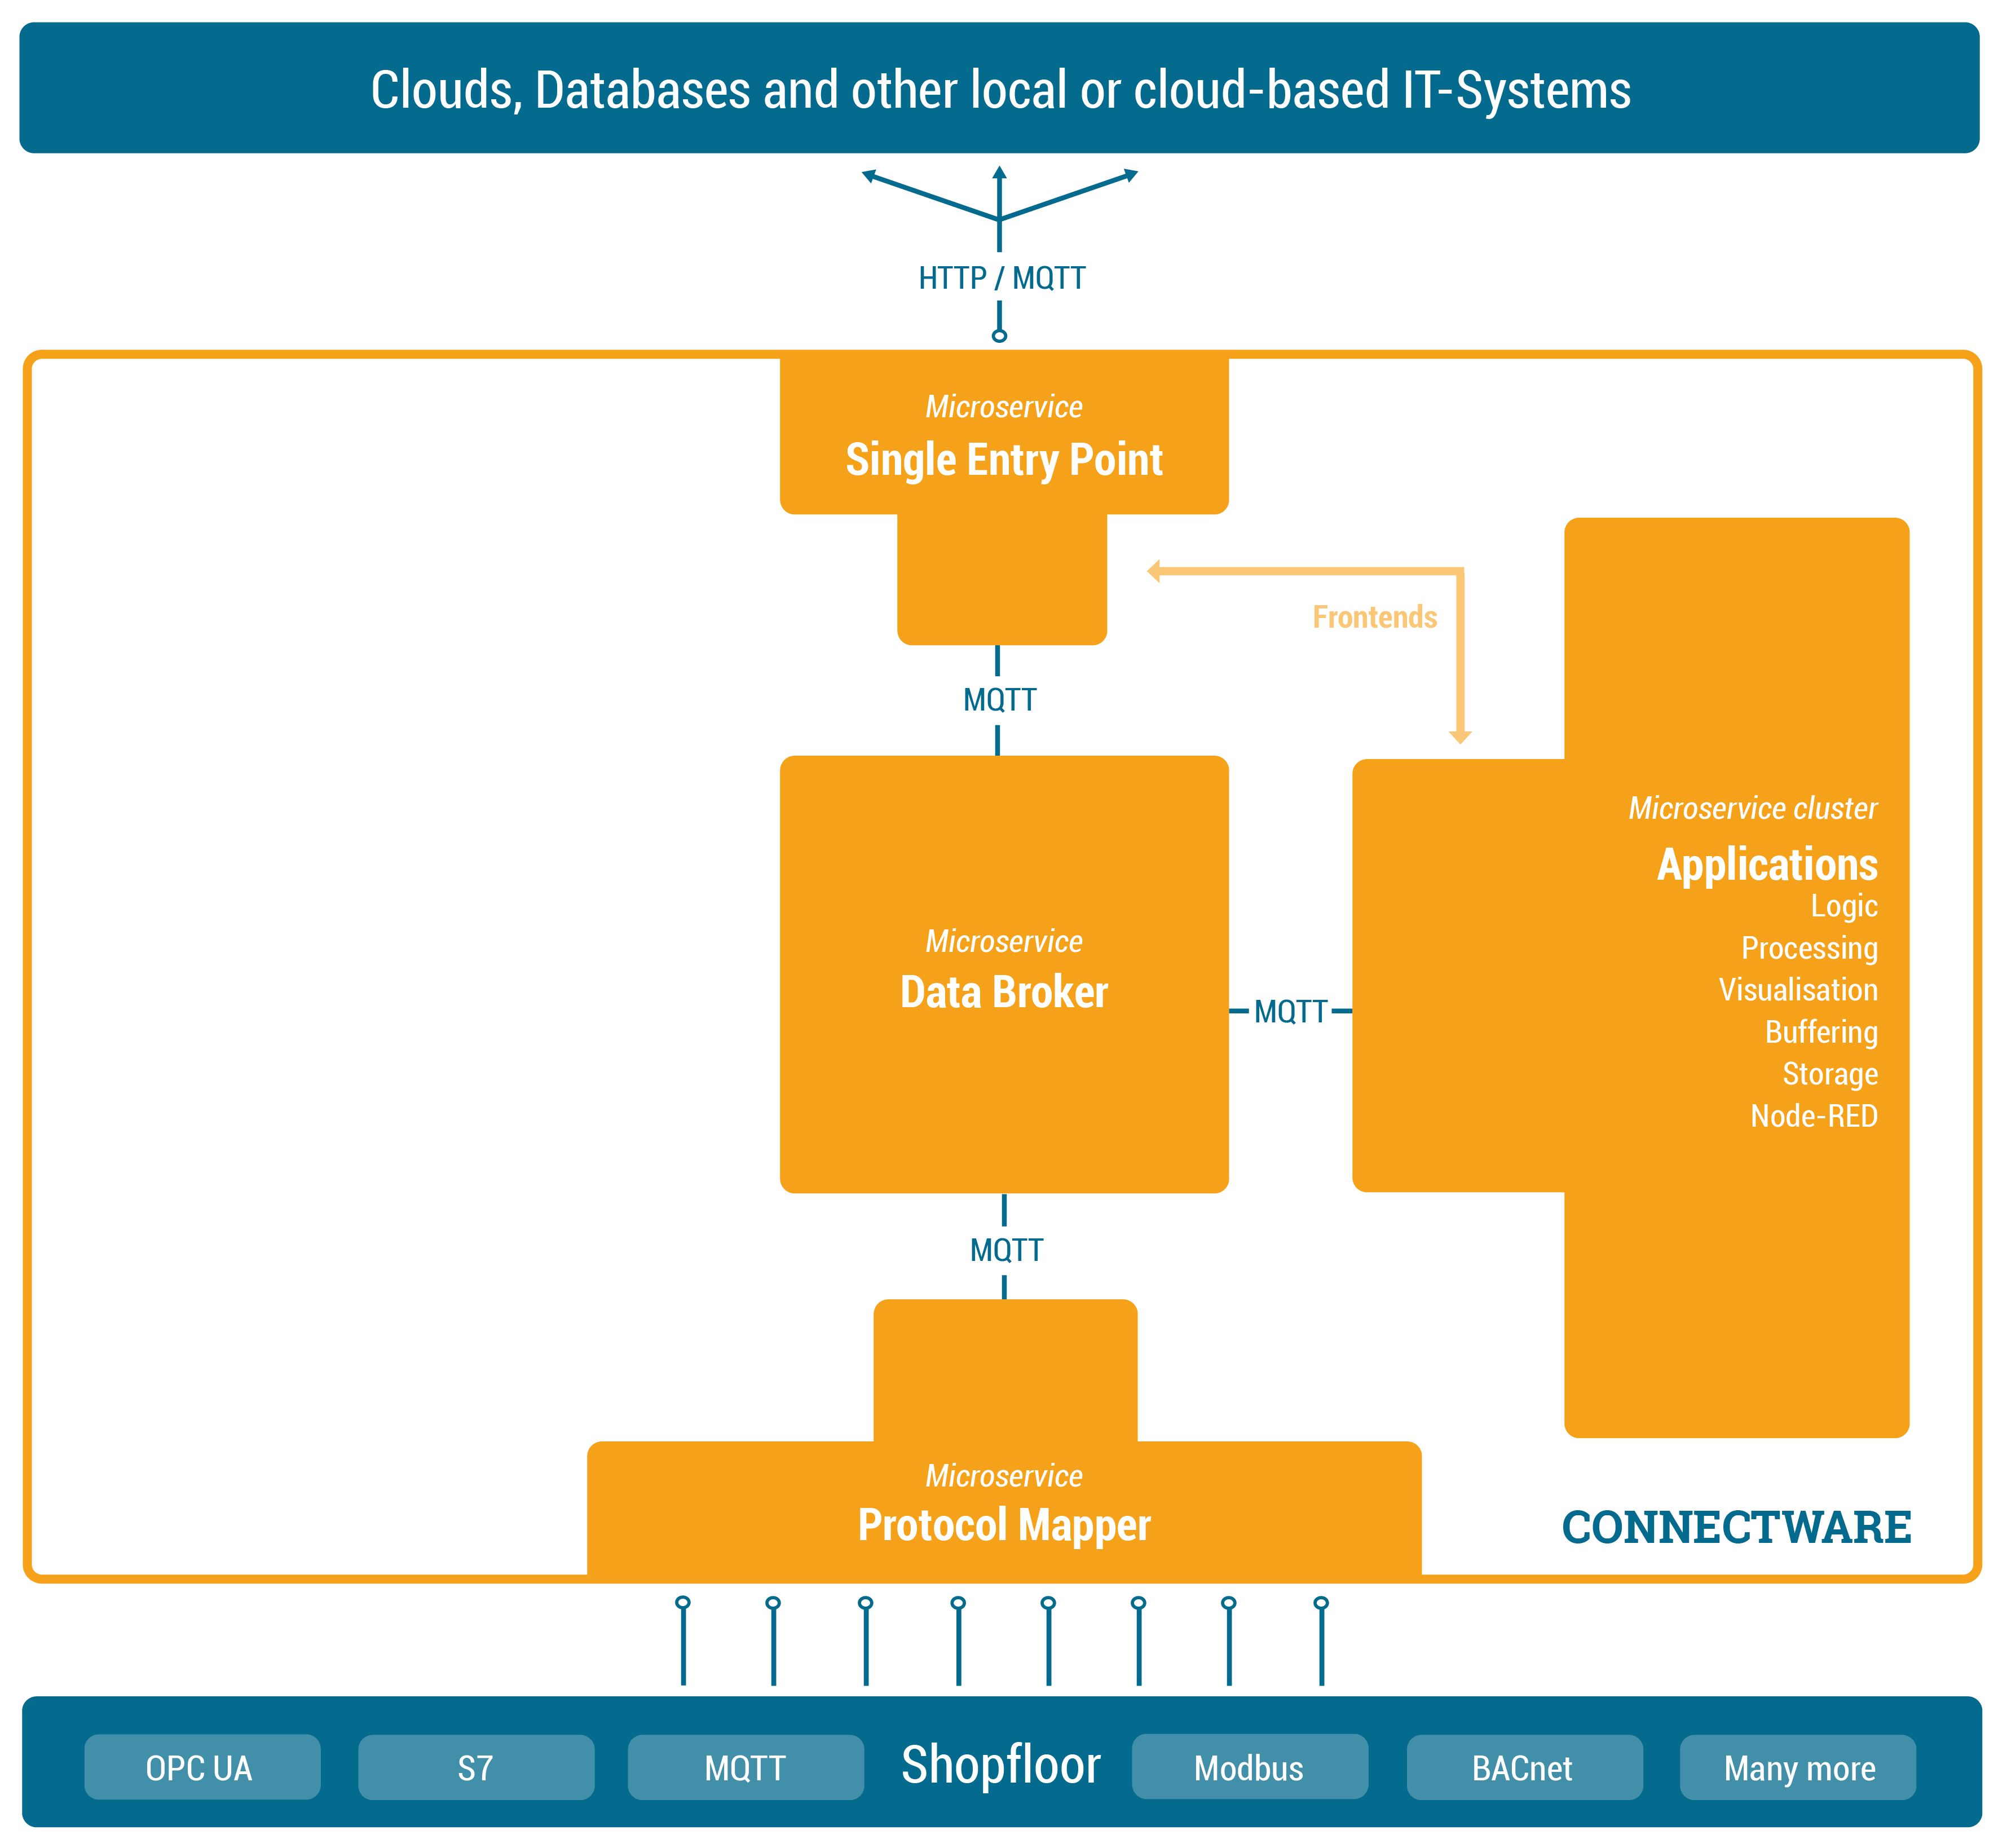
While Connectware allows to individually perform all settings (like managing grantees, setting permissions, starting containerized applications, etc.) the idea of Services is to bundle all these activities into a single point of configuration and execution. Services are usually built for a specific task and context. They bundle required resources with user/permission management in a easy to handle and shareable package.
The Service configuration is done via a Commissioning File – a YAML based text file. The installation process is simply done by feeding the Commissioning File to Connectware, upon this action Connectware will review and display all the configurations that the specific Service wants to create or consume and one can decide whether or not to grant this permission to the Service (think Google Maps wants to know your location). If all permissions are agreed to then the Service will be deployed. This practice puts you in charge of your data and keeps sensitive data from leaving the factory borders.
Services can have a wide variety of different uses on Connectware, from data storage, preprocessing and applying logic to data on-premise prior to e.g. forwarding it to external applications. Services can also serve front-ends (visualizations, dashboards, etc) that can be used to access and control Services from the outside.
To learn more about the configuration and usage of Services see the Service Basics lesson.
We are now very far in our journey of getting data out of our shopfloor. We have a Data Broker which is able to receive and forward shopfloor data and we have a runtime in which we can individually process the data. Now let’s add management and security to it.
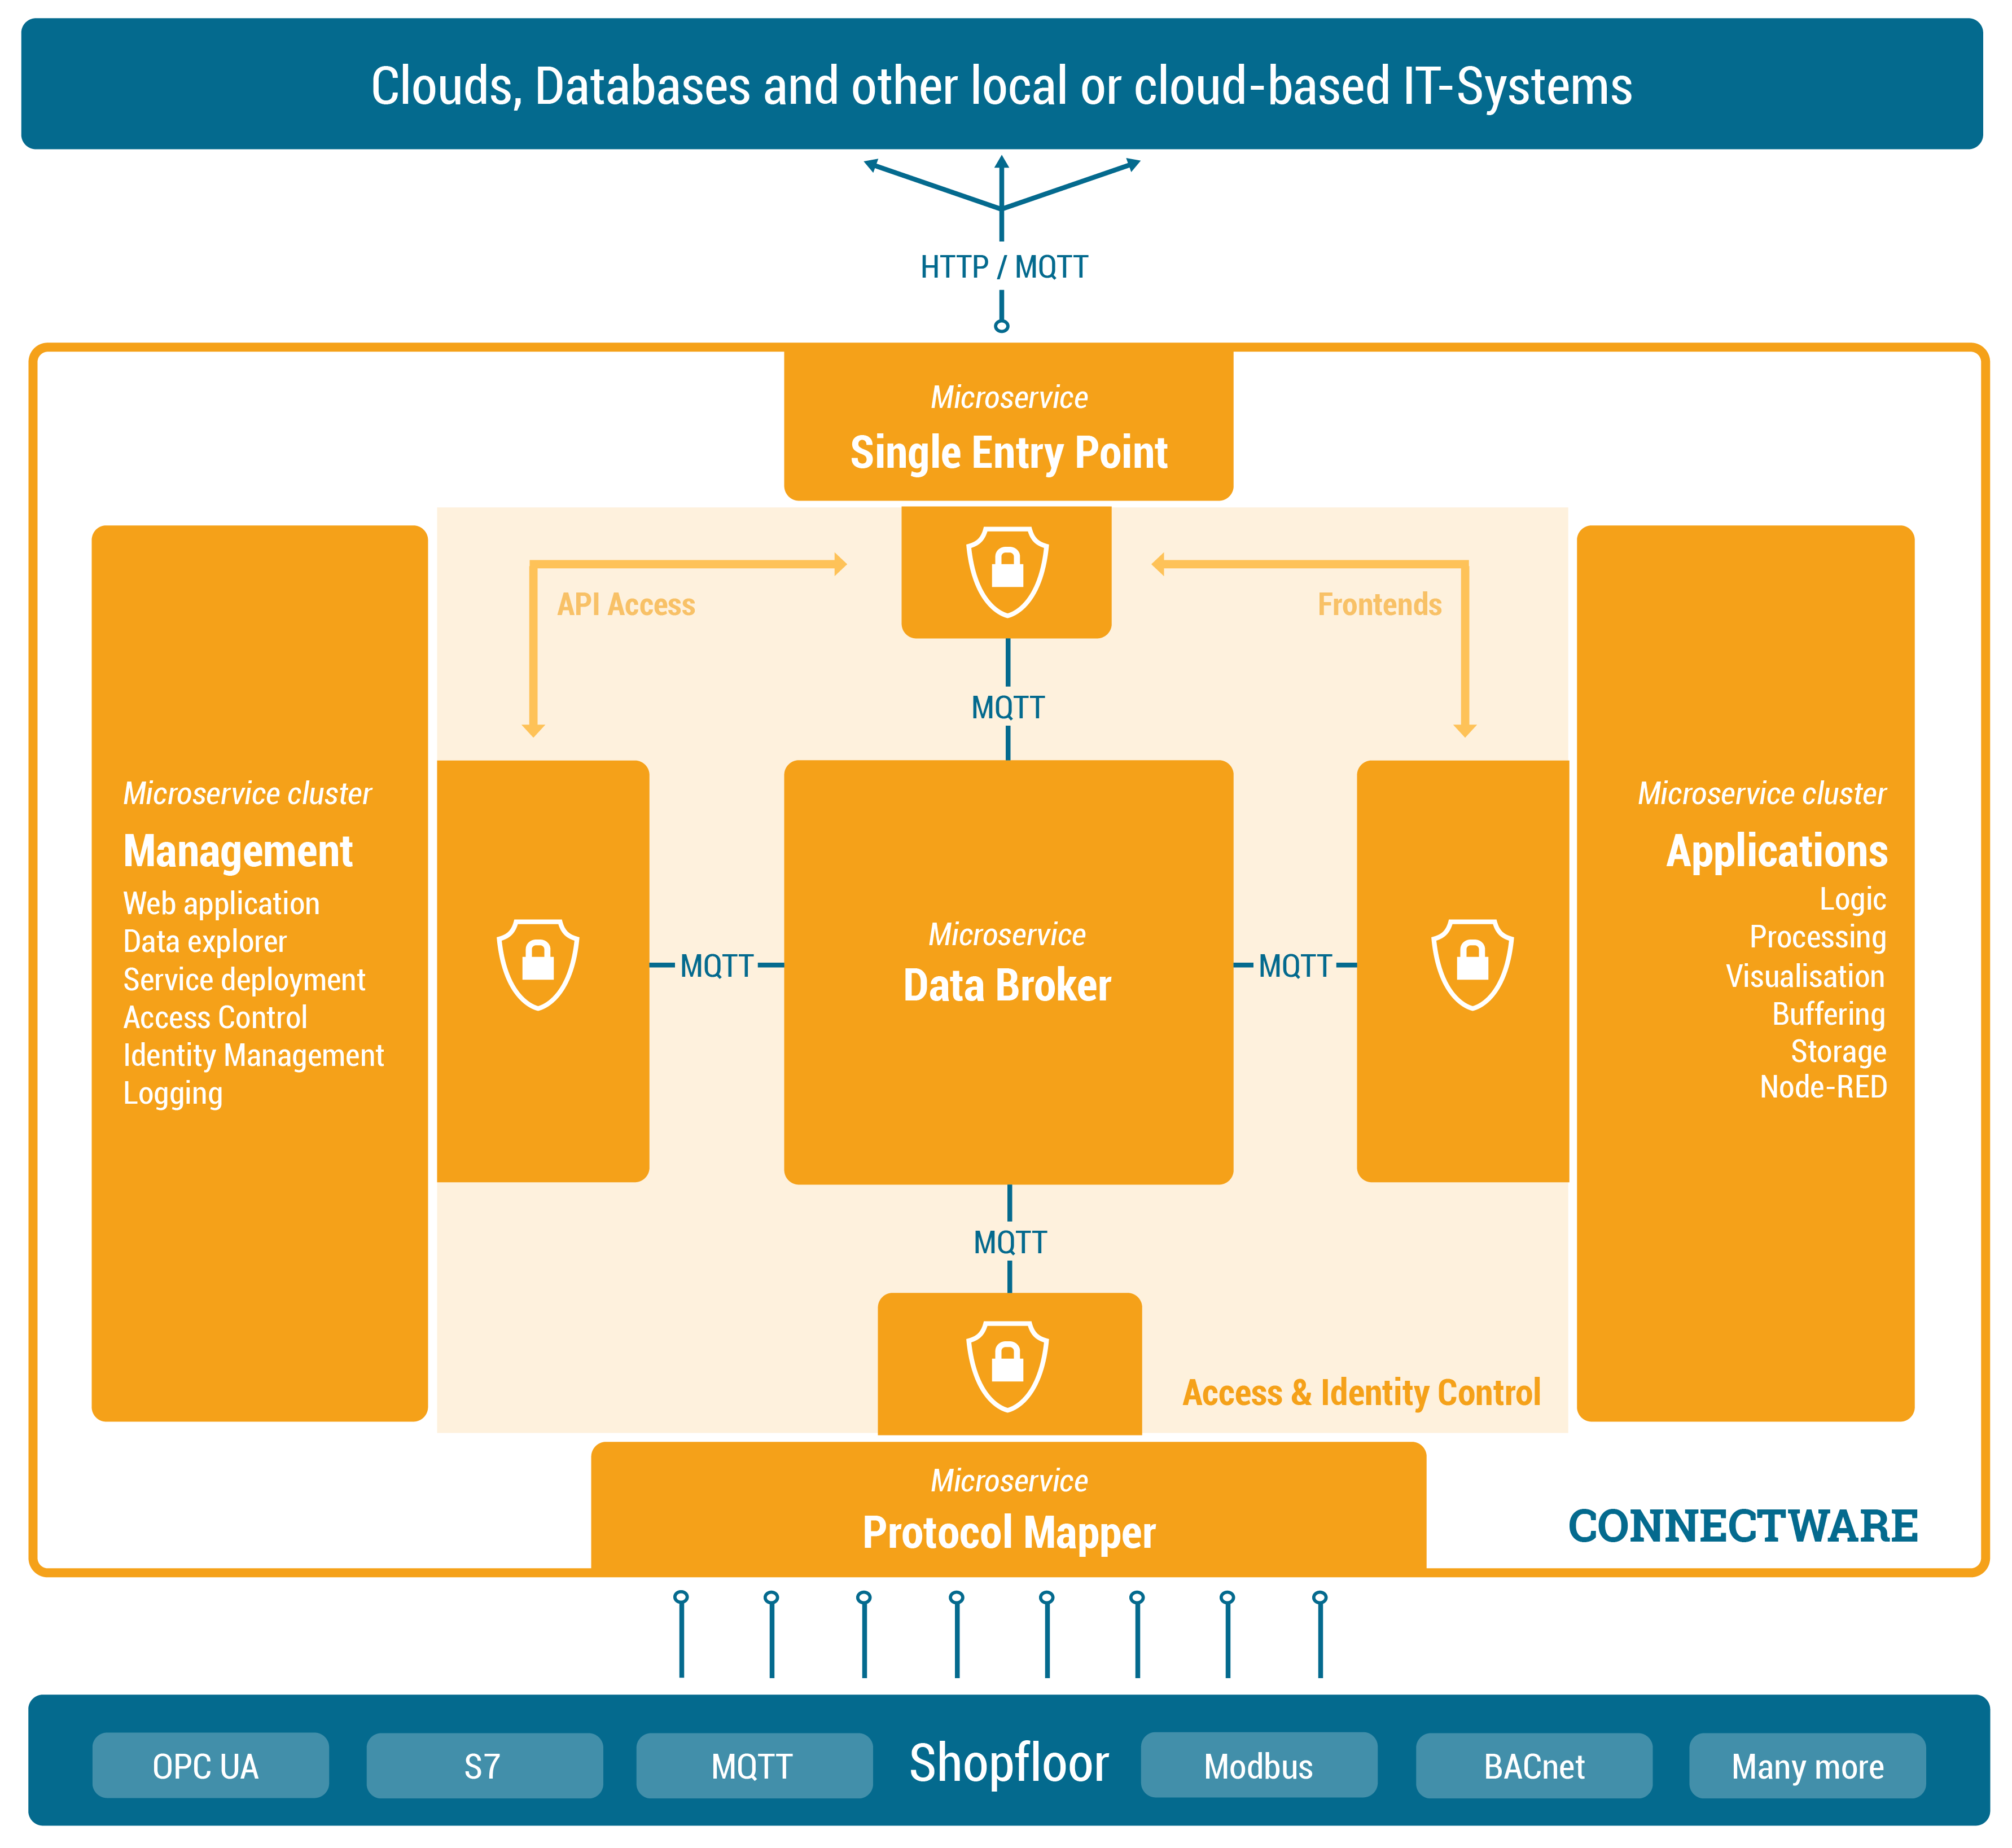
The Management Cluster is concerned with managing Connectware by providing the following:
Managing Connectware is done through a modern web application through which the entire software can be configured. Here you can manage users and services through a graphical user interface. All features of the web interface can also be accessed through a REST API.
Once a client is ready to read or write data tasks like client authentication (through tokens, certificates and pre-shared passwords) and access control (who is allowed to read and write to what) are handled here. Access control is established via a simple, yet powerful control layer that handles read and write access on API endpoints and on the MQTT data broker. If required identity management can also be coupled here to directory services like Active Directory.
Connectware also has logging functionality for all system components and Service applications events. The logs can be viewed and queried via the web application. The log messages can also easily be integrated into external log management systems like ElasticSearch or Splunk.
This article covered a more technical introduction into the different microservices that build up Connectware. Starting with Connectwares scalable MQTT data broker and the Protocol Mapper which maps different industry protocol to specified MQTT topics in a standardised JSON format. Over the Rule Engine that allows complex data transformations, enriching data by combining different sources and buffering capabilities. To how we can secure and manage all of it with the Single Entry Point and the Management Cluster.
This lesson gave overview over the basic Connectware architecture and functionality. In the following lessons we will dive way deeper into Connectware and it’s components, explaining how to connect devices, how to use and build Services yourself and how to manage Connectware. Have a look at the following articles as a starting point:
Sie müssen den Inhalt von reCAPTCHA laden, um das Formular abzuschicken. Bitte beachten Sie, dass dabei Daten mit Drittanbietern ausgetauscht werden.
Mehr InformationenSie sehen gerade einen Platzhalterinhalt von Facebook. Um auf den eigentlichen Inhalt zuzugreifen, klicken Sie auf die Schaltfläche unten. Bitte beachten Sie, dass dabei Daten an Drittanbieter weitergegeben werden.
Mehr InformationenSie sehen gerade einen Platzhalterinhalt von Instagram. Um auf den eigentlichen Inhalt zuzugreifen, klicken Sie auf die Schaltfläche unten. Bitte beachten Sie, dass dabei Daten an Drittanbieter weitergegeben werden.
Mehr InformationenSie sehen gerade einen Platzhalterinhalt von X. Um auf den eigentlichen Inhalt zuzugreifen, klicken Sie auf die Schaltfläche unten. Bitte beachten Sie, dass dabei Daten an Drittanbieter weitergegeben werden.
Mehr Informationen

